
If you want to use a different language in Windows XP, there are several ways to do so. Changing the system language (interface) is a bit more complicated, especially after the operating system has been installed. You can also change the input language to type text in another language.
System Language
Step 1. Install the language pack.
Install the language pack. You can find various language packs online that can be installed without reinstalling Windows. To install a language pack, your system must have Service Pack 3 (SP3) installed.
- As of April 2014, Microsoft discontinued support for Windows XP. Look for the necessary language pack online, and trust only reputable sites.
- The Russian language pack can be downloaded here.
- The link provided above allows you to download an image file that needs to be burned to a blank CD or run using a drive emulation program. Depending on the service pack installed on your computer, select the appropriate option after launching the image and follow the on-screen instructions to install the language pack. Restart your computer once the installation is complete for the changes to take effect.
Step 2. Understand the process.
Understand the essence of the process. You cannot change the primary system language without reinstalling the system, but you can replace the system interface with the desired language interface. To do this, you will need to download Service Pack 3 (SP3) (even if it is already installed on your system) and modify some values in the registry.
Step 3. Download the SP3 update for your desired language.
Download the SP3 update for your desired language. To download the update, visit this page. Two languages are available: Russian and English. We provide a link to a third-party site since Microsoft has discontinued support for Windows XP.
- Do not run the SP3 update installation yet. This method will not work without making changes to the registry.
Step 4. Open the Registry Editor.
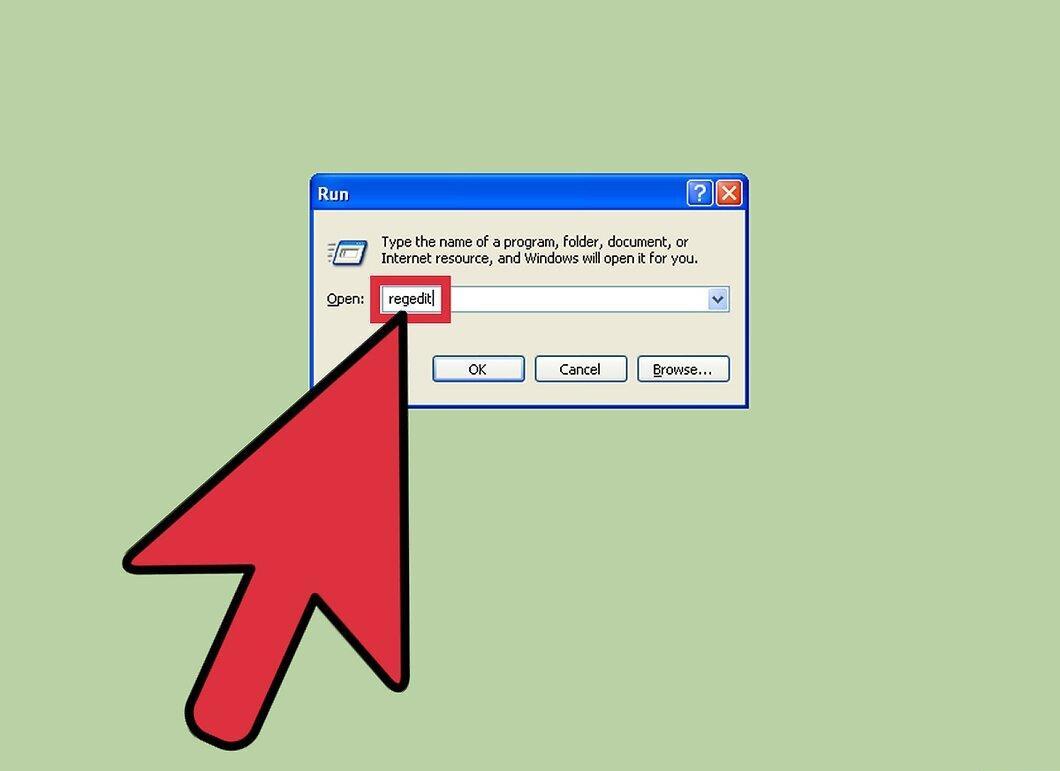
Open the Registry Editor. The registry controls the entire system, so be cautious when making changes.
- To open the Registry Editor, press ⊞ Win+R, type regedit, and press ↵ Enter.
Step 5. Use the folder tree in the left panel to navigate the registry.
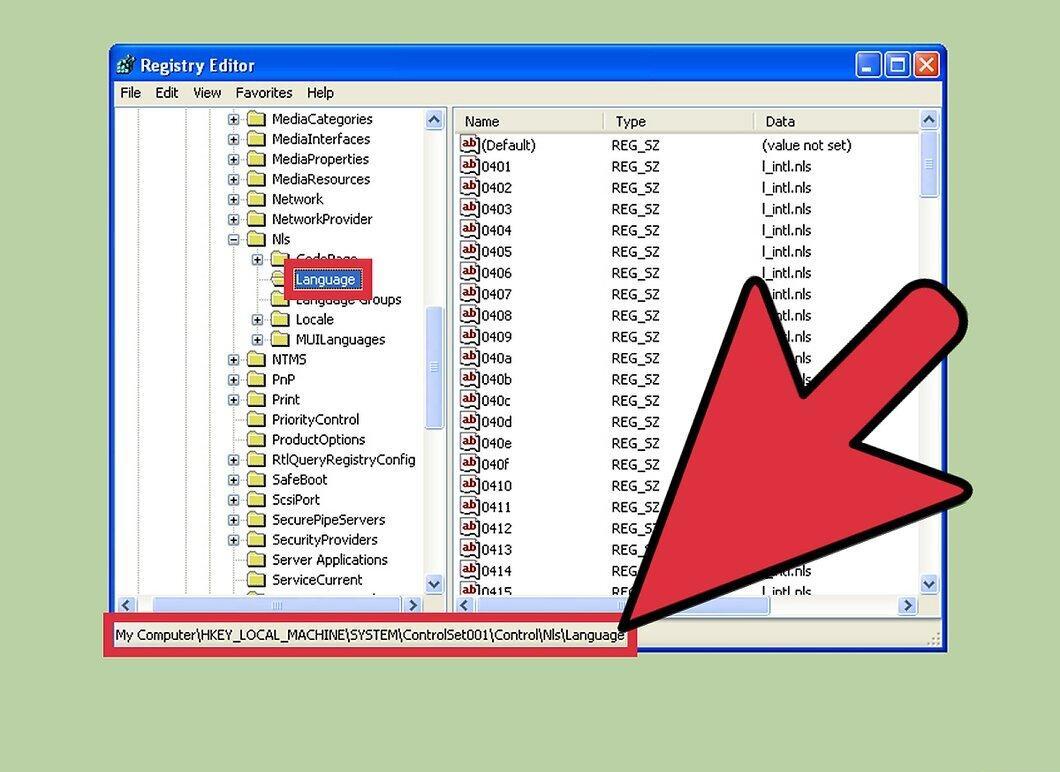
Use the folder tree in the left panel to navigate the registry. You can expand folders to display nested folders. When a folder is selected, the right panel will display the registry entries contained in that folder.
- Open the folder HKEY_LOCAL_MACHINE/SYSTEM/ControlSet001/Control/NIs/Language.
Step 6. Double-click the "(Default)" entry.
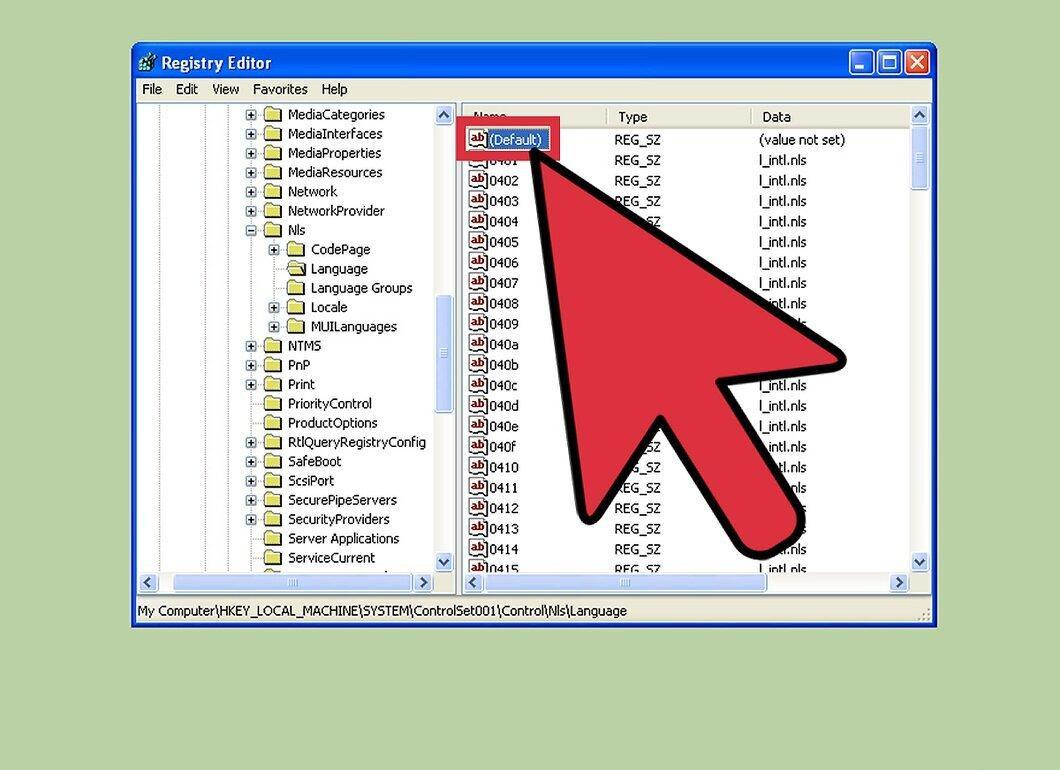
Double-click the "(Default)" entry. It is located at the top of the list. A new window will open.
Step 7. In the opened window, enter the code for your desired language in the "Value" field.
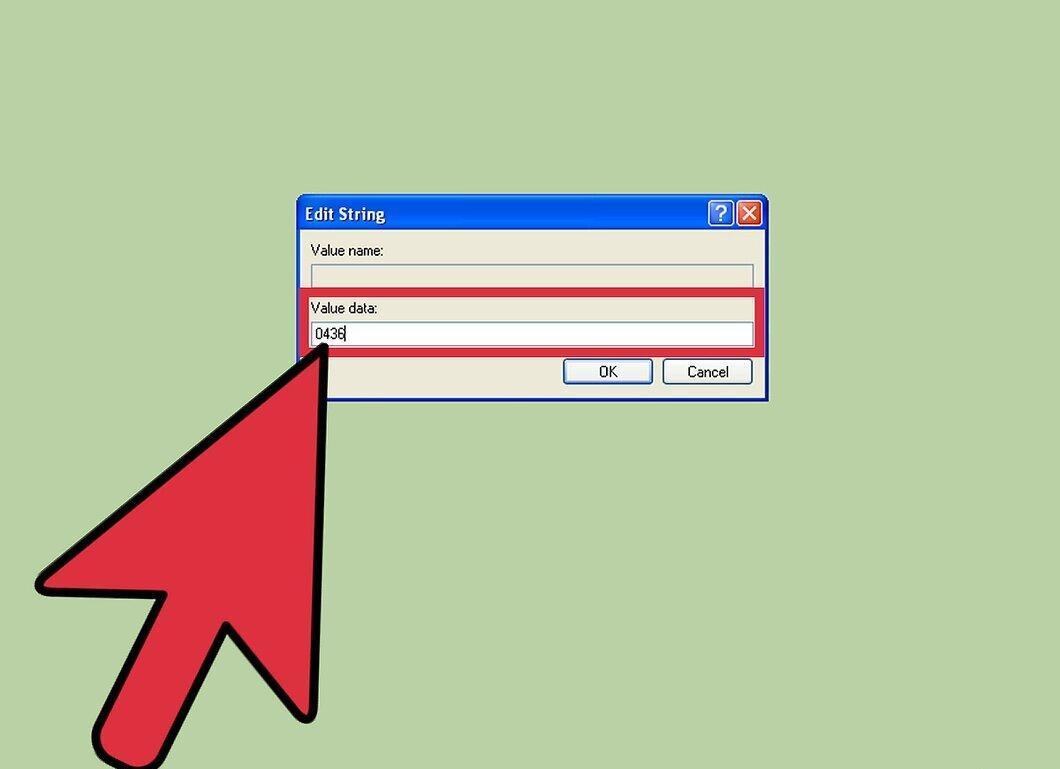
In the opened window, enter the code for your desired language in the "Value" field. Find the code for the language you need in the list below. Ensure you select the same code as the language you downloaded SP3 for. Language Codes:
- 0436 = "af; Afrikaans"
- 041C = "sq; Albanian"
- 0001 = "ar; Arabic"
- 0401 = "ar-sa; Arabic (Saudi Arabia)"
- 0801 = "ar-iq; Arabic (Iraq)"
- 0C01 = "ar-eg; Arabic (Egypt)"
- 1001 = "ar-ly; Arabic (Libya)"
- 1401 = "ar-dz; Arabic (Algeria)"
- 1801 = "ar-ma; Arabic (Morocco)"
- 1C01 = "ar-tn; Arabic (Tunisia)"
- 2001 = "ar-om; Arabic (Oman)"
- 2401 = "ar-ye; Arabic (Yemen)"
- 2801 = "ar-sy; Arabic (Syria)"
- 2C01 = "ar-jo; Arabic (Jordan)"
- 3001 = "ar-lb; Arabic (Lebanon)"
- 3401 = "ar-kw; Arabic (Kuwait)"
- 3801 = "ar-ae; Arabic (UAE)"
- 3C01 = "ar-bh; Arabic (Bahrain)"
- 4001 = "ar-qa; Arabic (Qatar)"
- 042D = "eu; Basque"
- 0402 = "bg; Bulgarian"
- 0423 = "be; Belarusian"
- 0403 = "ca; Catalan"
- 0004 = "zh; Chinese"
- 0404 = "zh-tw; Chinese (Taiwan)"
- 0804 = "zh-cn; Chinese (China)"
- 0C04 = "zh-hk; Chinese (Hong Kong)"
- 1004 = "zh-sg; Chinese (Singapore)"
- 041A = "hr; Croatian"
- 0405 = "cs; Czech"
- 0406 = "da; Danish"
- 0413 = "nl; Dutch (Netherlands)"
- 0813 = "nl-be; Dutch (Belgium)"
- 0009 = "en; English"
- 0409 = "en-us; English (United States)"
- 0809 = "en-gb; English (United Kingdom)"
- 0C09 = "en-au; English (Australia)"
- 1009 = "en-ca; English (Canada)"
- 1409 = "en-nz; English (New Zealand)"
- 1809 = "en-ie; English (Ireland)"
- 1C09 = "en-za; English (South Africa)"
- 2009 = "en-jm; English (Jamaica)"
- 2809 = "en-bz; English (Belize)"
- 2C09 = "en-tt; English (Trinidad)"
- 0425 = "et; Estonian"
- 0438 = "fo; Faroese"
- 0429 = "fa; Persian"
- 040B = "fi; Finnish"
- 040C = "fr; French (France)"
- 080C = "fr-be; French (Belgium)"
- 0C0C = "fr-ca; French (Canada)"
- 100C = "fr-ch; French (Switzerland)"
- 140C = "fr-lu; French (Luxembourg)"
- 043C = "gd; Gaelic"
- 0407 = "de; German (Germany)"
- 0807 = "de-ch; German (Switzerland)"
- 0C07 = "de-at; German (Austria)"
- 1007 = "de-lu; German (Luxembourg)"
- 1407 = "de-li; German (Liechtenstein)"
- 0408 = "el; Greek"
- 040D = "he; Hebrew"
- 0439 = "hi; Hindi"
- 040E = "hu; Hungarian"
- 040F = "is; Icelandic"
- 0421 = "in; Indonesian"
- 0410 = "it; Italian (Italy)"
- 0810 = "it-ch; Italian (Switzerland)"
- 0411 = "ja; Japanese"
- 0412 = "ko; Korean"
- 0426 = "lv; Latvian"
- 0427 = "lt; Lithuanian"
- 042F = "mk; Macedonian"
- 043E = "ms; Malay (Malaysia)"
- 043A = "mt; Maltese"
- 0414 = "no; Norwegian (Bokmal)"
- 0814 = "no; Norwegian (Nynorsk)"
- 0415 = "pl; Polish"
- 0416 = "pt-br; Portuguese (Brazil)"
- 0816 = "pt; Portuguese (Portugal)"
- 0417 = "rm; Romansh"
- 0418 = "ro; Romanian"
- 0818 = "ro-mo; Romanian (Moldova)"
- 0419 = "ru; Russian"
- 0819 = "ru-mo; Russian (Moldova)"
- 0C1A = "sr; Serbian (Cyrillic)"
- 081A = "sr; Serbian (Latin)"
- 041B = "sk; Slovak"
- 0424 = "sl; Slovenian"
- 042E = "sb; Sorbian"
- 040A = "es; Spanish (European)"
- 080A = "es-mx; Spanish (Mexico)"
- 0C0A = "es; Spanish (International)"
- 100A = "es-gt; Spanish (Guatemala)"
- 140A = "es-cr; Spanish (Costa Rica)"
- 180A = "es-pa; Spanish (Panama)"
- 1C0A = "es-do; Spanish (Dominican Republic)"
- 200A = "es-ve; Spanish (Venezuela)"
- 240A = "es-co; Spanish (Colombia)"
- 280A = "es-pe; Spanish (Peru)"
- 2C0A = "es-ar; Spanish (Argentina)"
- 300A = "es-ec; Spanish (Ecuador)"
- 340A = "es-cl; Spanish (Chile)"
- 380A = "es-uy; Spanish (Uruguay)"
- 3C0A = "es-py; Spanish (Paraguay)"
- 400A = "es-bo; Spanish (Bolivia)"
- 440A = "es-sv; Spanish (El Salvador)"
- 480A = "es-hn; Spanish (Honduras)"
- 4C0A = "es-ni; Spanish (Nicaragua)"
- 500A = "es-pr; Spanish (Puerto Rico)"
- 0430 = "sx; Sotho"
- 041D = "sv; Swedish"
- 081D = "sv-fi; Swedish (Finland)"
- 041E = "th; Thai"
- 0431 = "tn; Tswana"
- 0432 = "tn; Tswana"
- 041F = "tr; Turkish"
- 0422 = "uk; Ukrainian"
- 0420 = "ur; Urdu"
- 042A = "vi; Vietnamese"
- 0434 = "xh; Xhosa"
- 043D = "yi; Yiddish"
- 0435 = "zu; Zulu"
Step 8. Repeat the process for the "InstallLanguage" registry entry.
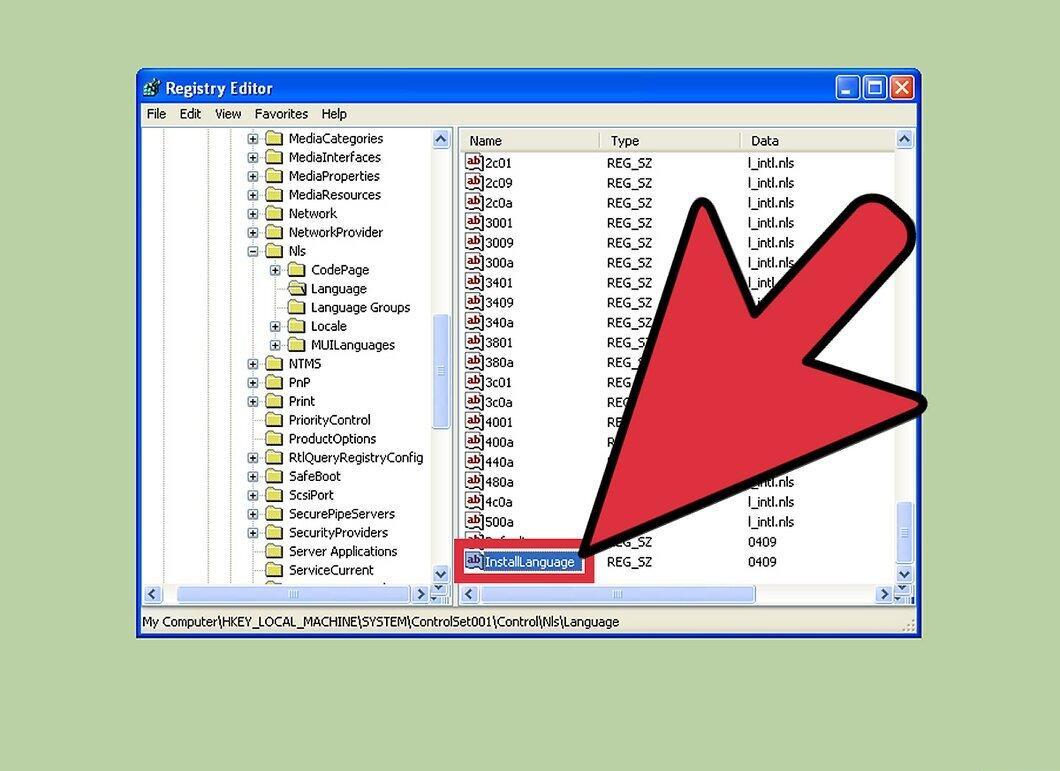
Repeat the process for the "InstallLanguage" registry entry. It is located at the bottom of the list. Use the same language code you entered for the "(Default)" entry.
Step 9. Close the Registry Editor and restart your computer.
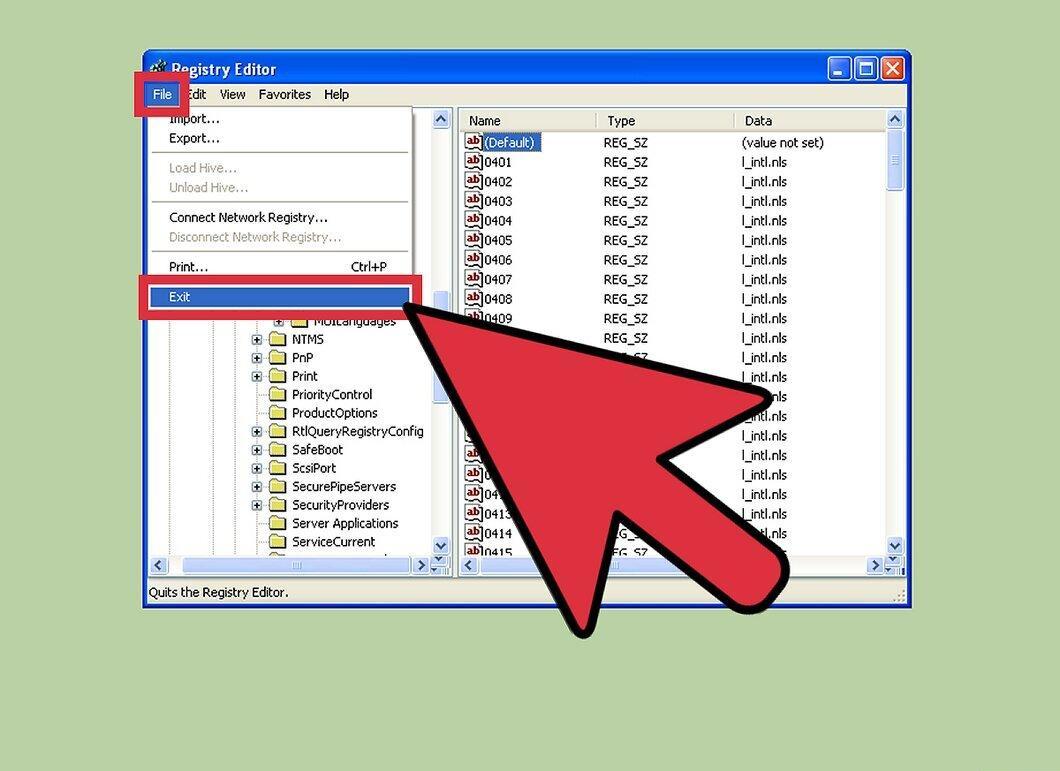
Close the Registry Editor and restart your computer. A restart is necessary; otherwise, the SP3 installation will not take effect.
Step 10. Install Service Pack 3 (SP3).
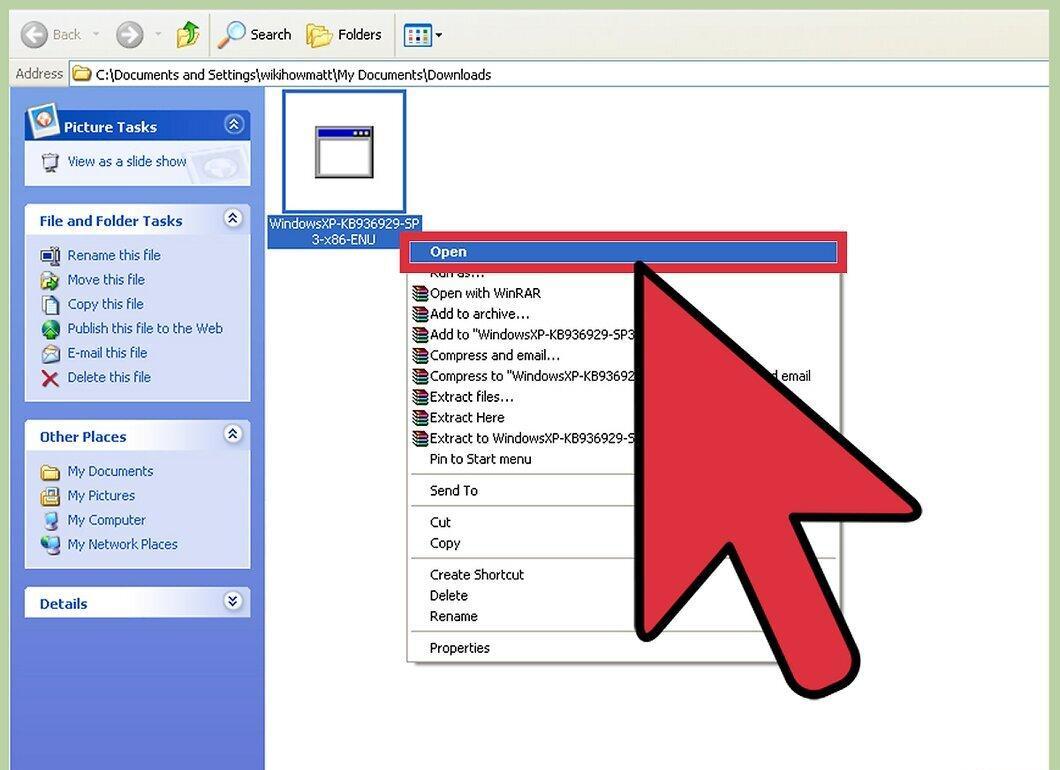
Install Service Pack 3 (SP3). It doesn't matter if you already have SP3 installed on your computer—the installer will simply overwrite the system files with new ones in your selected language. Follow the on-screen instructions to install SP3.
Step 11. After installing SP3, restart your computer for the changes to take effect.
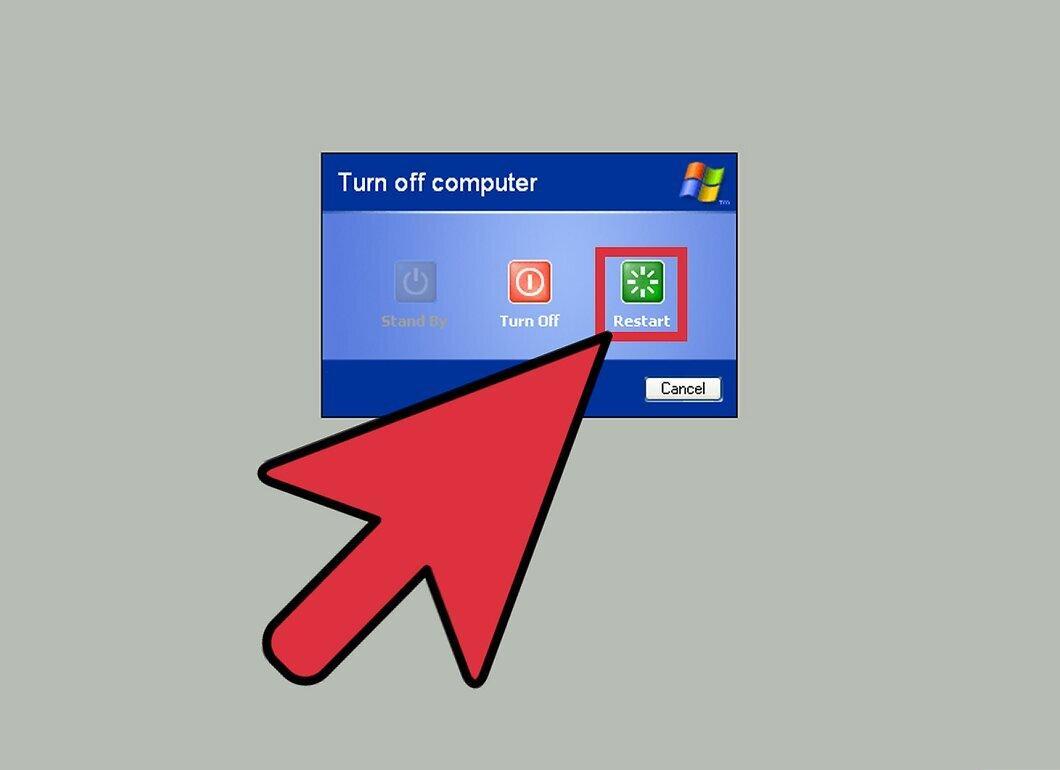
- Some interface elements may still display in the system's base language. This is a drawback of the method described. The only way to fully change the system language is to reinstall the system and select the desired language during installation.
Step 12. Download the language pack after changing the system's base language (if desired).
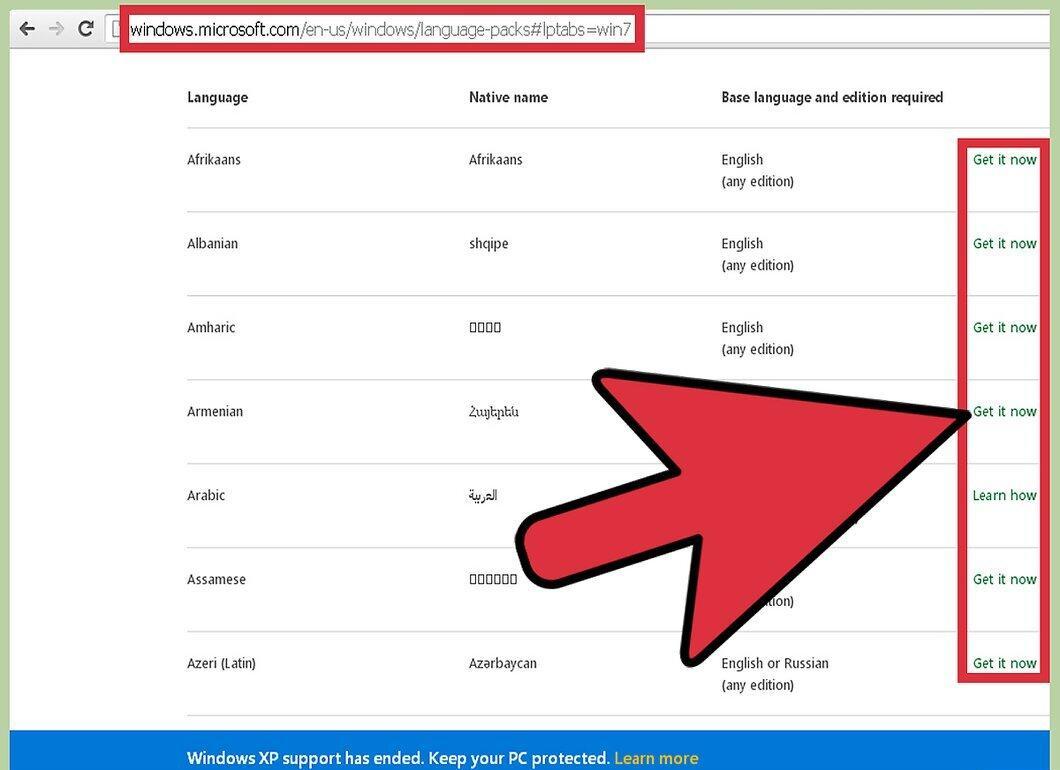
Download the language pack after changing the system's base language (if desired). After completing the previous steps, you can now download and install the language pack. Refer to the first step of this section for detailed information.
Input Language
Step 1. Click "Start" > "Control Panel."
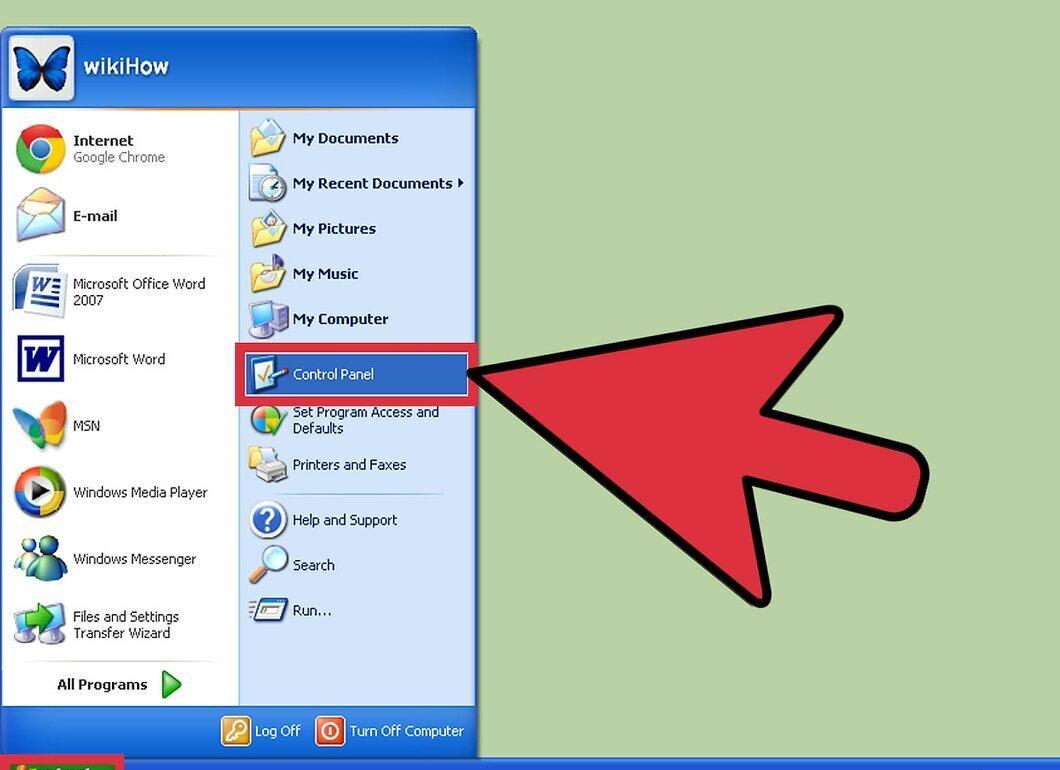
Click "Start" > "Control Panel." In older versions of Windows XP, you need to click "Start" > "Settings" > "Control Panel."
Step 2. Select "Date, Time, Language, and Regional Standards."
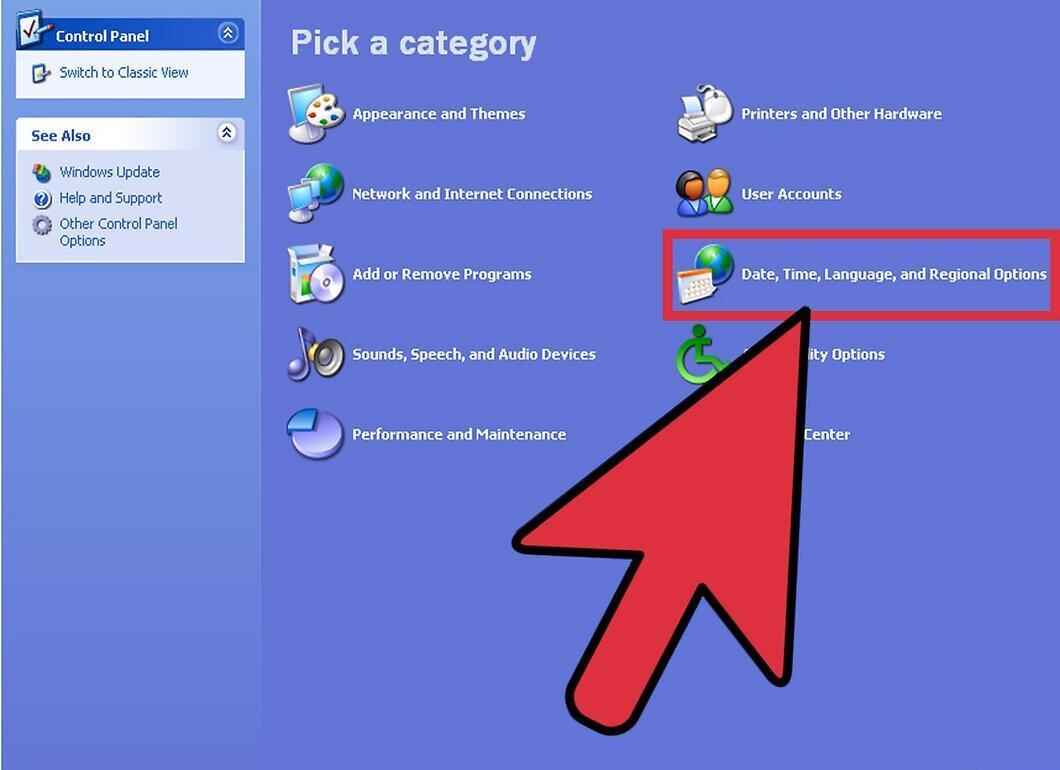
Select "Date, Time, Language, and Regional Standards." If you are using the classic view of the Control Panel, choose "Language and Regional Standards."
Step 3. Open the "Languages" tab.
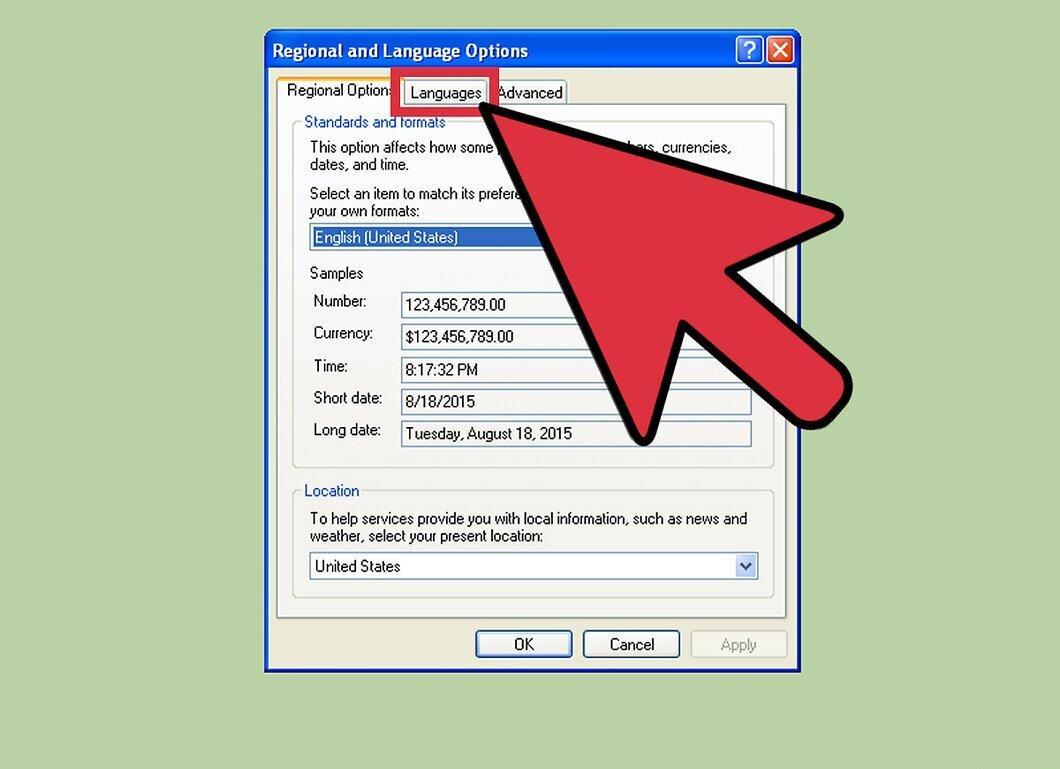
Open the "Languages" tab. Here you will be able to change the input language.
- If you want to change the language to one of the East Asian languages, check the corresponding option and click "Apply" to download the necessary additional files.
Step 4. Click "Details."
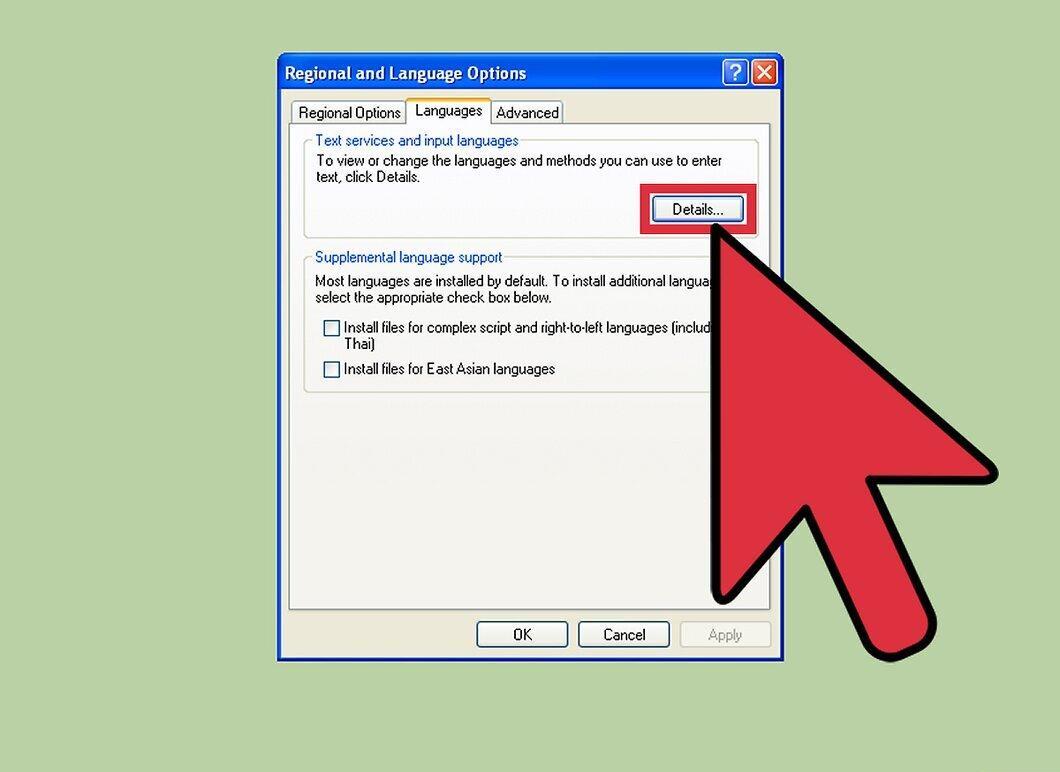
Click "Details." This will open the "Text and Input Language" menu.
Step 5. Click "Add."
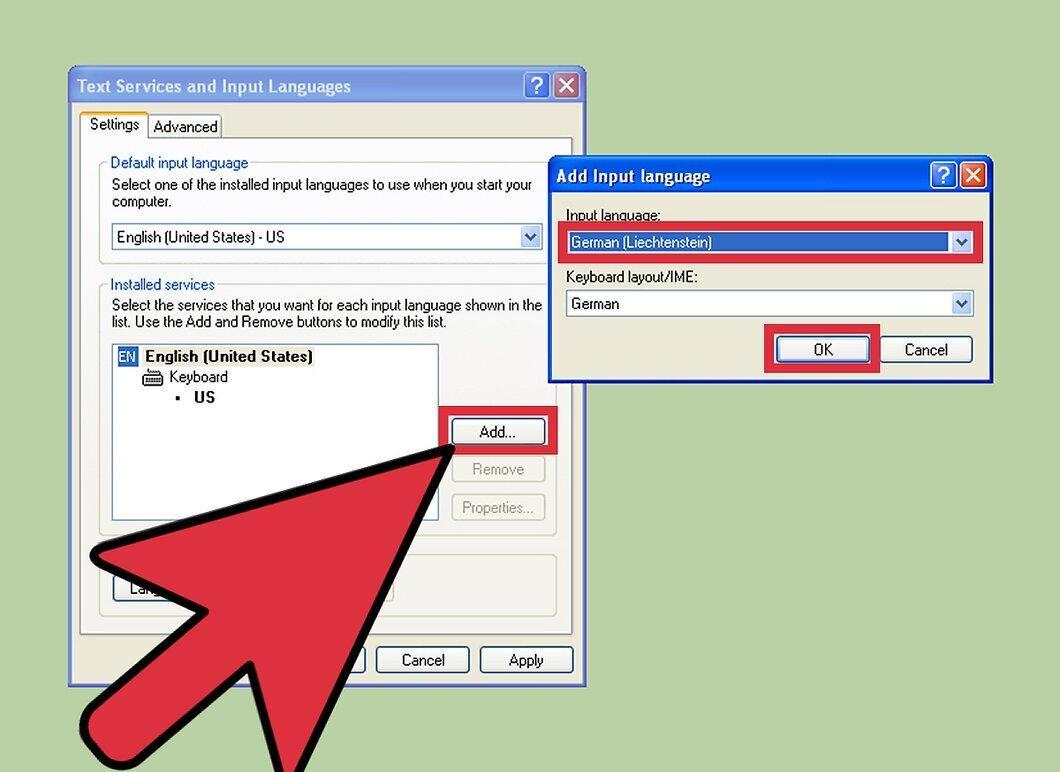
Click "Add." In the opened menu, select your desired language and keyboard layout. Then click "OK."
Step 6. In the drop-down menu, select your desired language.
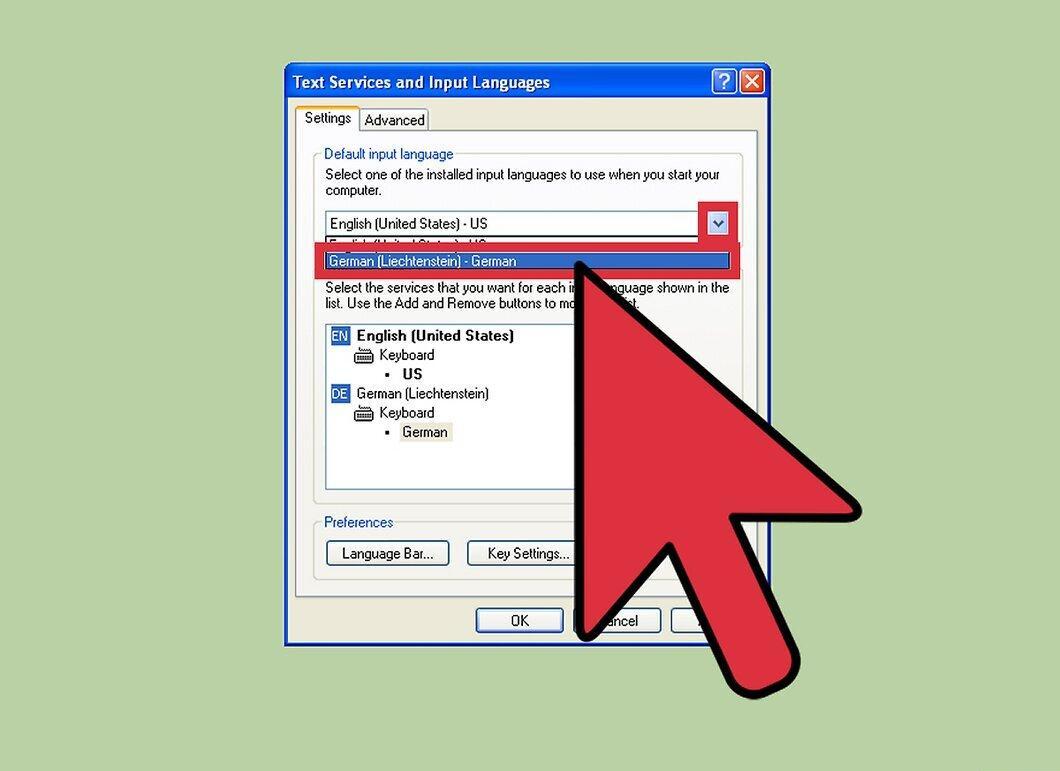
In the drop-down menu, select your desired language. The language you added will appear in the "Default Input Language" menu. Select this language if you want to change the input language. Click "Apply" to save the changes.
Step 7. Use the language bar to switch between installed input languages.
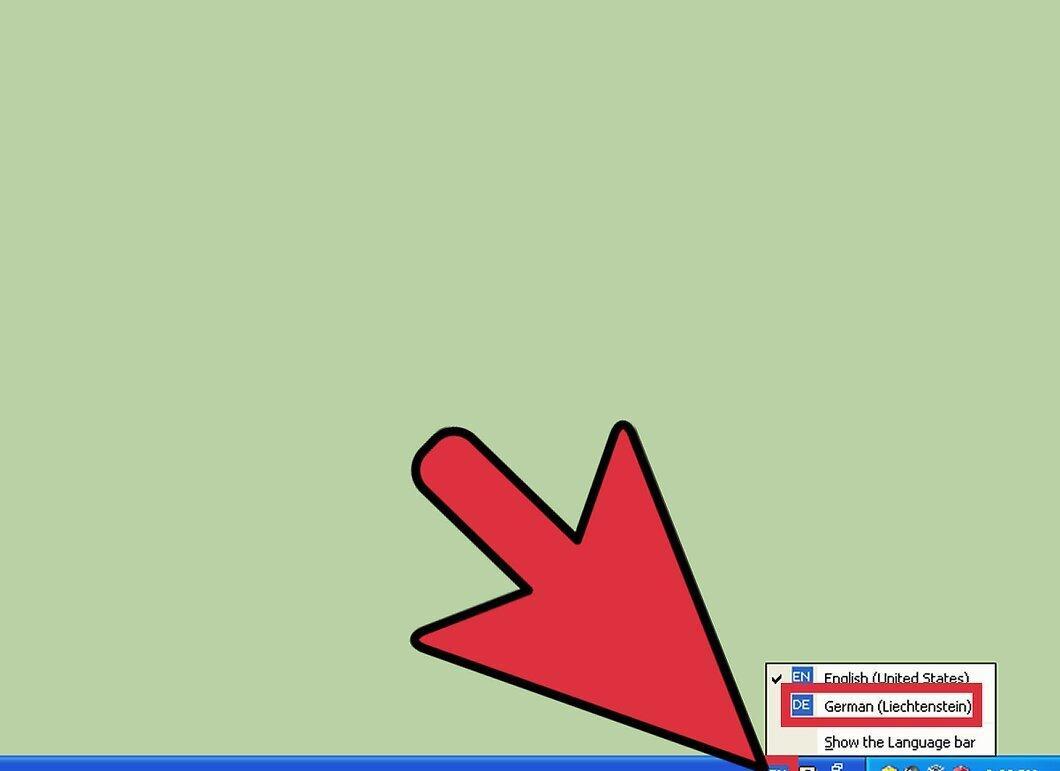
Use the language bar to switch between installed input languages. The language bar automatically appears when you have multiple input languages installed. You can find this bar on the taskbar near the notification area. Click the active language to see a list of all installed input languages.
- Alternatively, press Left Alt+⇧ Shift to switch between installed input languages.


