
Learn how to establish file sharing and internet connection between a desktop PC and a laptop using an Ethernet cable. Note that modern Macs do not have Ethernet ports, so you will need a USB-C to Ethernet adapter.
File Sharing (Windows to Windows)
Step 1. Connect the devices with an Ethernet cable.
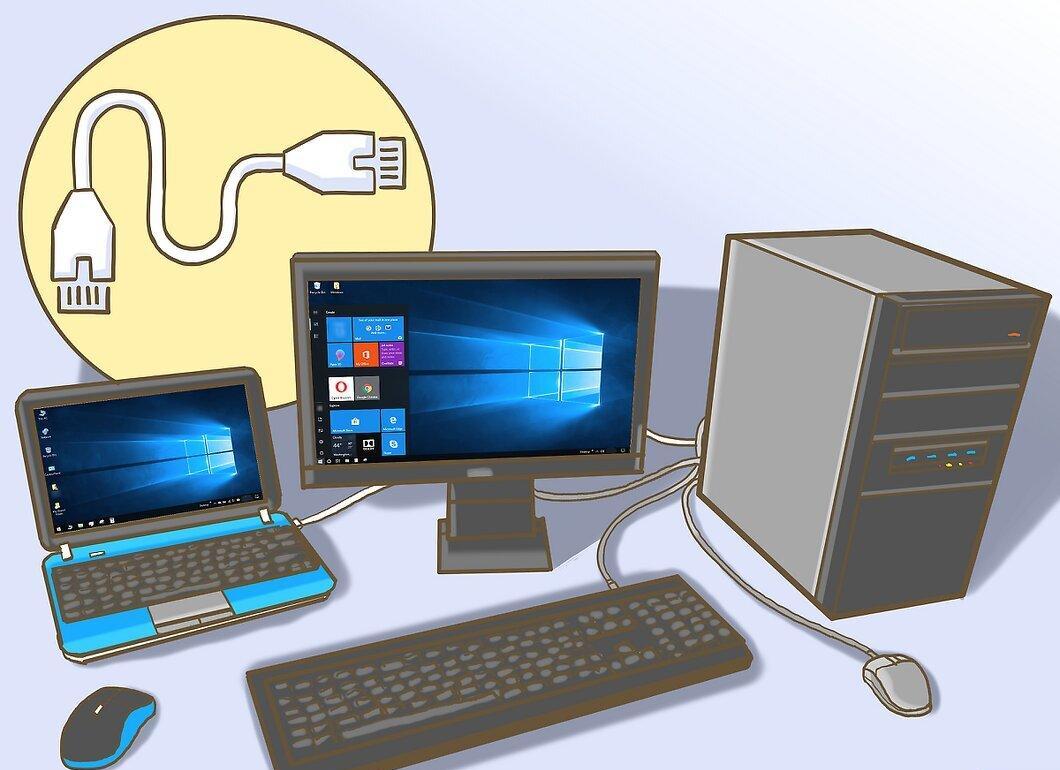
Connect both devices using an Ethernet cable. Insert one end of the cable into the square port on the back of your desktop and the other end into the corresponding port on the side of the laptop.
Step 2. Open the Start menu on the desktop PC.
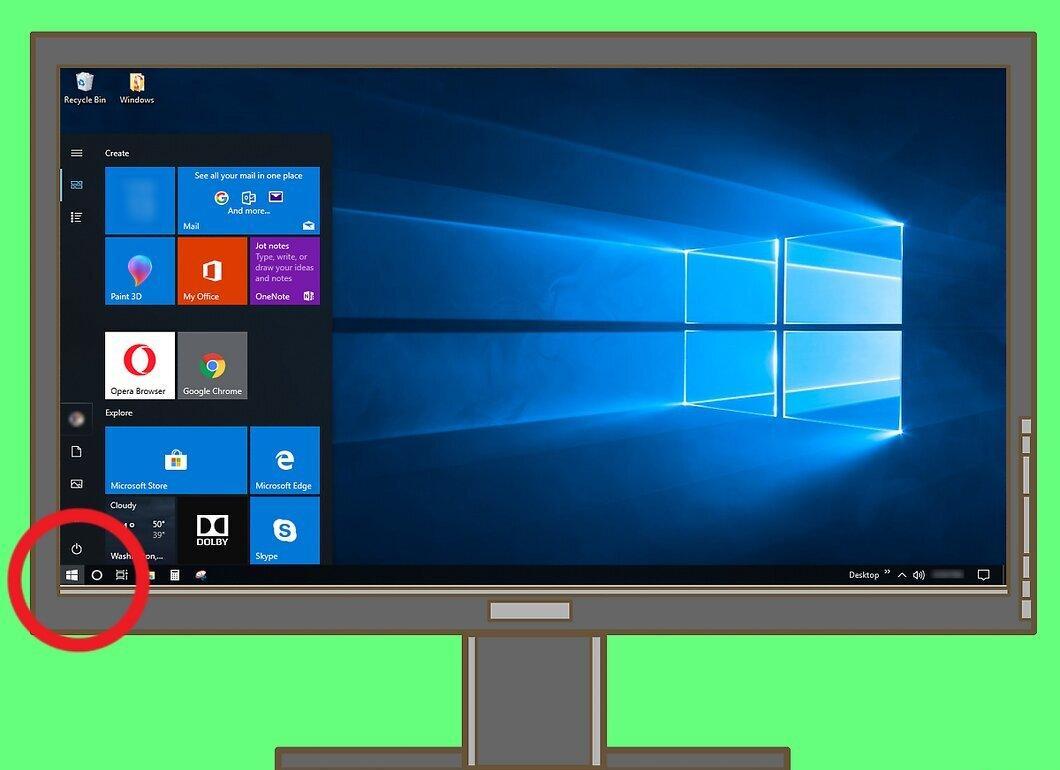
Click on the Windows logo located in the lower-left corner of your desktop screen.
Step 3. Search for Control Panel.
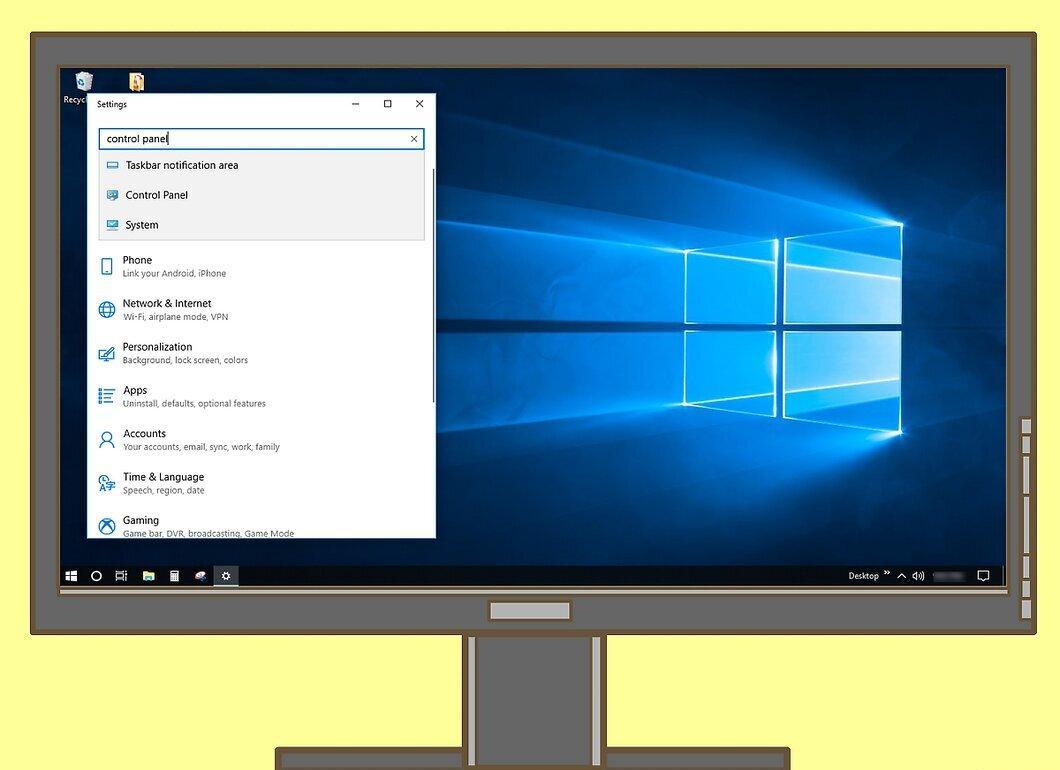
Type "Control Panel" into the search bar to find this utility.
Step 4. Open Control Panel.
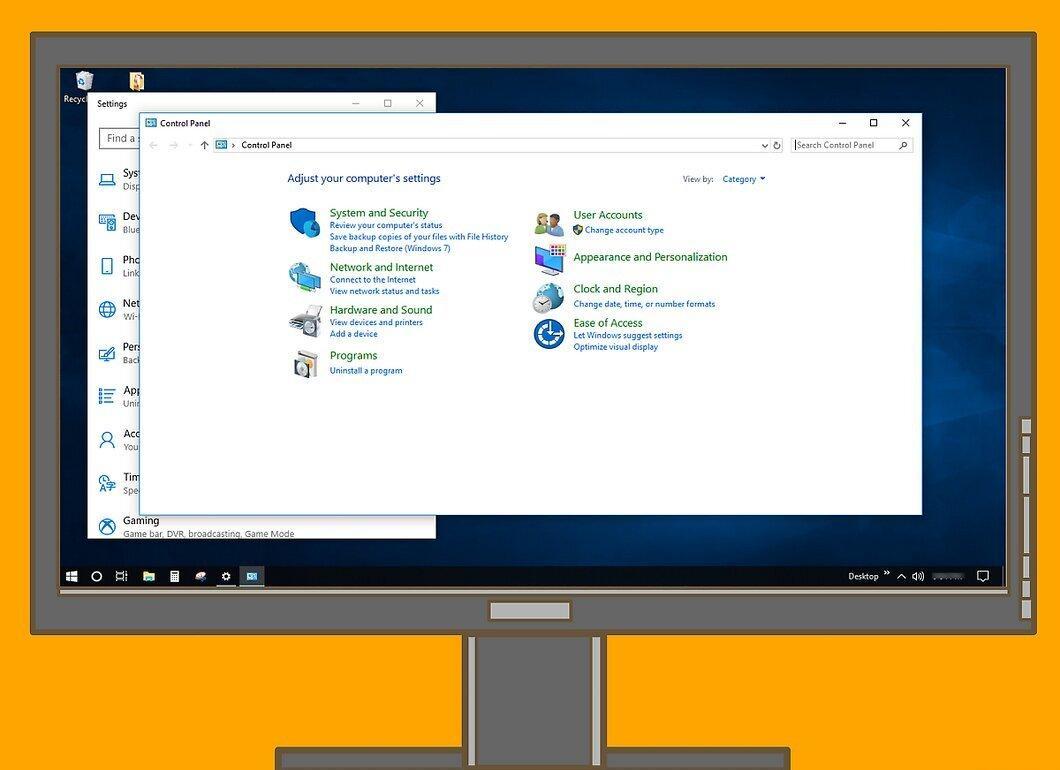
Click on "Control Panel" that appears at the top of the Start menu. The corresponding window will open.
Step 5. Go to the "Network and Internet" section.
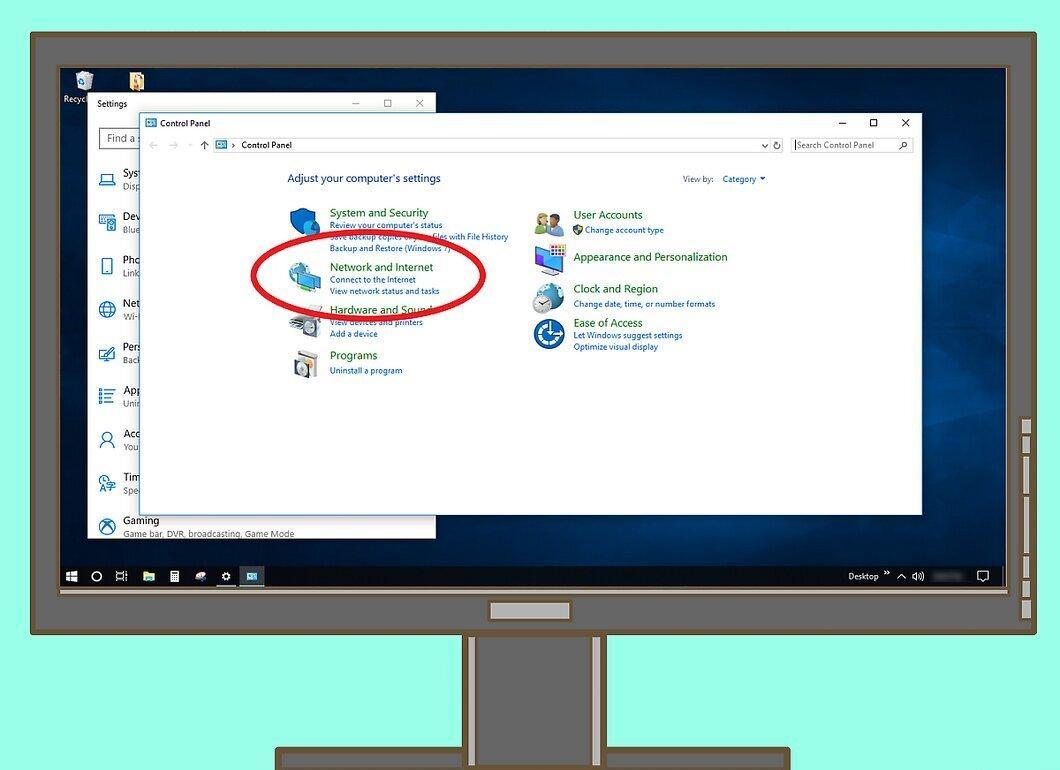
Click on "Network and Internet" in the left part of the Control Panel window.
- If you see options for "Small icons" or "Large icons" in the upper right corner, skip this step.
Step 6. Open Network and Sharing Center.
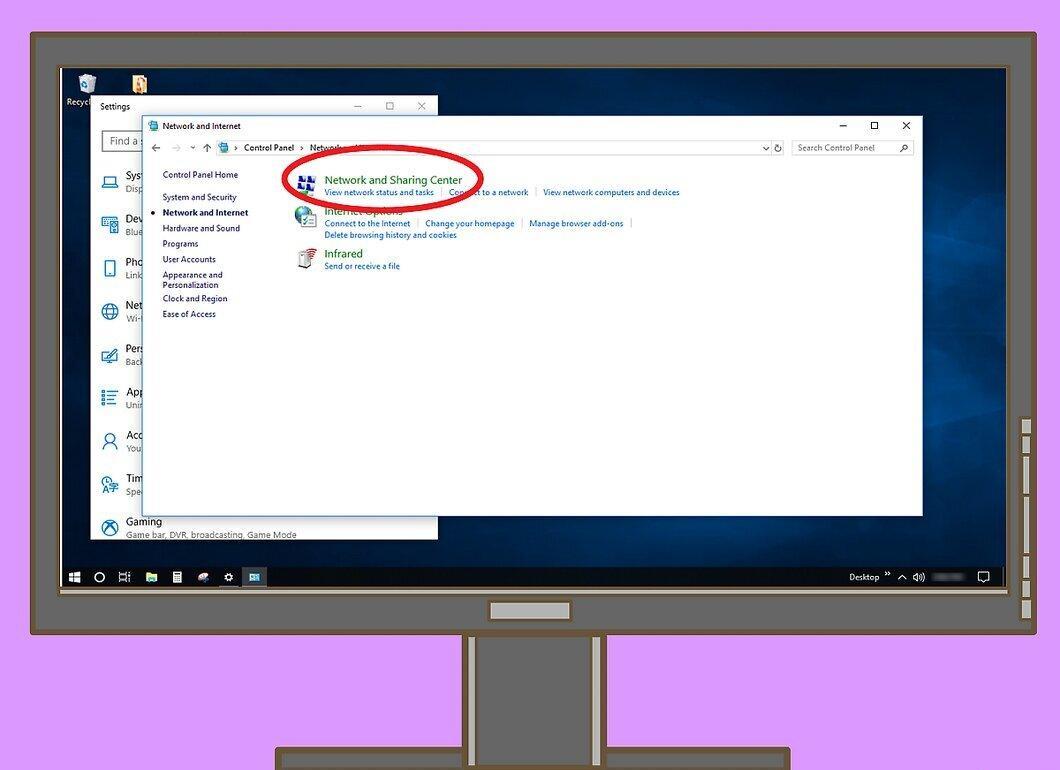
Go to the "Network and Sharing Center" to view a list of all current connections, including the Ethernet connection to the laptop.
Step 7. Select the Ethernet connection.
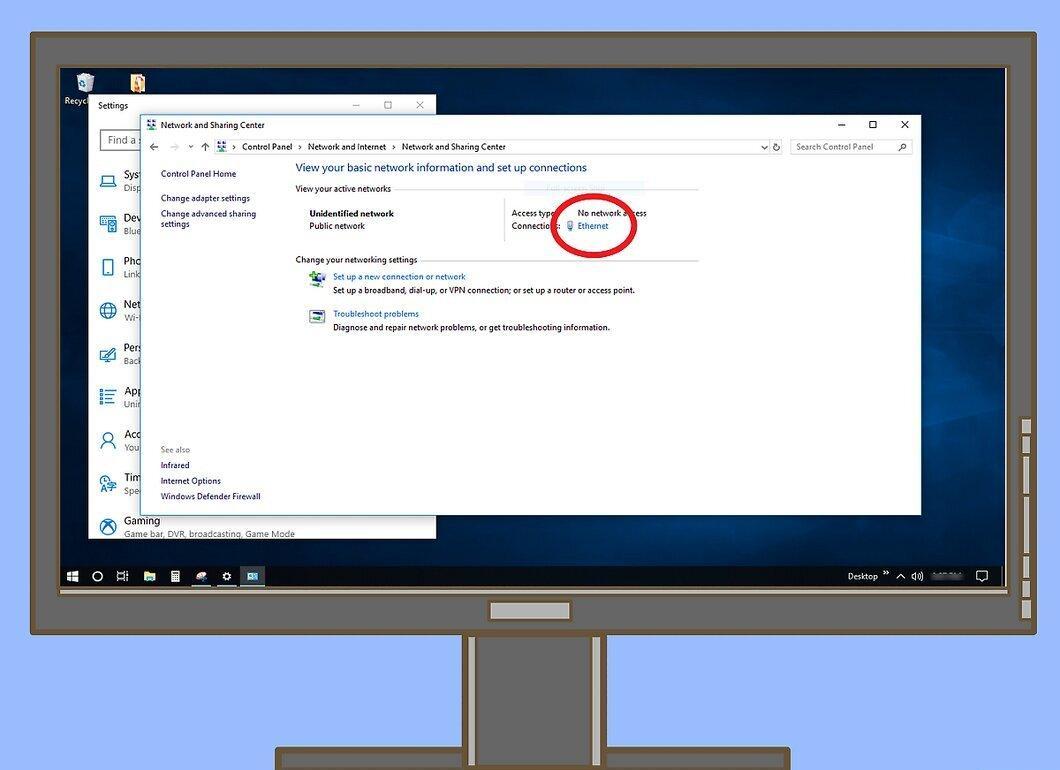
Click on the "Ethernet" link located under the active internet connection.
Step 8. Open Properties.
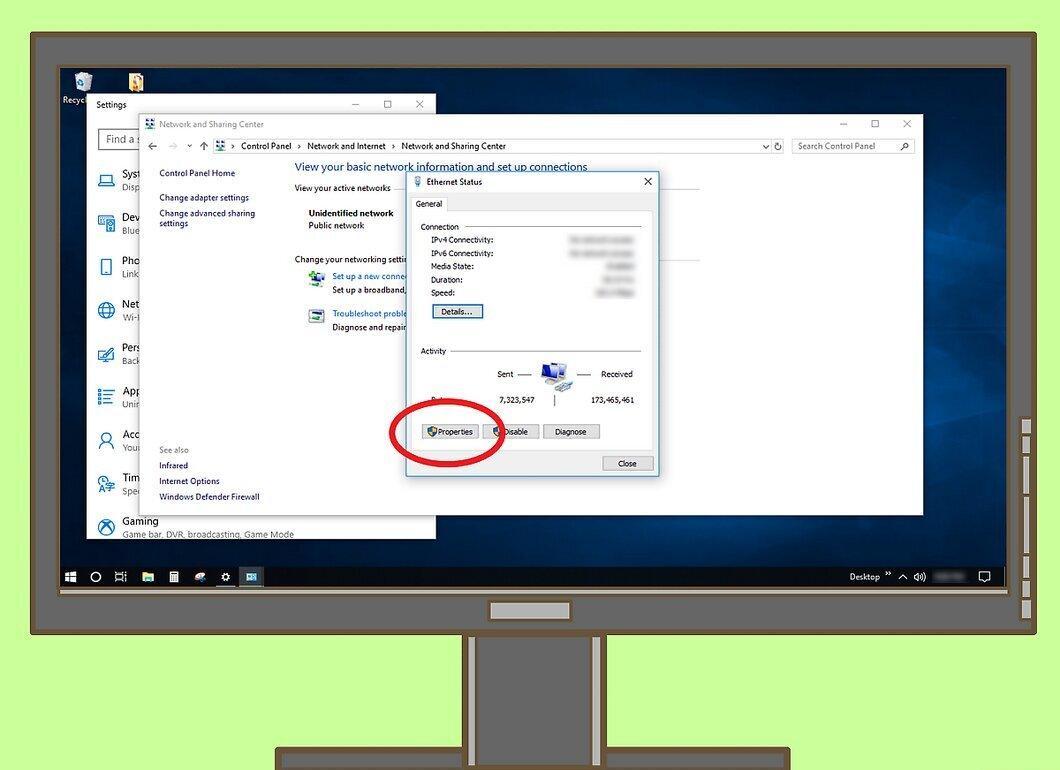
Click on the "Properties" button in the lower-left corner of the window.
Step 9. Select Internet Protocol Version 4.
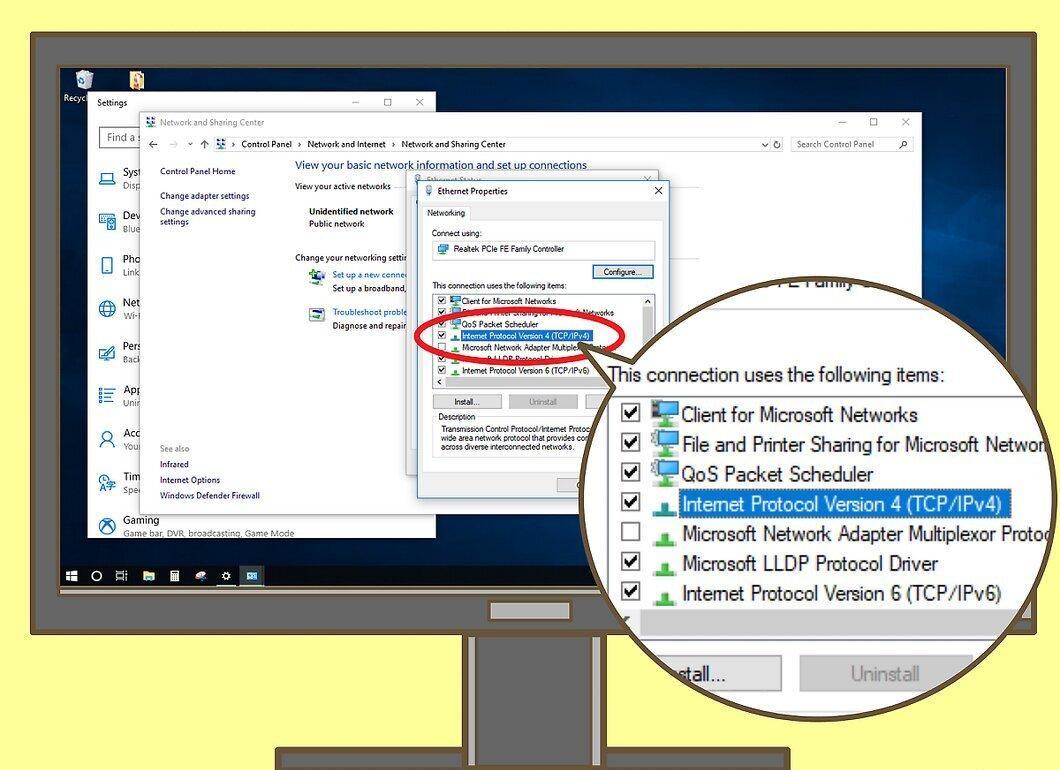
Click on "Internet Protocol Version 4" which should be highlighted in the center of the window.
Step 10. Open Properties.
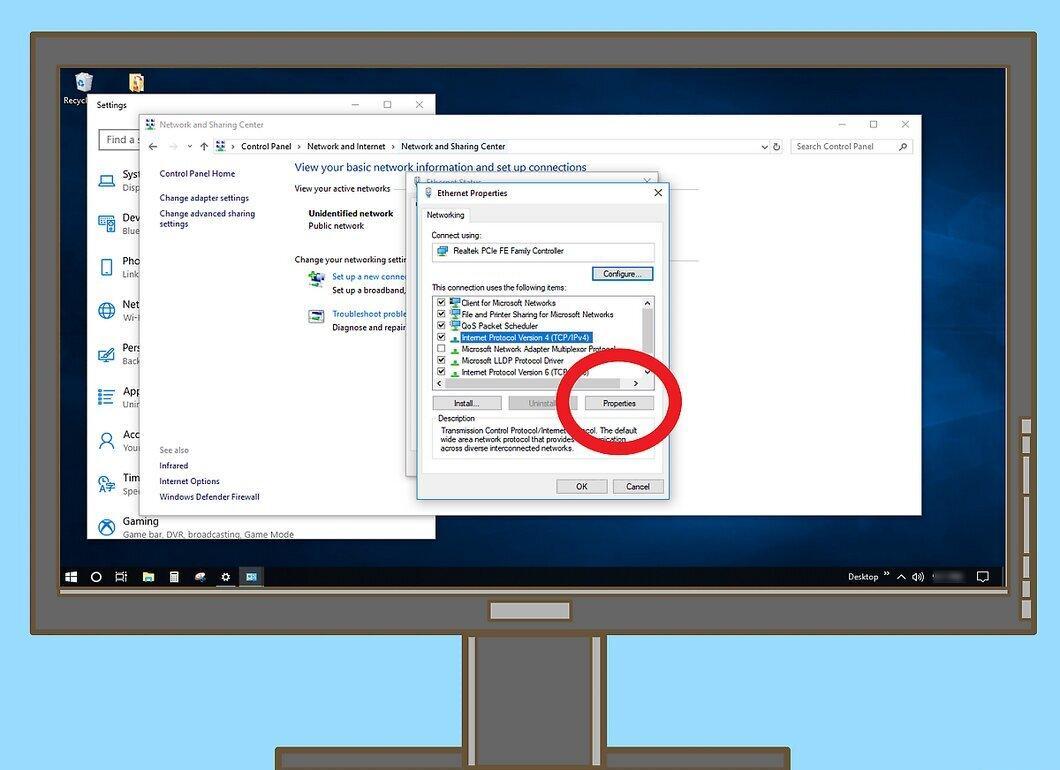
Click on "Properties" again in the bottom right corner.
Step 11. Set the IP address for the connection.
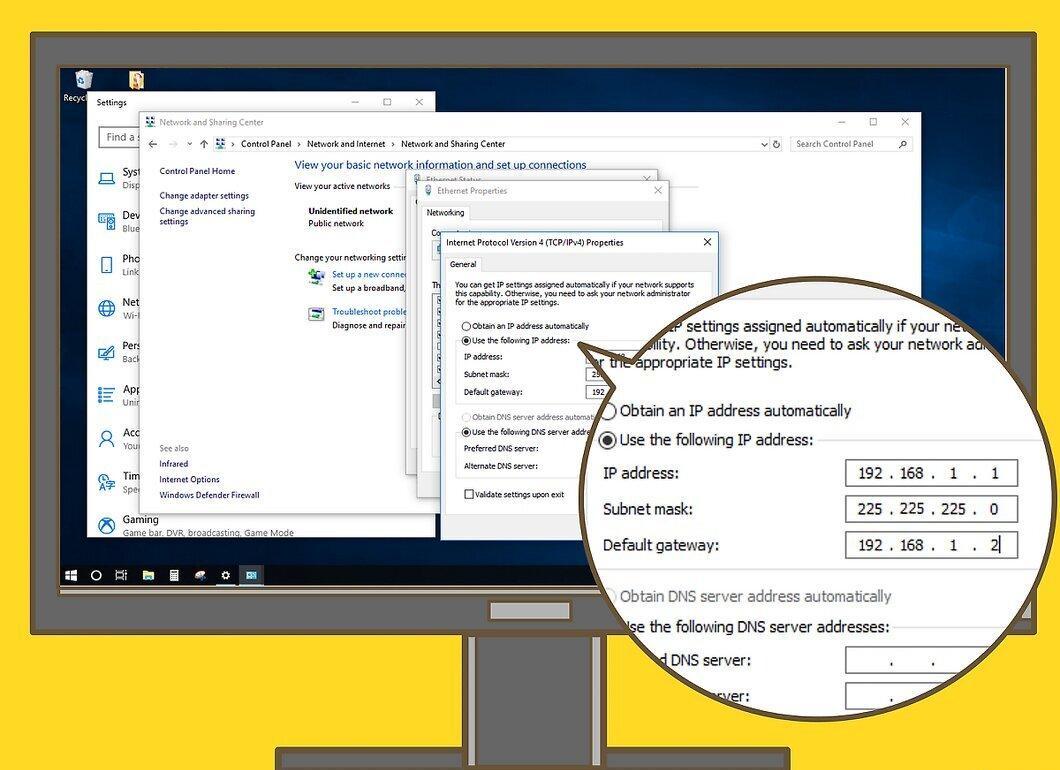
Select the option "Use the following IP address" and remember the following values:
- IP address: enter 192.168.1.1;
- Subnet mask: enter 255.255.255.0;
- Default gateway: enter 192.168.1.2.
Step 12. Change the IP address on the laptop.
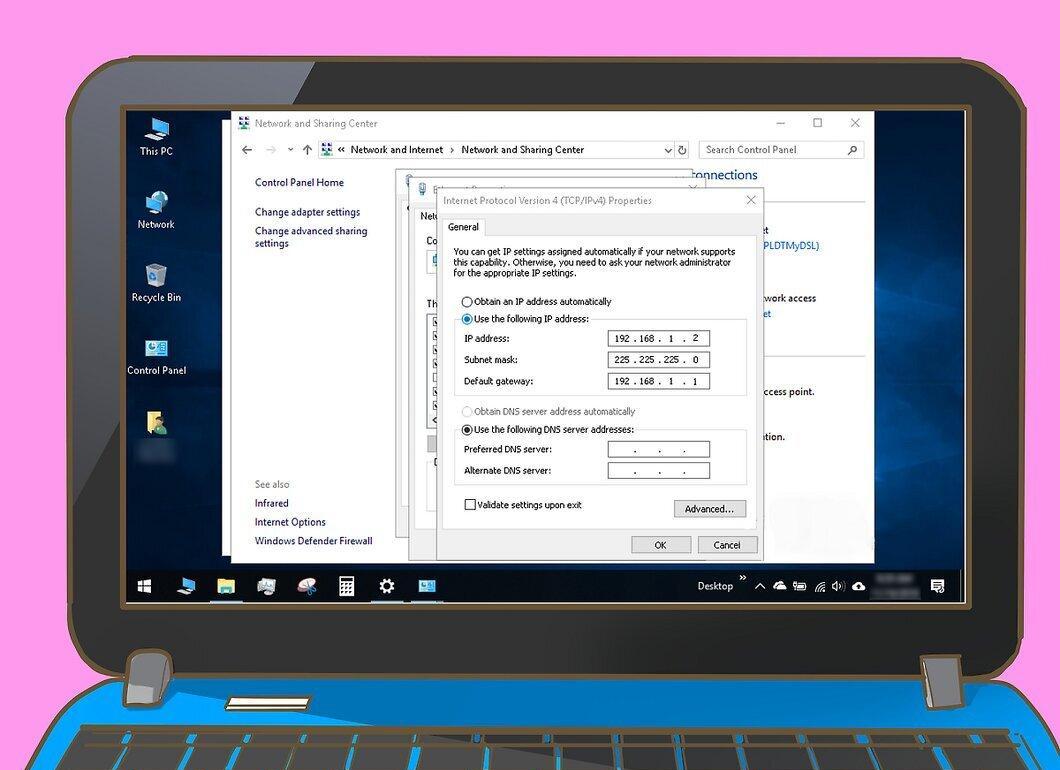
To do this:
- open Network and Sharing Center (just like on the desktop PC);
- go to Ethernet connection properties, select "Internet Protocol Version 4" and click "Properties";
- check the box for "Use the following IP address";
- enter 192.168.1.2 in the "IP address" field;
- enter 255.255.255.0 in the "Subnet mask" field;
- enter 192.168.1.1 in the "Default gateway" field;
- click "OK" twice.
Step 13. Return to the Start menu on the desktop PC.
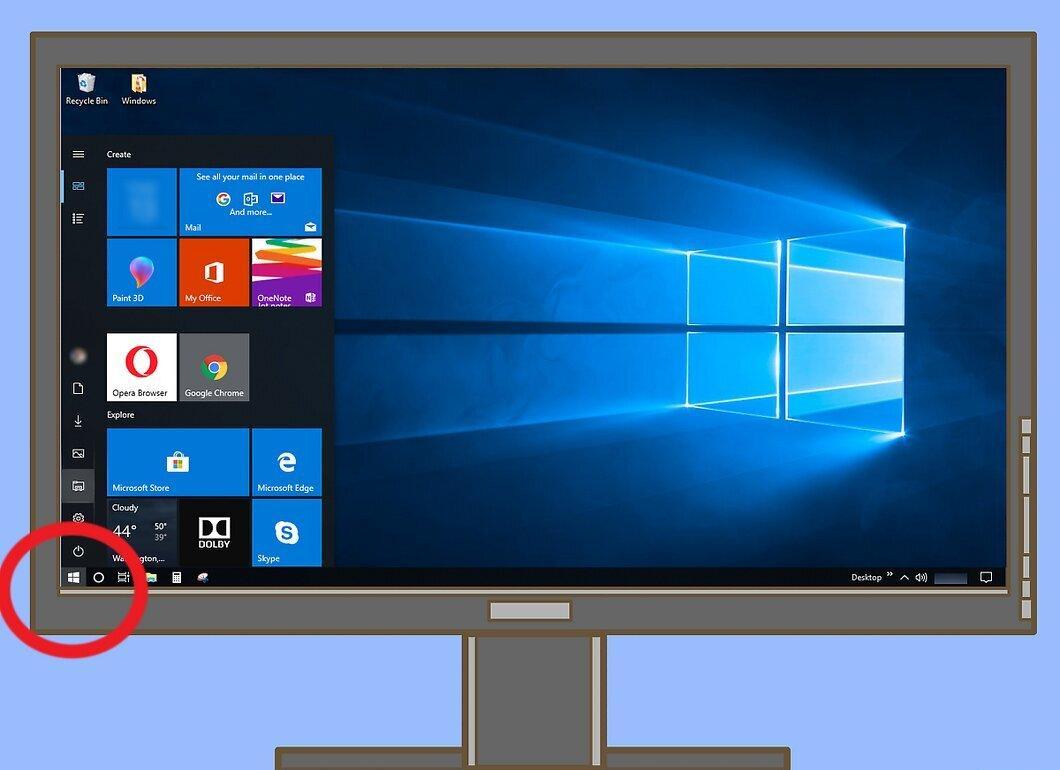
Open the Start menu again by clicking on the Windows logo.
Step 14. Open File Explorer.
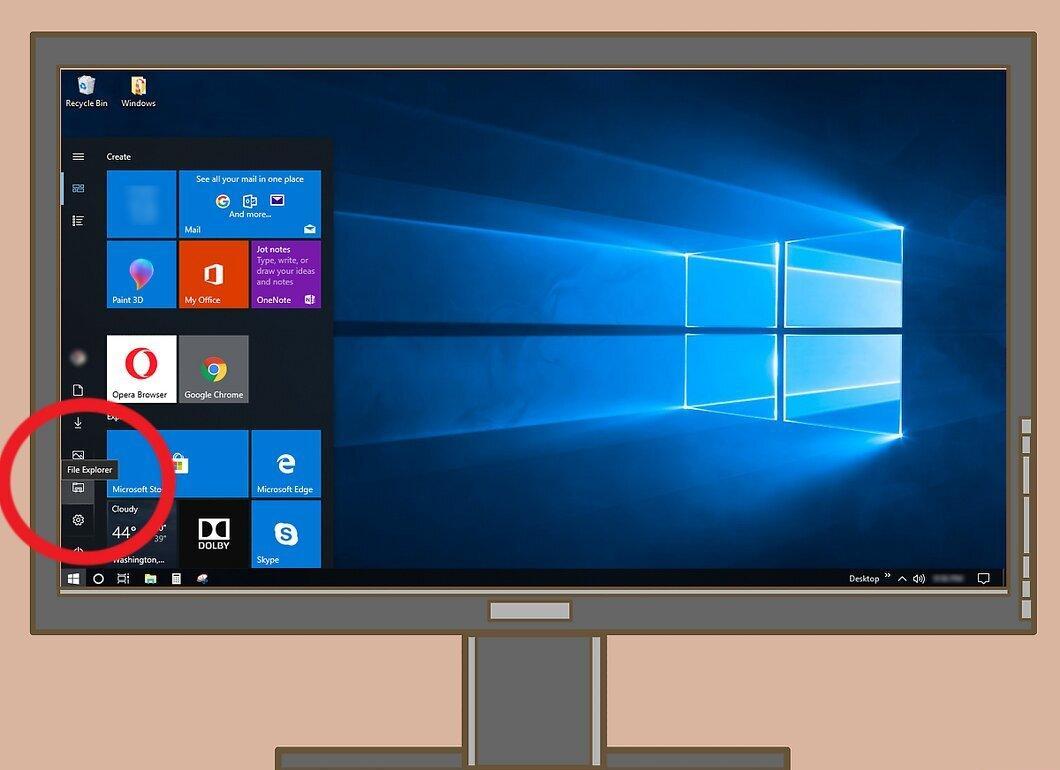
Open File Explorer by clicking on the folder icon at the bottom of the Start menu.
Step 15. Select a shared folder.
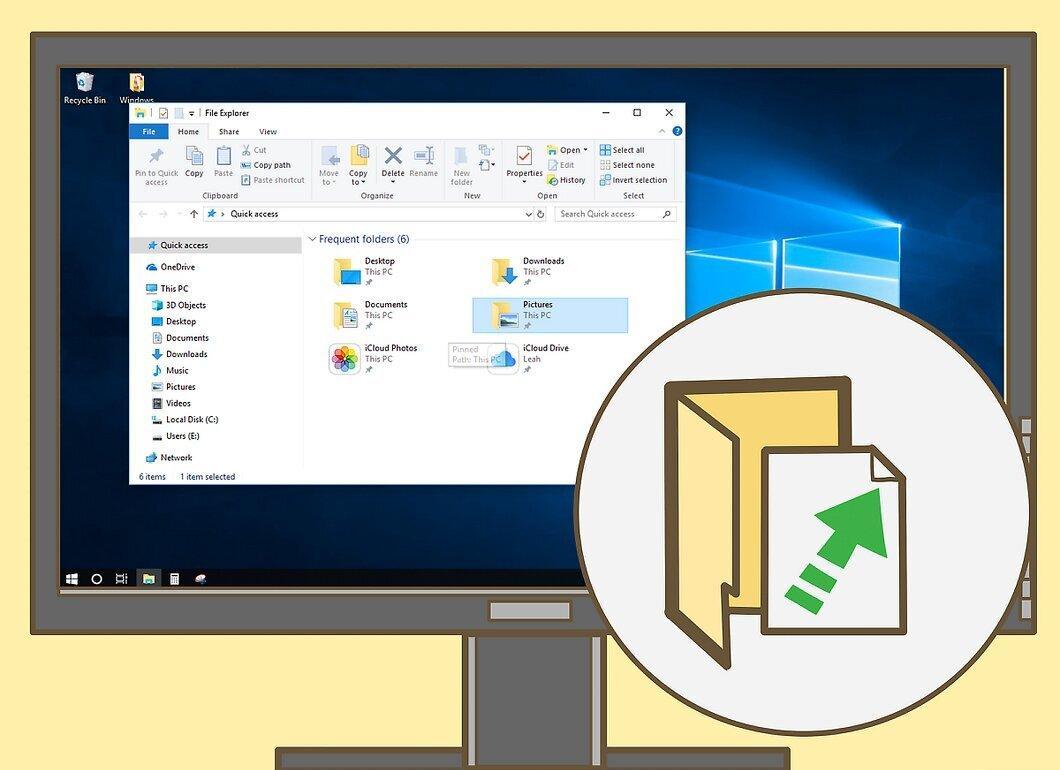
Choose the folder you want to share between your PC and laptop.
- You can also create a new folder and make it shared.
Step 16. Configure the shared folder.
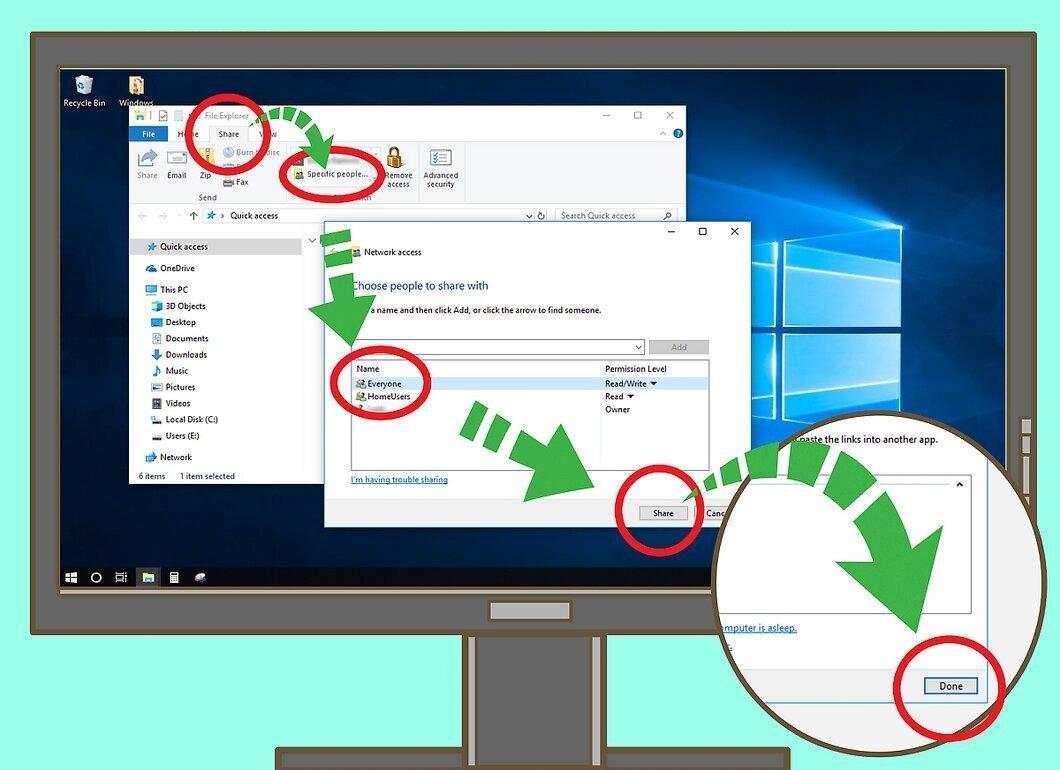
To do this:
- click "Share" in the upper left corner of the window;
- select "Specific people";
- click on the down arrow;
- choose "Everyone";
- click "Share";
- confirm by clicking "Done".
Step 17. Move files to the shared folder.
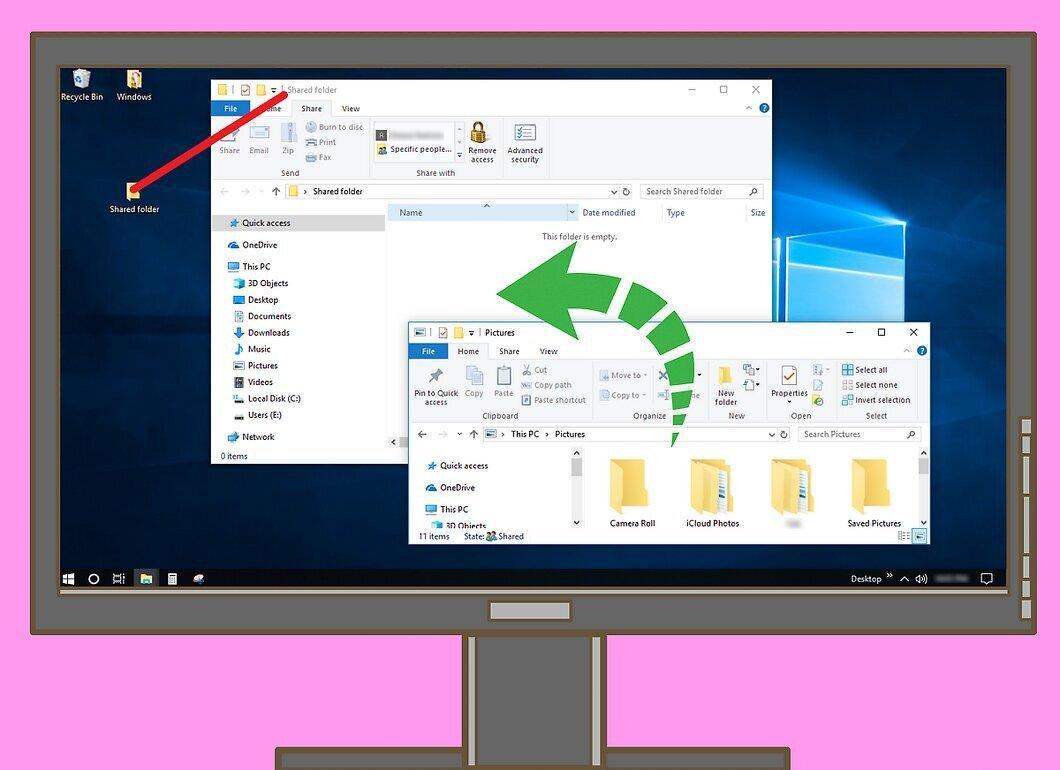
To do this:
- locate the files you need;
- select the files and press Ctrl+C to copy;
- open the shared folder and press Ctrl+V to paste.
Step 18. Go to the Windows laptop.
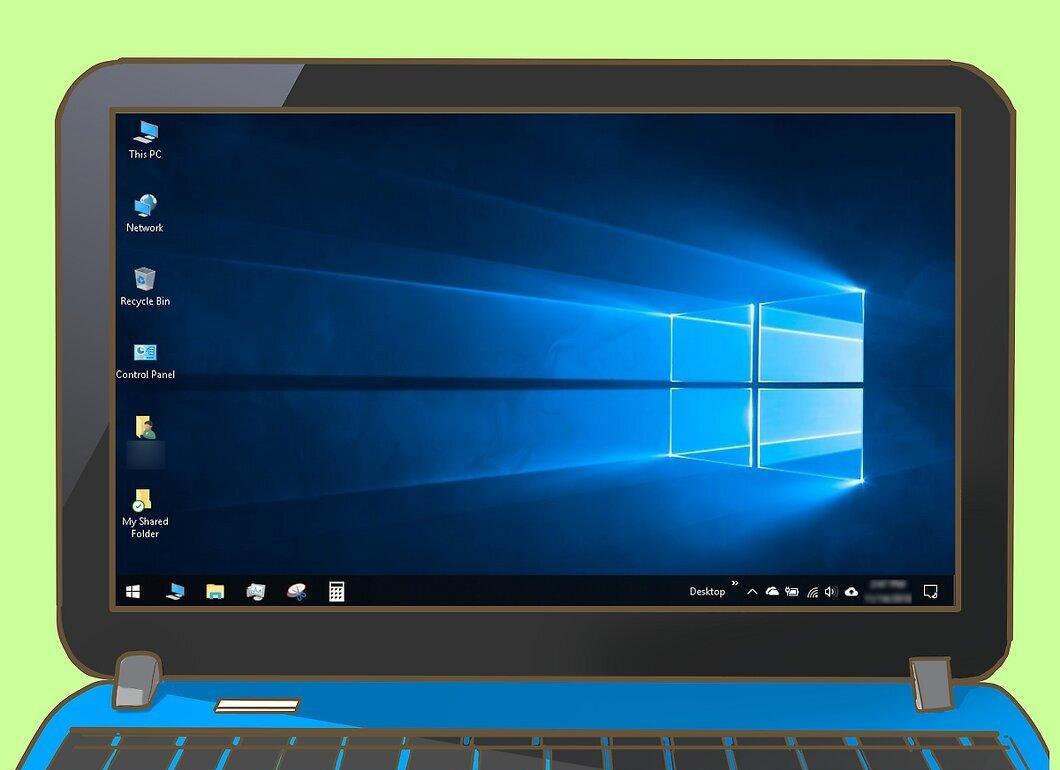
Navigate to the laptop from which you plan to access the shared folder.
Step 19. Open the shared folder.
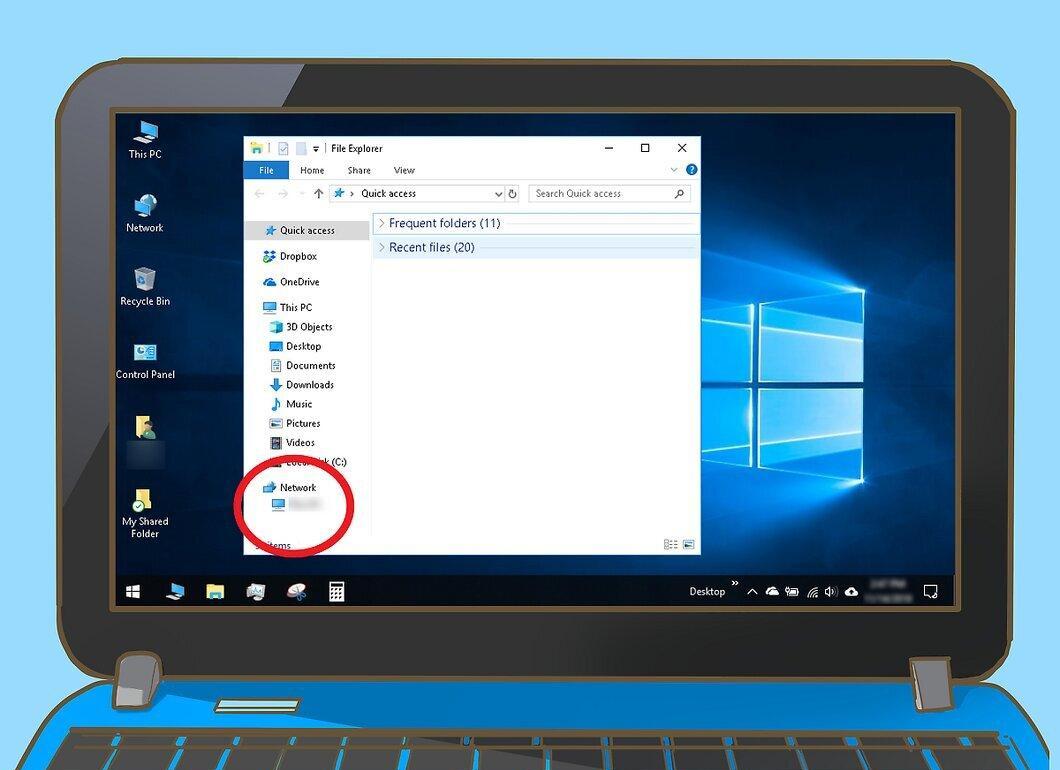
Open the Start menu, go to File Explorer, select the name of the desktop PC, and then double-click on the shared folder.
- You may need to scroll down to find the desktop PC's name in the left panel.
Step 20. Copy files to the laptop.
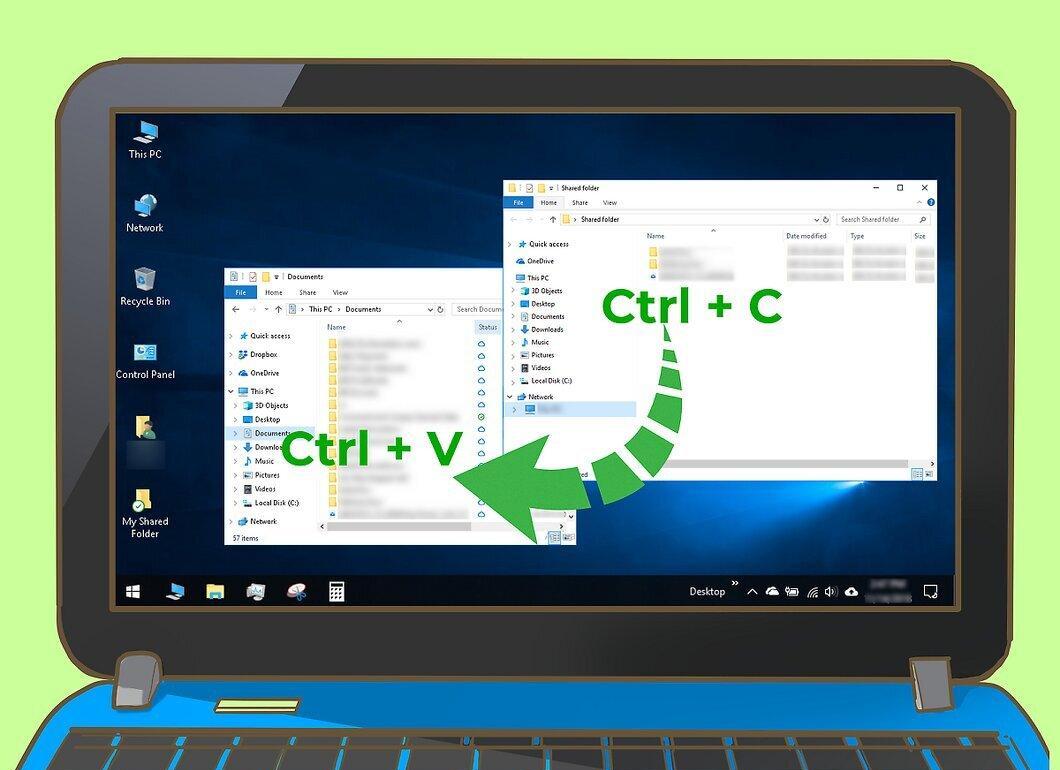
Select the files, press Ctrl+C, open the folder where you want to copy them, and press Ctrl+V.
- Files on the laptop can also be added to the shared folder for access from the desktop PC.
File Sharing (Windows to Mac OS X)
Step 1. Get a USB-C to Ethernet adapter for Mac.
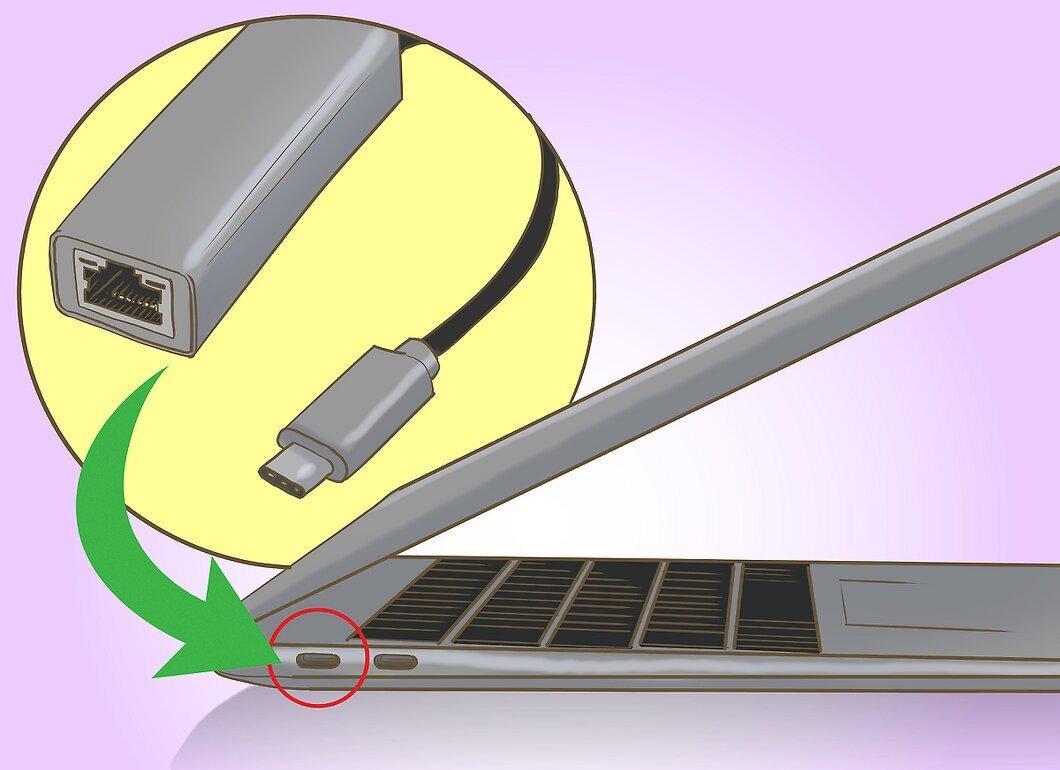
Purchase a USB-C to Ethernet adapter for your Mac. Modern Mac laptops do not have Ethernet ports, so you need an adapter that connects to the USB port.
Step 2. Connect the adapter to the Mac.
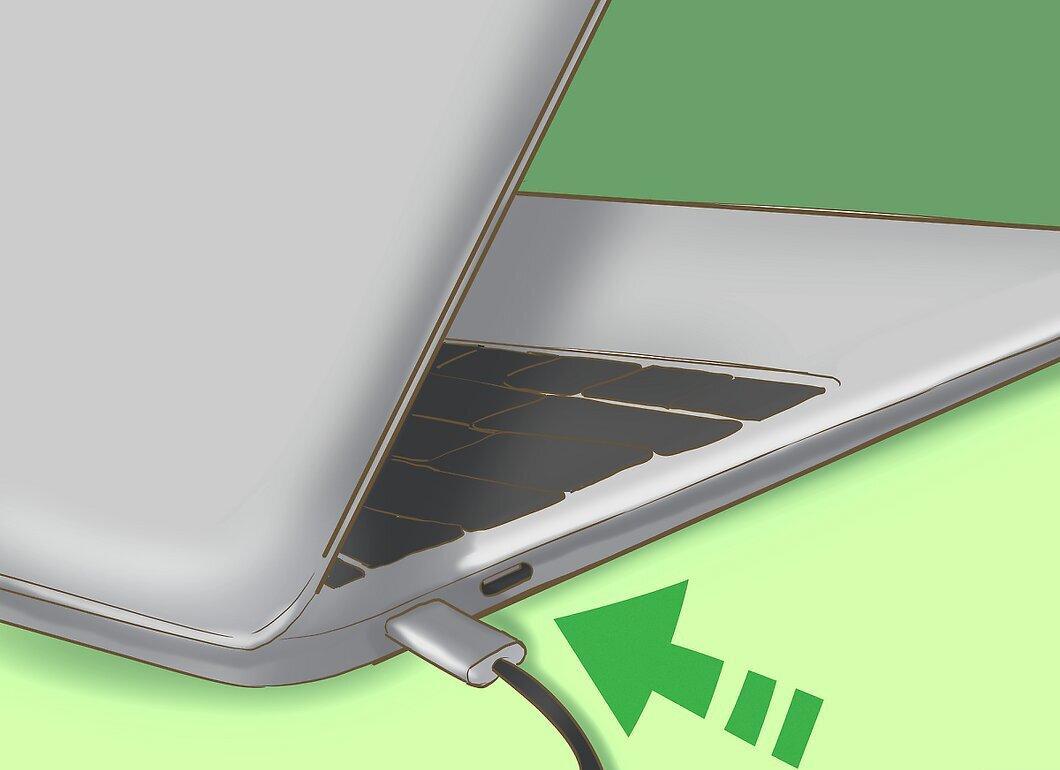
Connect the adapter to the USB port of your Mac.
Step 3. Connect the devices with an Ethernet cable.
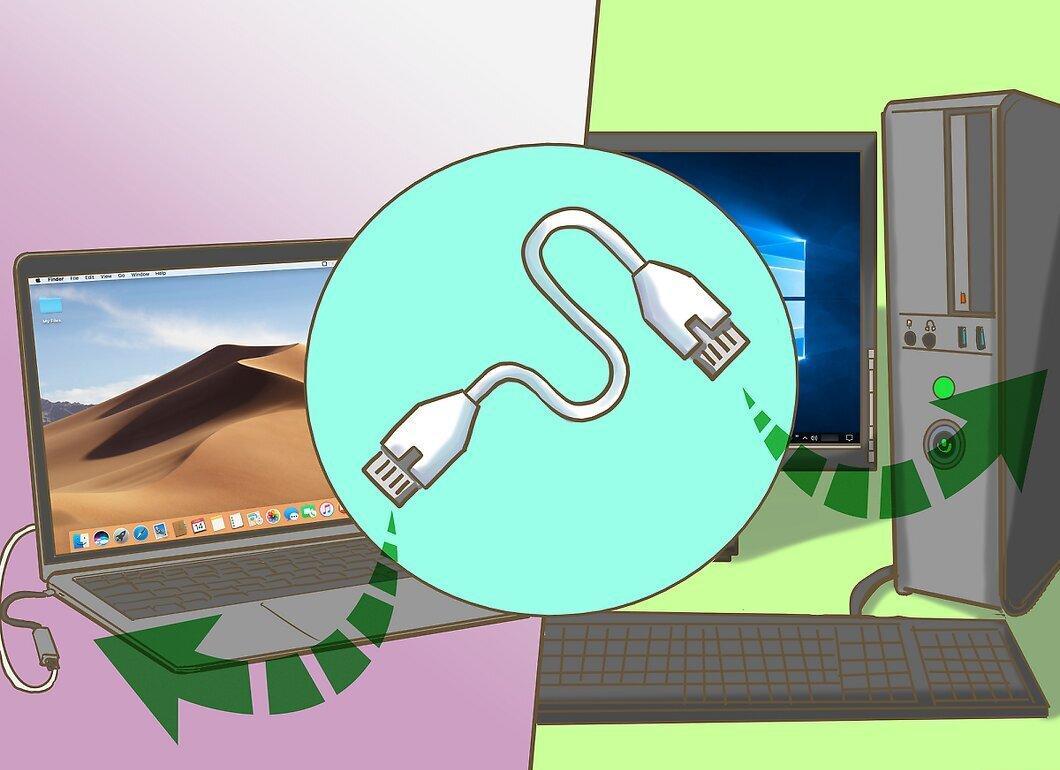
Connect both devices using an Ethernet cable, inserting the ends into the corresponding ports.
Step 4. Open the Start menu on the desktop PC.
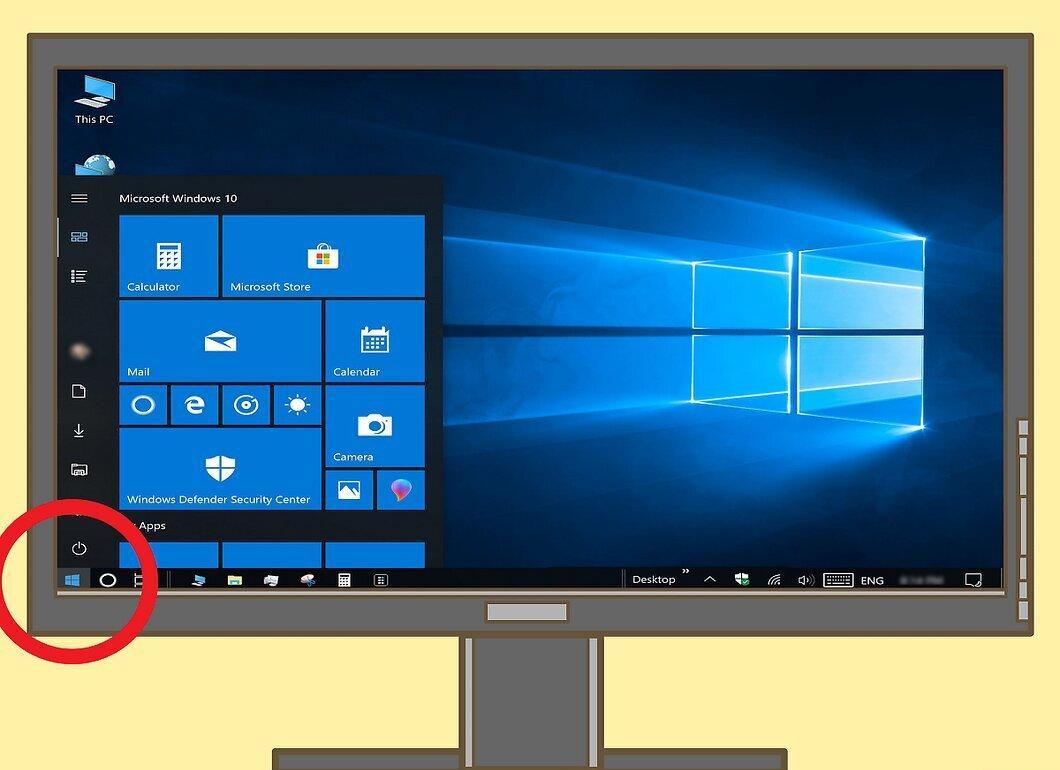
Open the Start menu on the desktop by clicking the Windows logo.
Step 5. Open File Explorer.
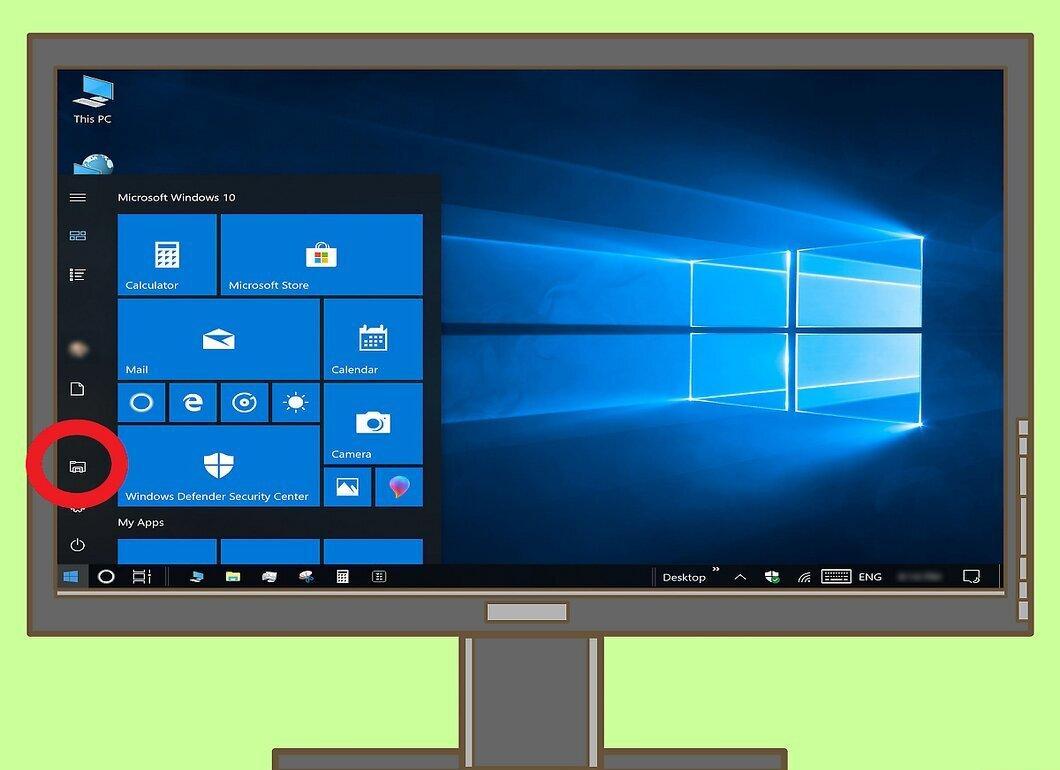
Open File Explorer by clicking the folder button.
Step 6. Select a shared folder.
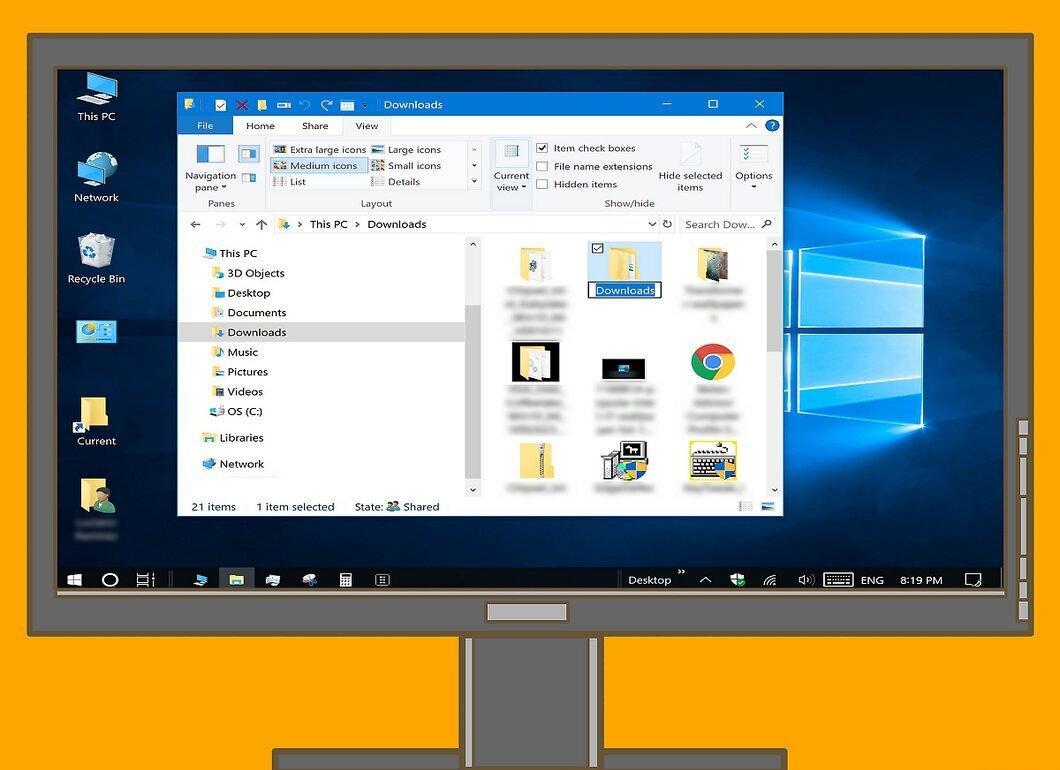
Choose the folder to which you want to provide access from the Mac laptop.
- You can also create a new folder and make it shared.
Step 7. Configure the folder for sharing.
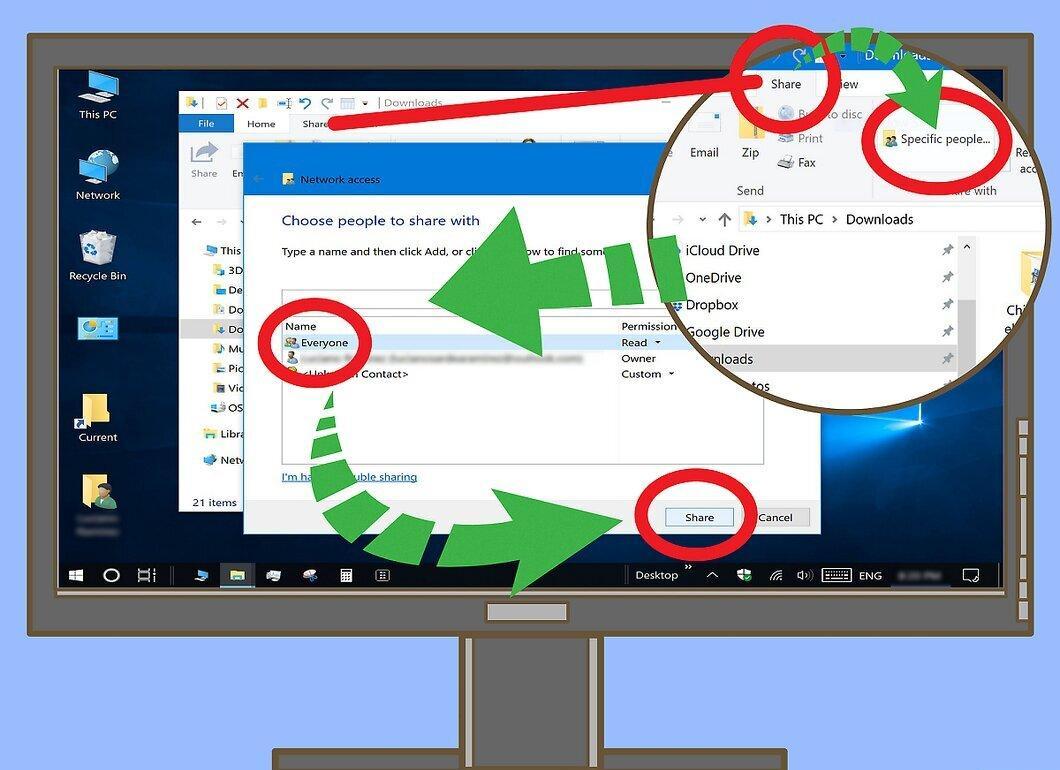
To do this:
- click "Share";
- select "Specific people";
- click the down arrow;
- choose "Everyone";
- click "Share";
- finish the process by clicking "Done".
Step 8. Go to the Mac laptop and open the "Go" menu.
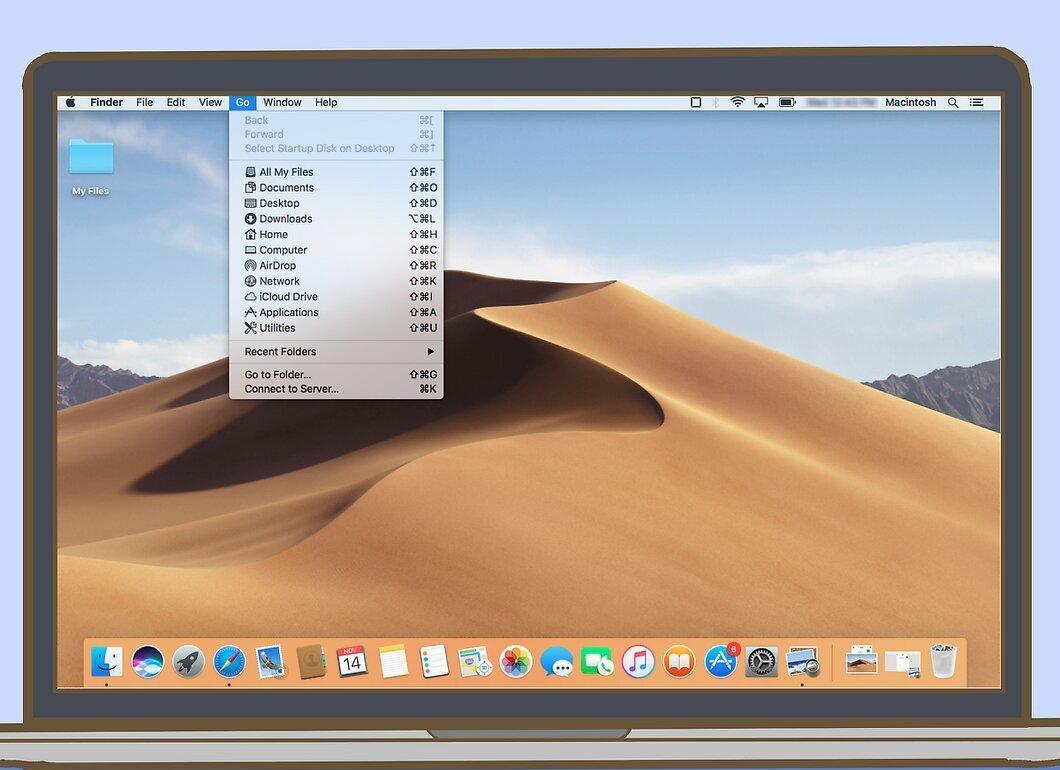
On the Mac, click on "Go" at the top of the screen.
- If you don't see the "Go" menu, open Finder or click on the desktop.
Step 9. Select "Connect to Server".
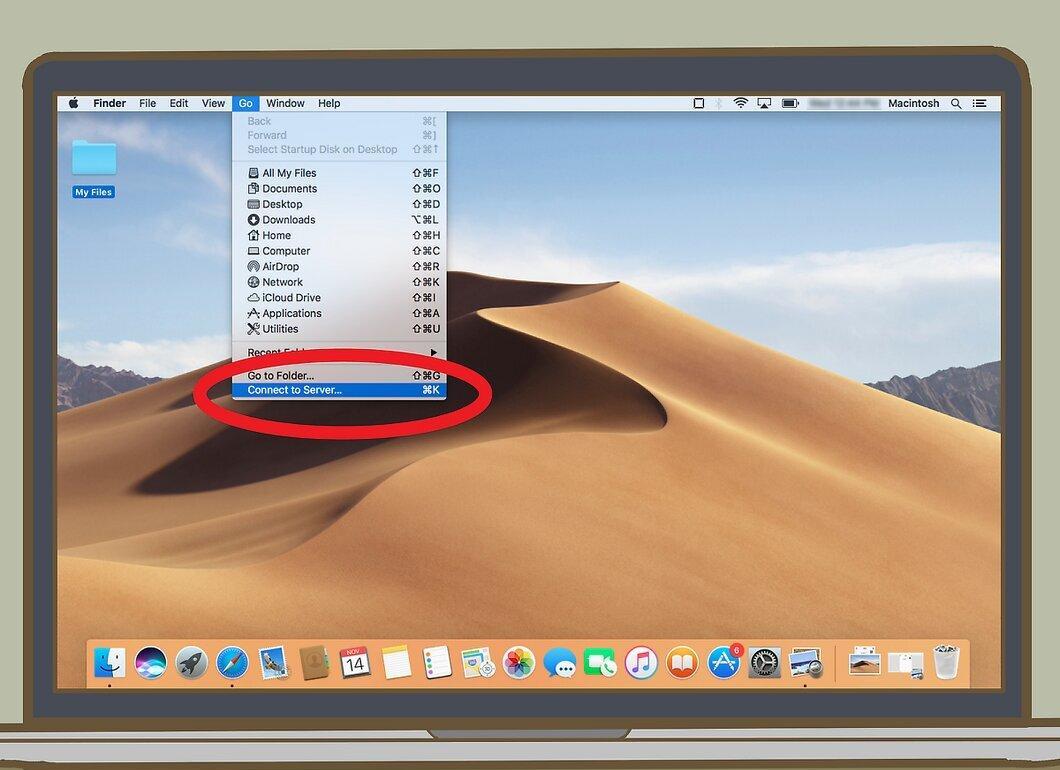
Select "Connect to Server" from the dropdown menu.
Step 10. Enter the IP address of the Windows PC.
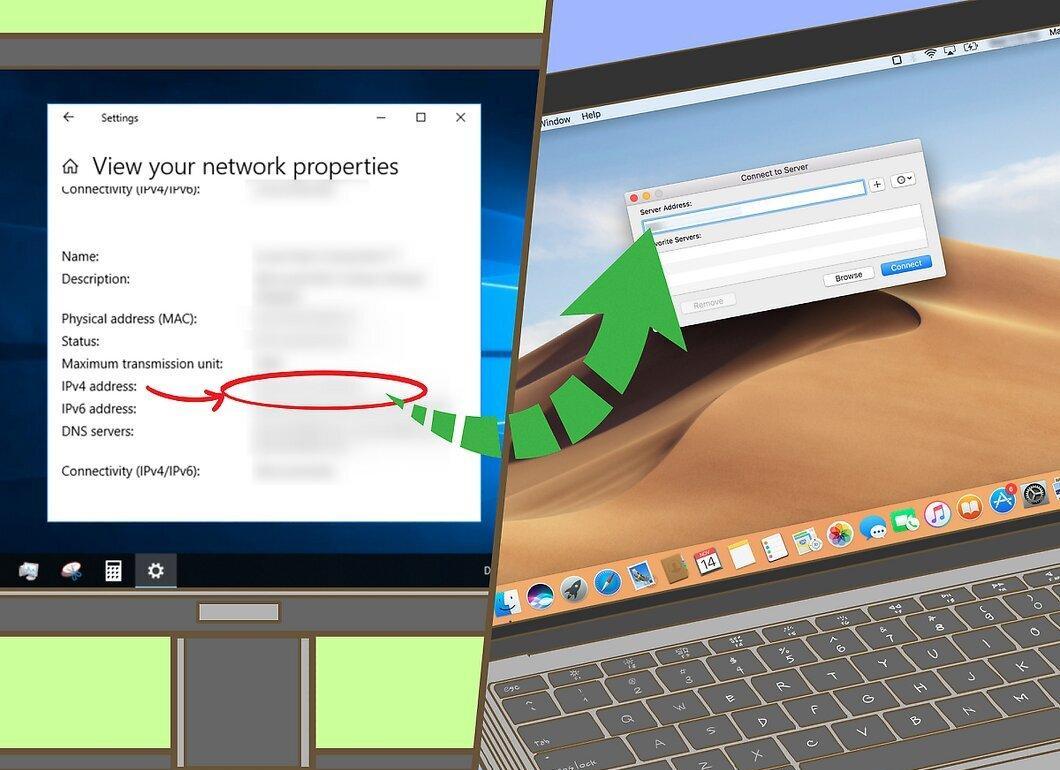
Enter the IP address of the Windows computer in the field at the top of the window.
- To find the IP address, open the Start menu, then "Settings" and select "Network and Internet".
Step 11. Click "Connect".
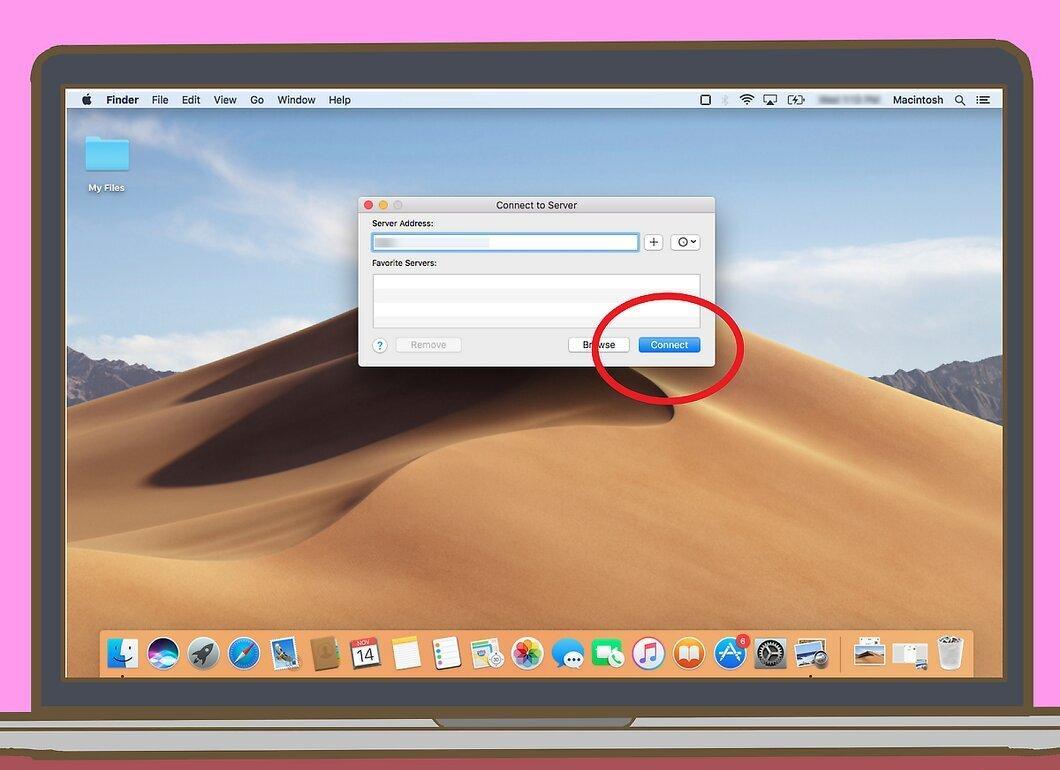
Click the "Connect" button to access the server.
Step 12. Enter the Windows PC credentials.
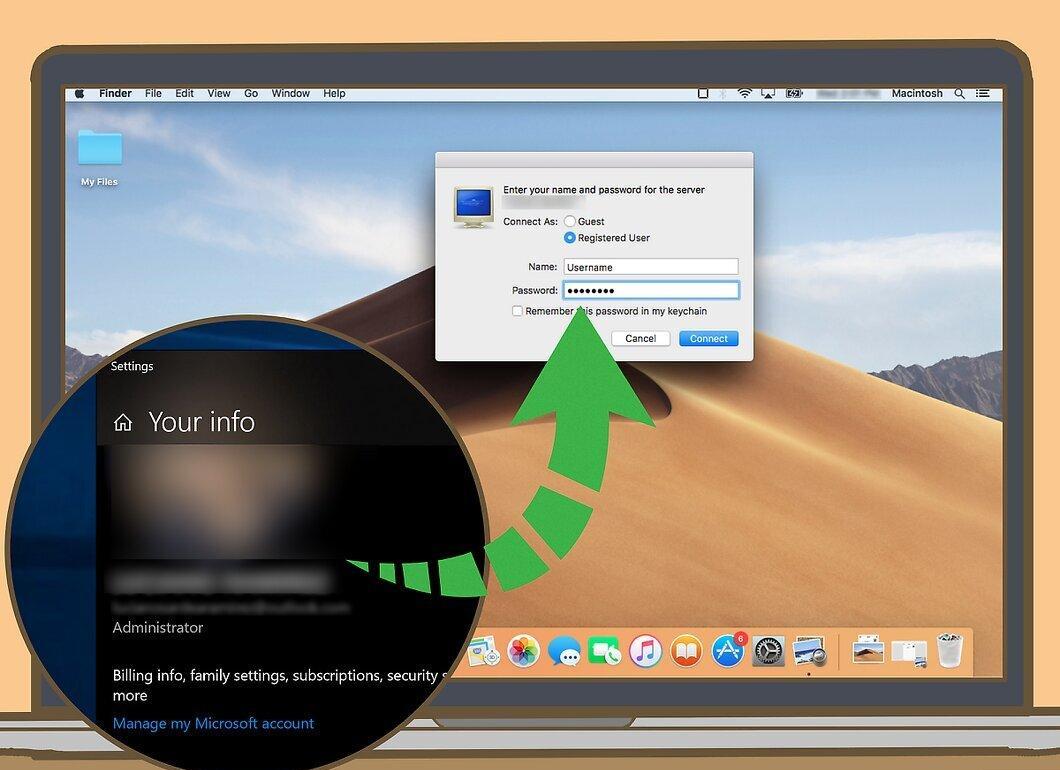
Enter the necessary information:
- check the box for "Registered user";
- enter the username and password for the Windows PC;
- click "Connect".
Step 13. Move files to the shared folder.
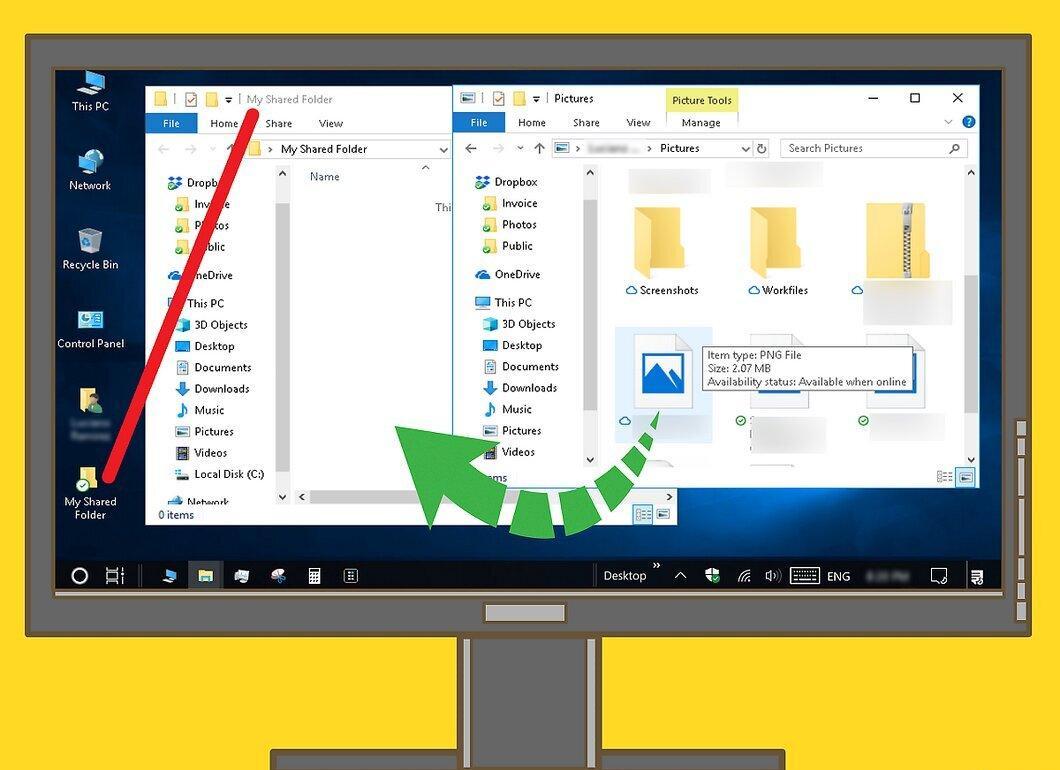
Return to the desktop PC and do the following:
- find the files to share;
- select them and press Ctrl+C to copy;
- open the shared folder and press Ctrl+V to paste.
Step 14. Access shared files on Mac OS X.
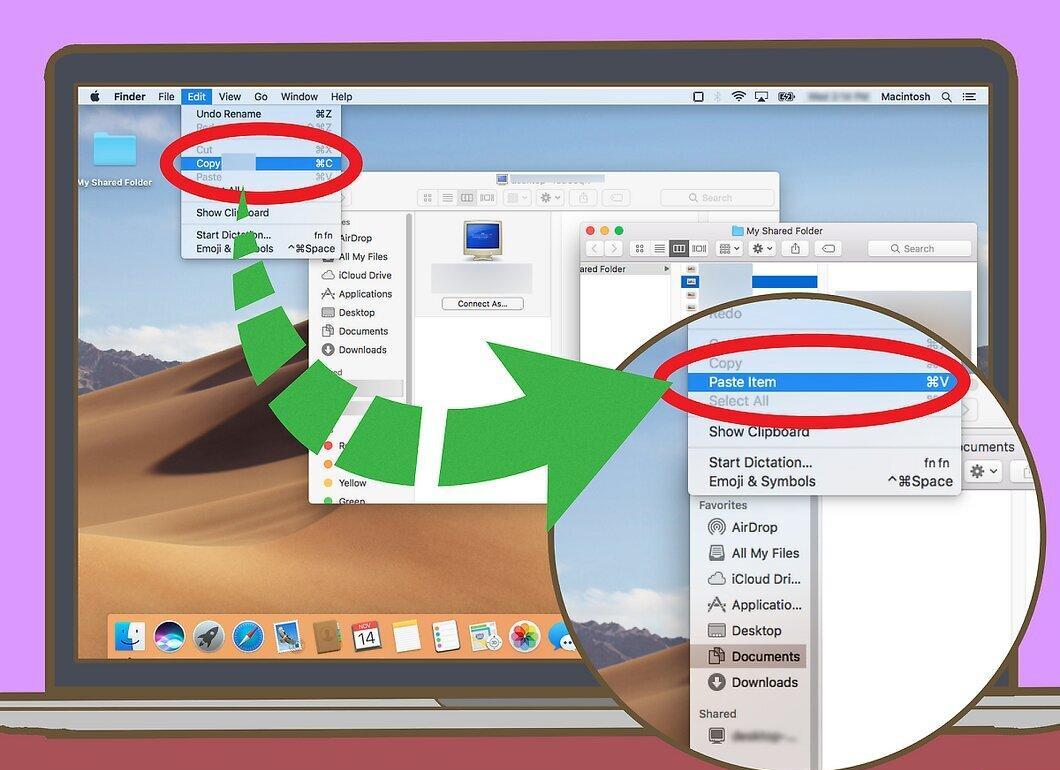
On the Mac laptop:
- open Finder;
- select the name of the Windows PC on the left side of the window;
- open the shared folder;
- select the files you need;
- use the "Copy" command;
- choose the folder where you want to paste the files and click "Paste".
Step 15. Transfer files from Mac to Windows PC.
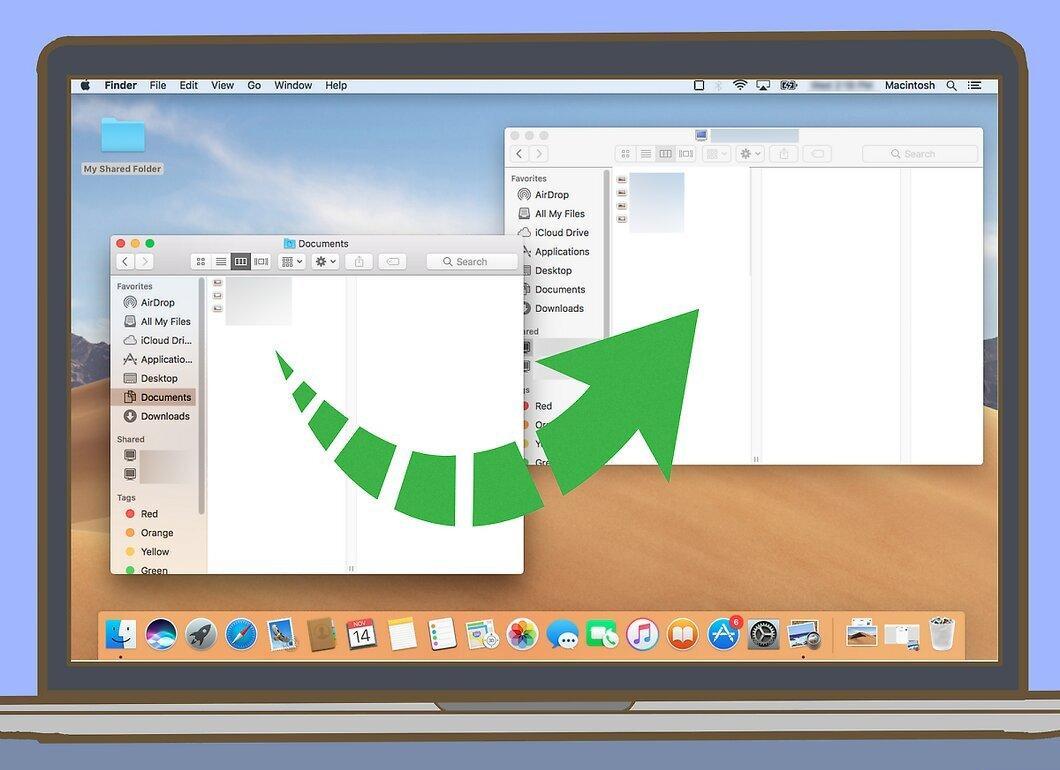
To copy files from Mac to Windows, add them to the shared folder, open it on the PC, and copy them.
File Sharing (Mac OS X to Mac OS X)
Step 1. Get two USB-C to Ethernet adapters.
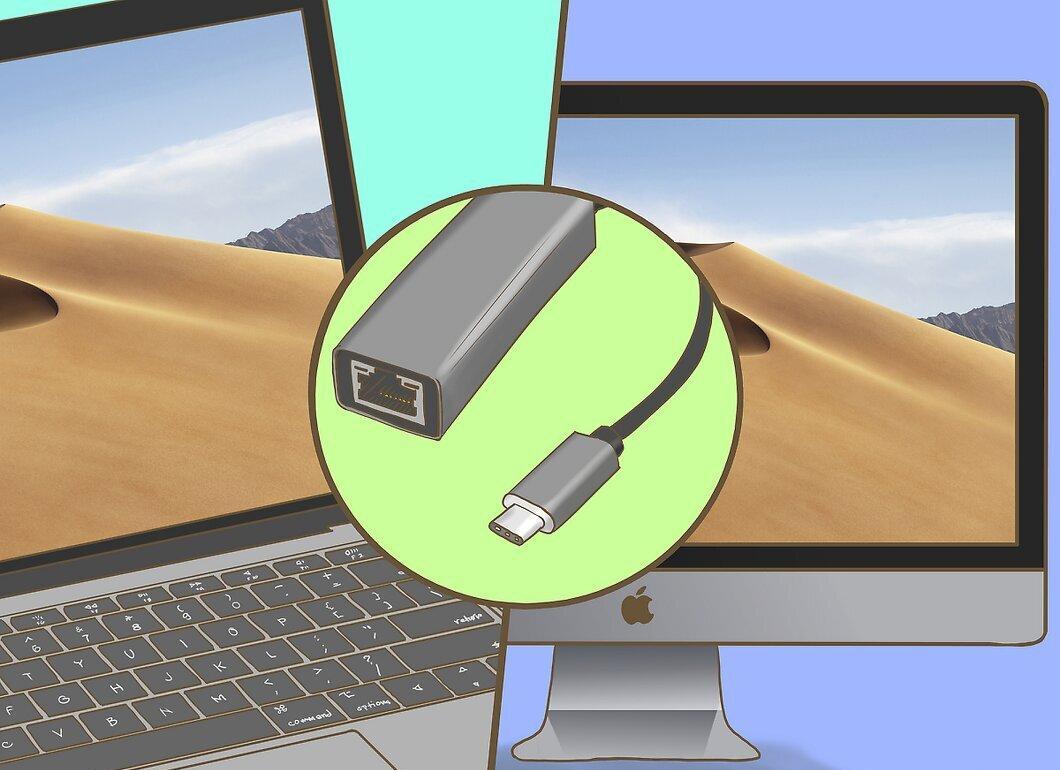
Purchase two USB-C to Ethernet adapters, as modern Macs are not equipped with Ethernet ports.
Step 2. Connect the adapters to the Macs.
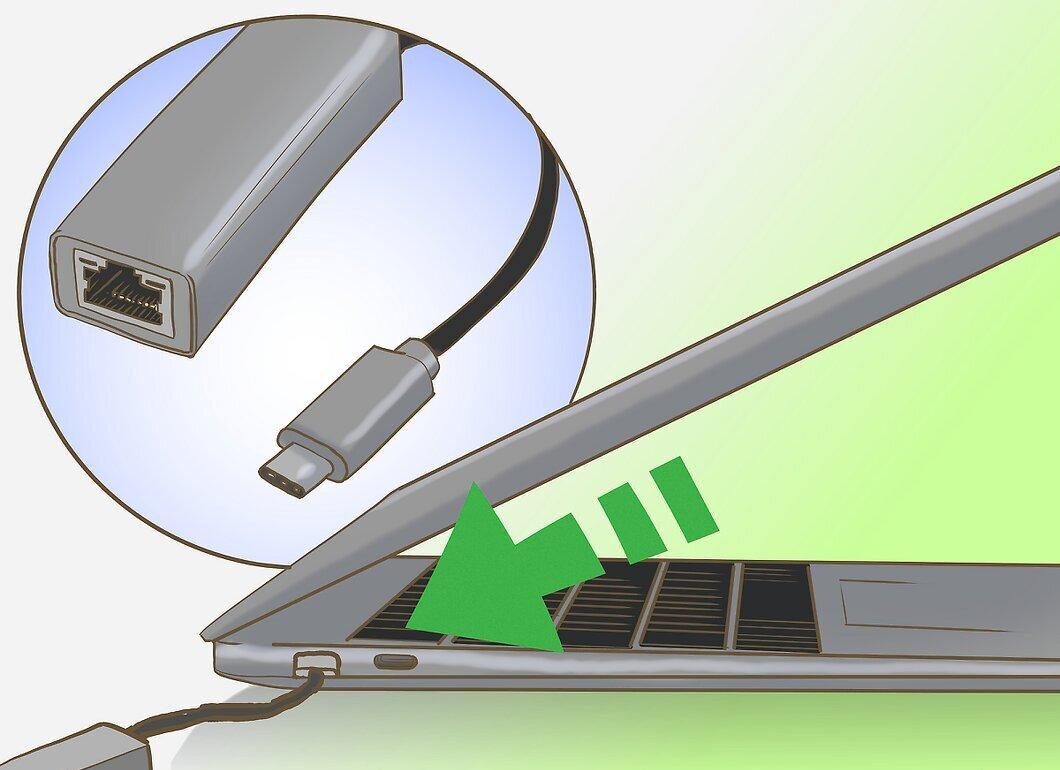
Connect each adapter to the USB port of the respective Mac.
Step 3. Connect the devices with an Ethernet cable.
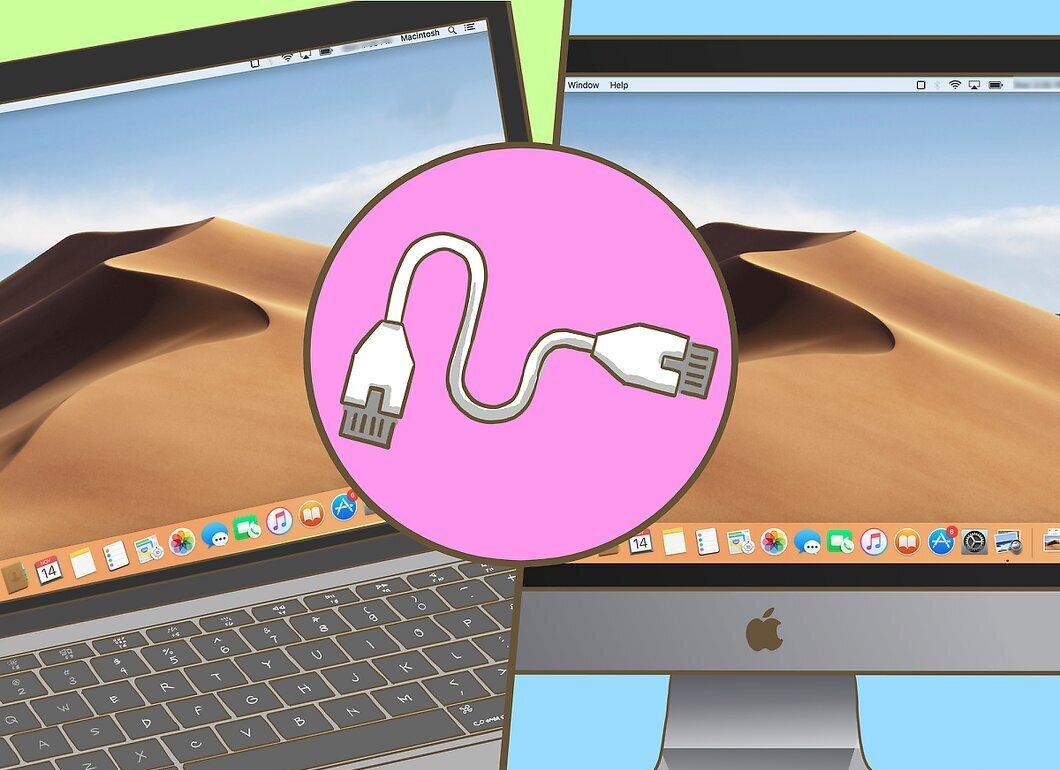
Connect one end of the Ethernet cable to the adapter of the first Mac and the other end to the adapter of the second Mac.
Step 4. Open the "Go" menu on one of the Macs.
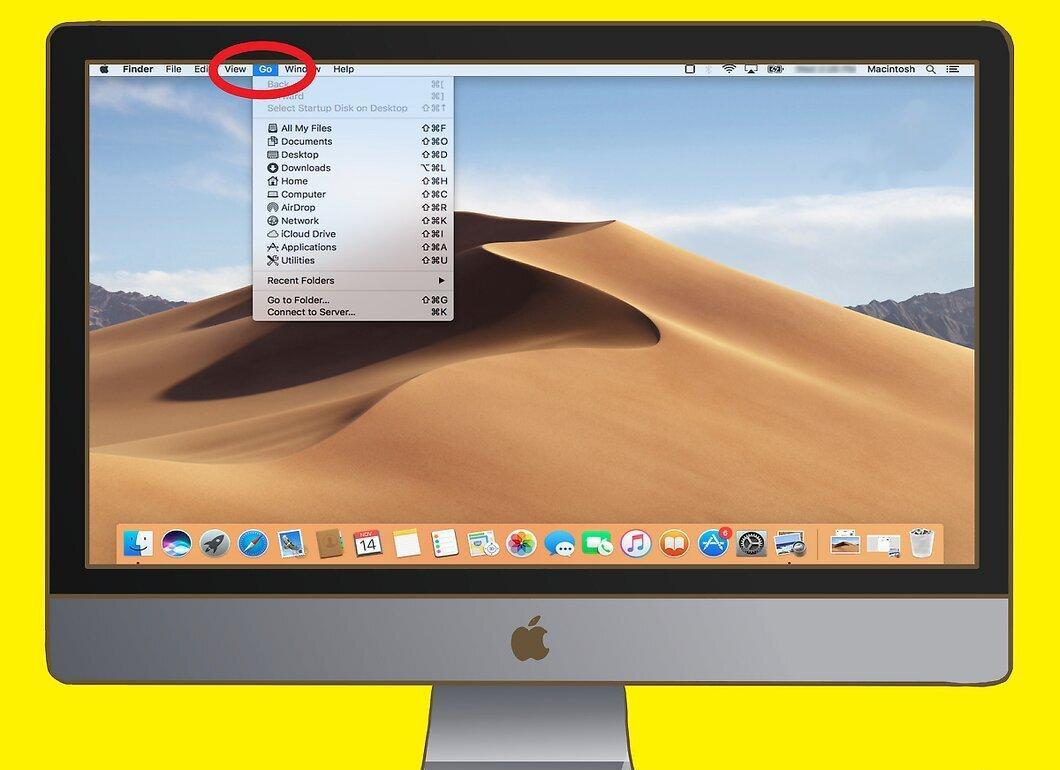
Click on "Go" at the top of the screen.
- If the "Go" menu is absent, open Finder or click on the desktop.
Step 5. Select "Connect to Server".
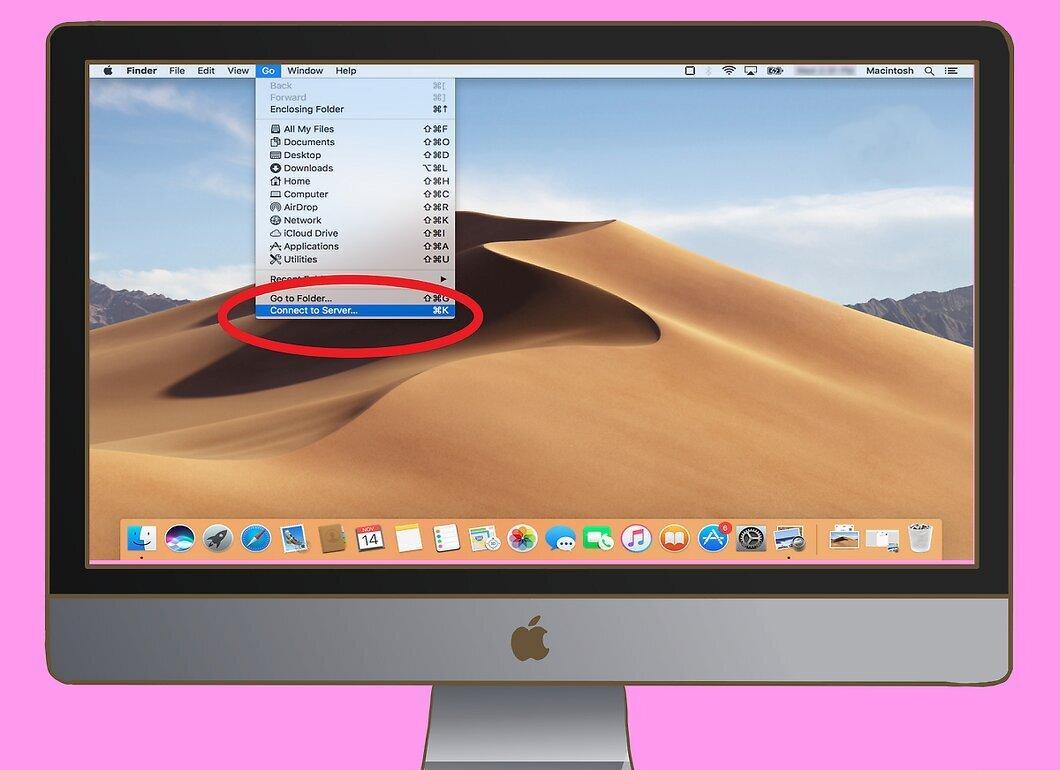
Click on "Connect to Server" in the dropdown menu.
Step 6. Click "Browse".
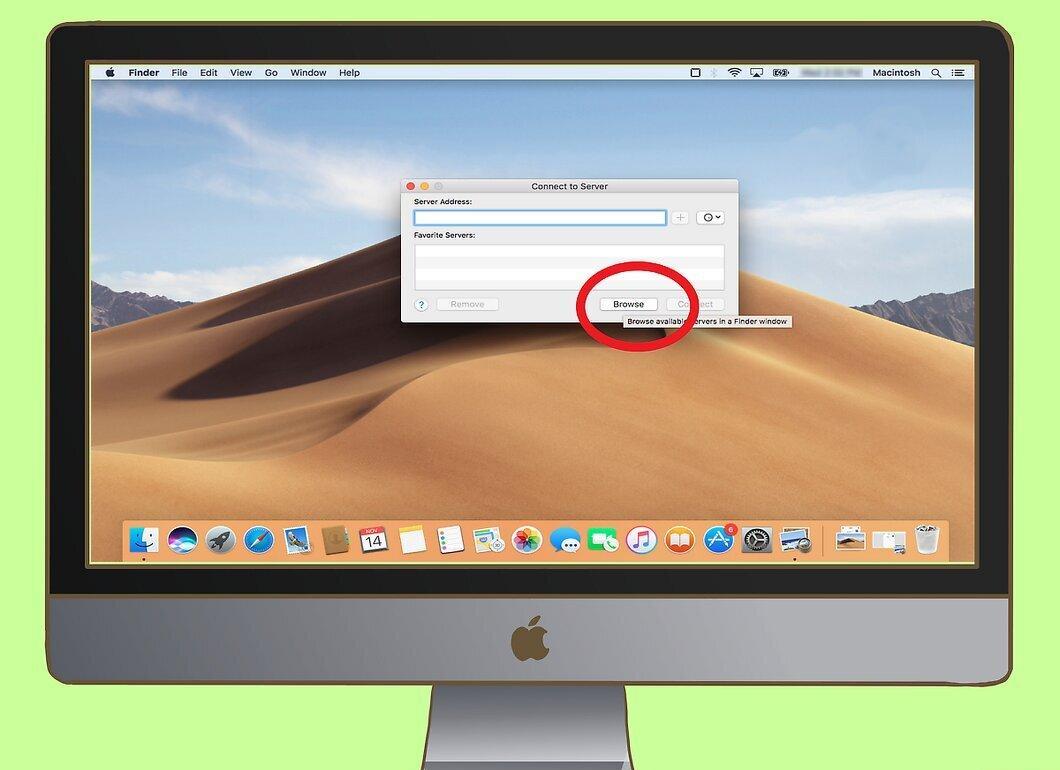
Select the "Browse" option at the bottom of the "Connect to Server" window.
Step 7. Double-click the name of the second Mac.
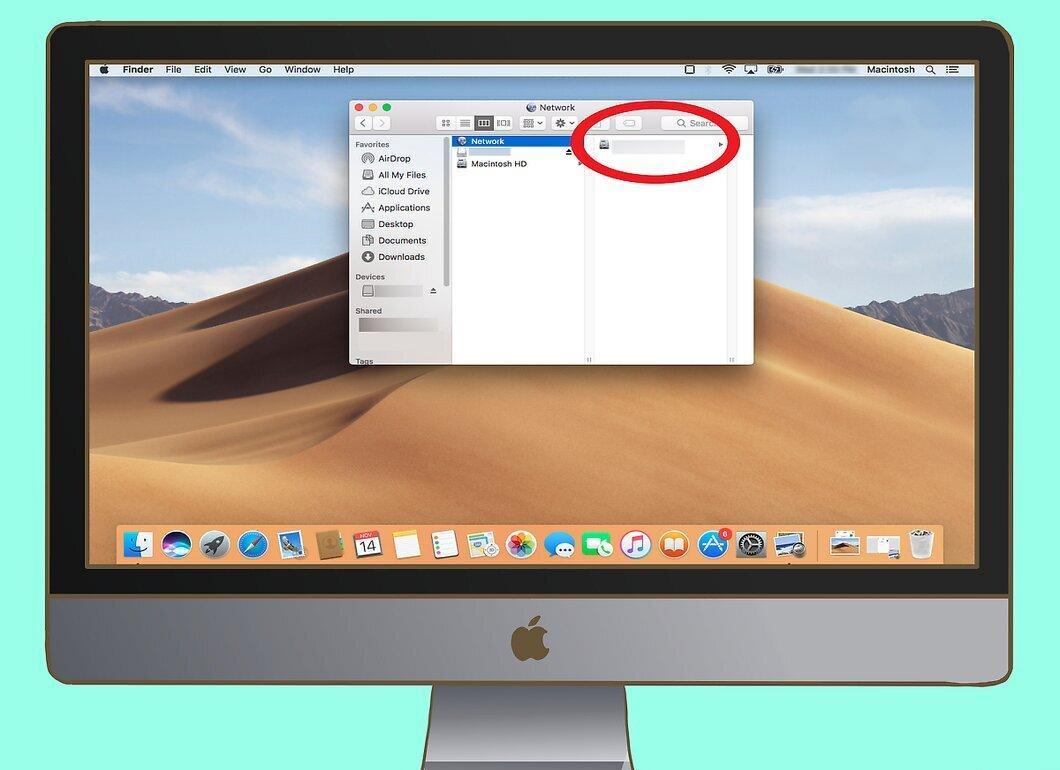
A new window will open with the contents of the second Mac.
- If you do not know the name of the second Mac, go to the Apple menu, select "System Preferences" > "Network" and check the name.
Step 8. Enter the password to connect.
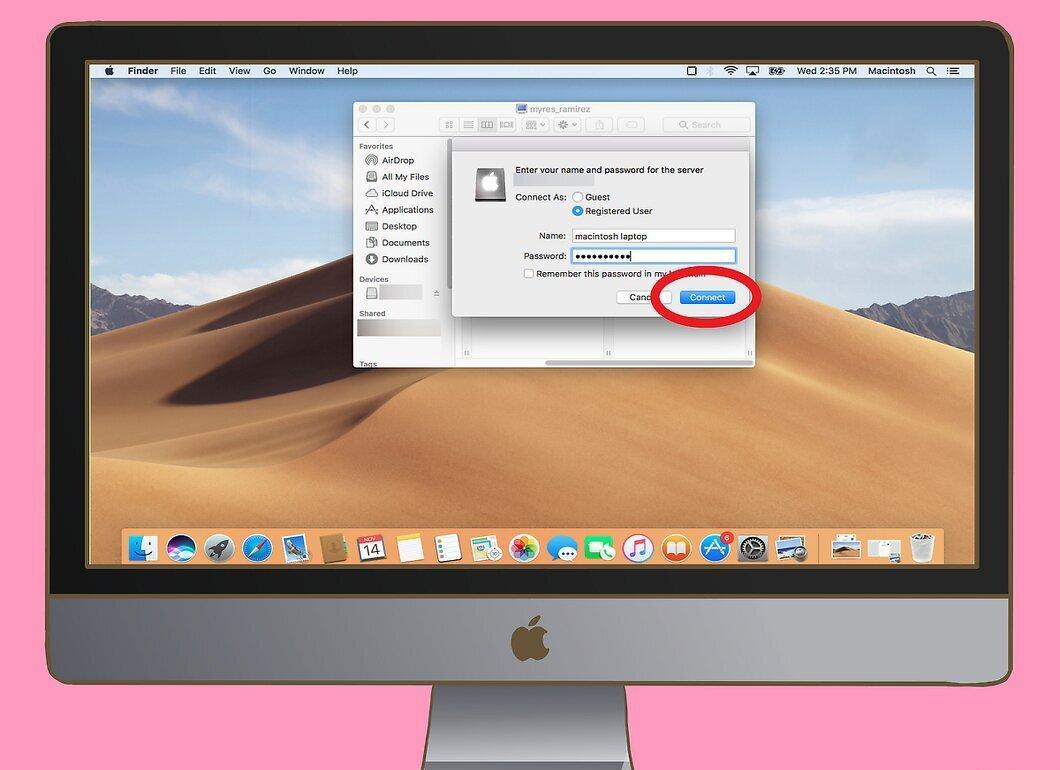
Enter the password for the second Mac and click "Connect".
Step 9. Open Finder on one of the Macs.
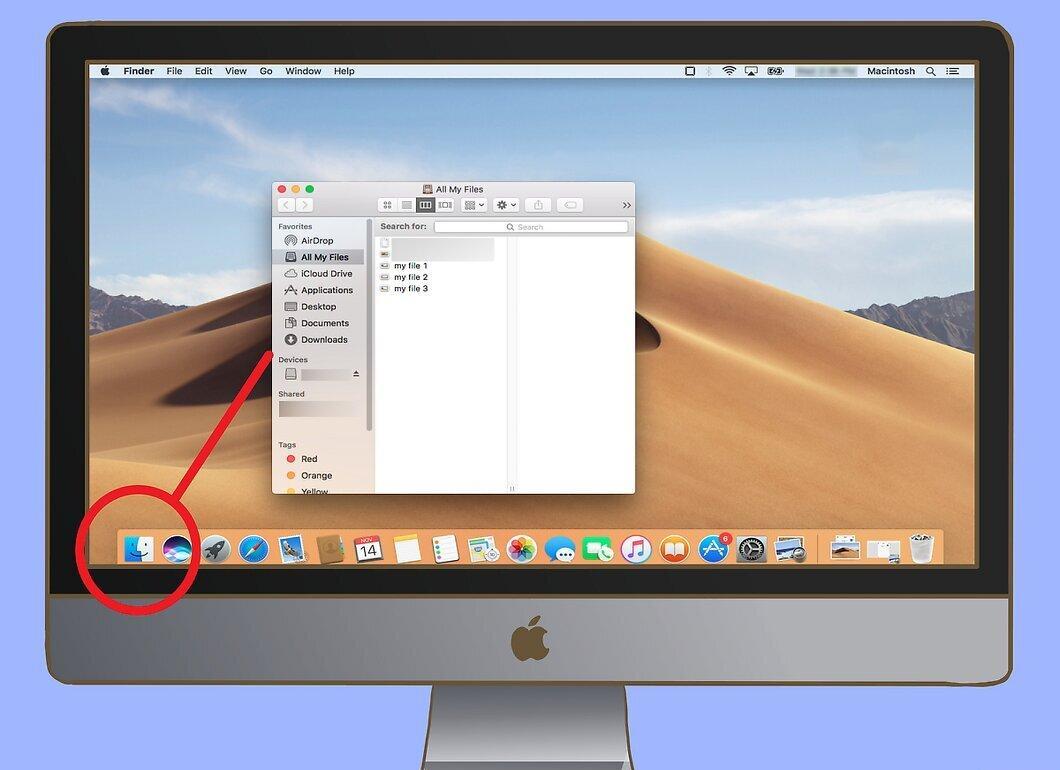
Launch Finder by clicking on its icon.
Step 10. Select files to transfer to the laptop.
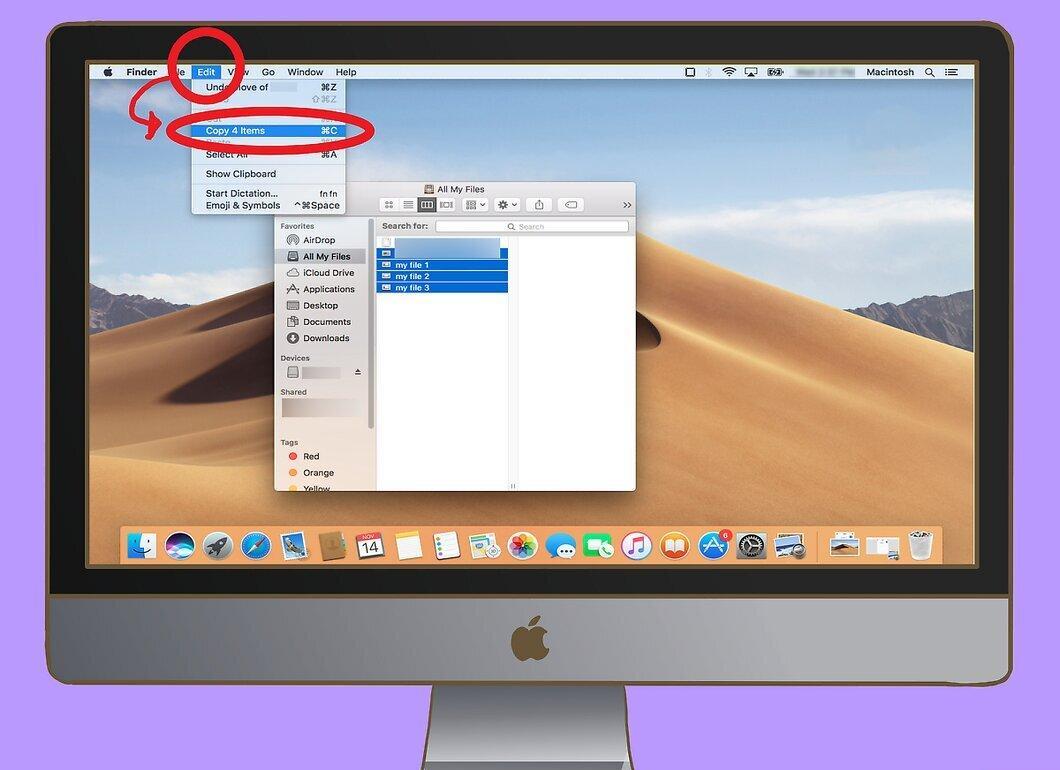
Find the files you need, select them, and use the "Copy" command.
Step 11. Click on the name of the second Mac in Finder.
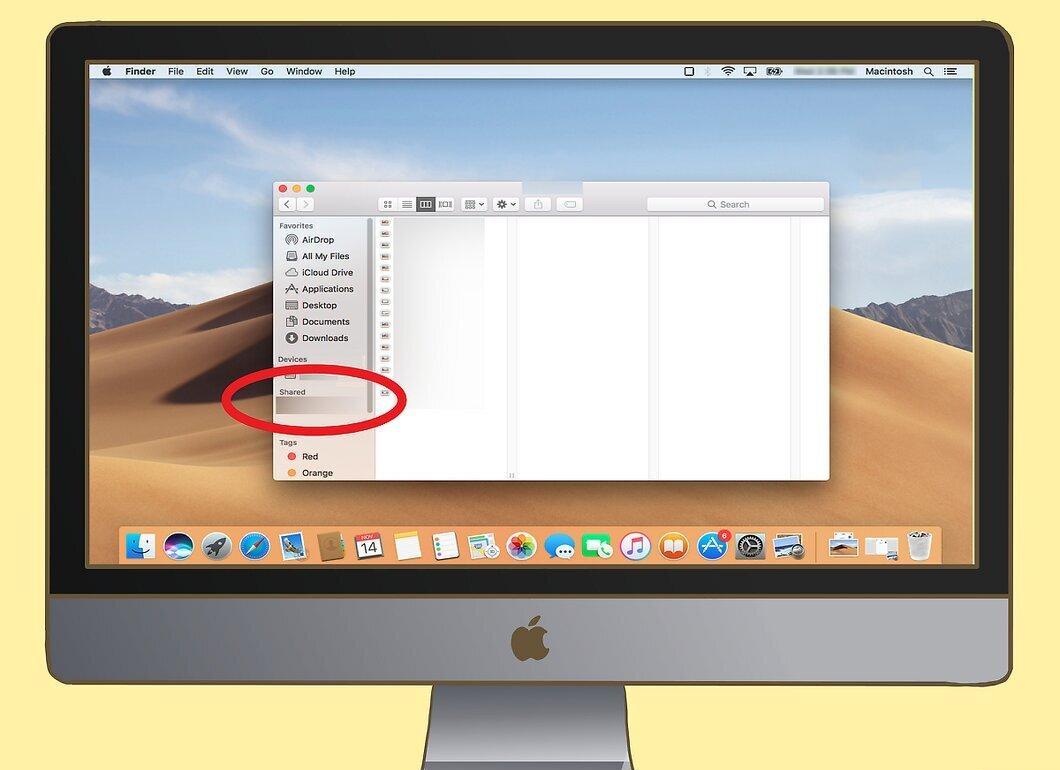
Select the name of the second Mac on the left side of the Finder window.
Step 12. Move the copied files.
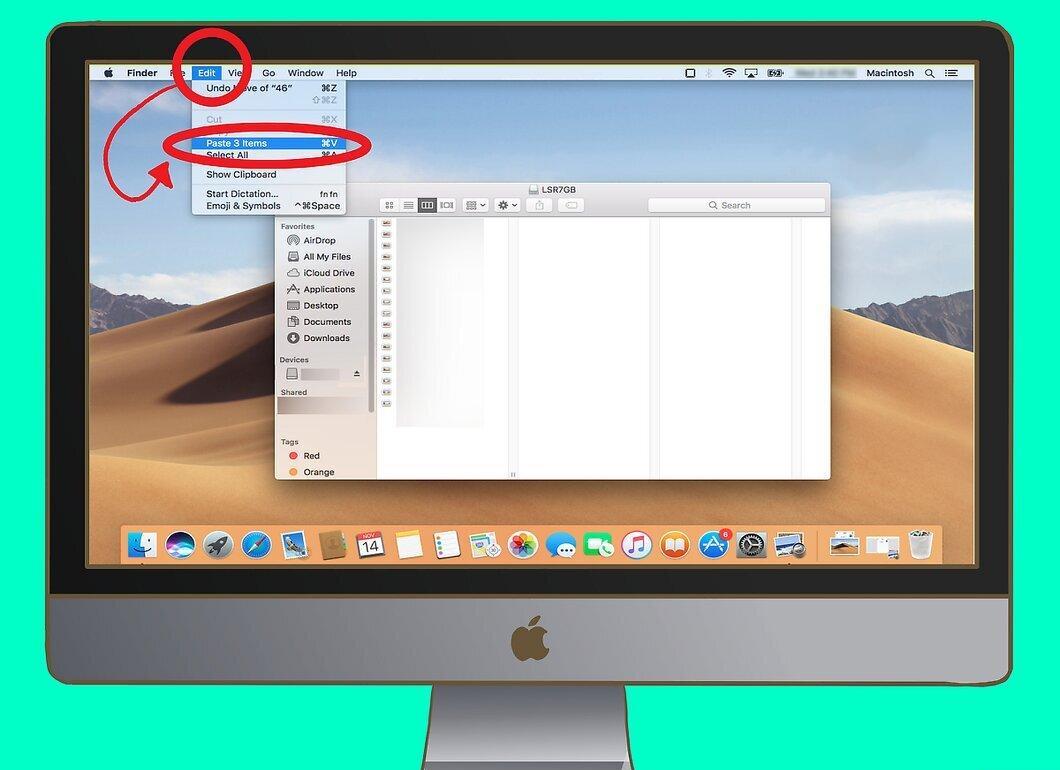
Double-click the folder of the second Mac, then use the "Paste" command to move the files.
- Similarly, files can be transferred from one Mac to another.
Sharing Internet Connection (Windows)
Step 1. Connect the PC and laptop using an Ethernet cable.
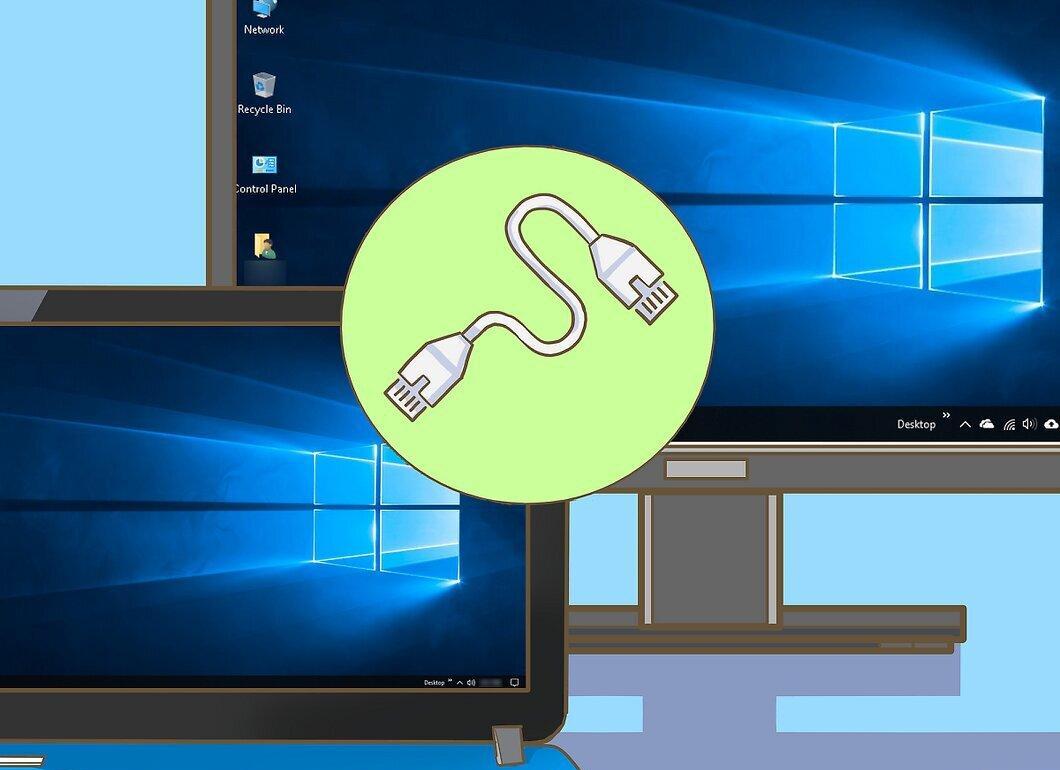
Connect one end of the Ethernet cable to the back of the computer and the other to the laptop.
- For Mac, a USB-C to Ethernet adapter is required, which connects to the laptop’s USB port.
Step 2. Open the Start menu on the computer.
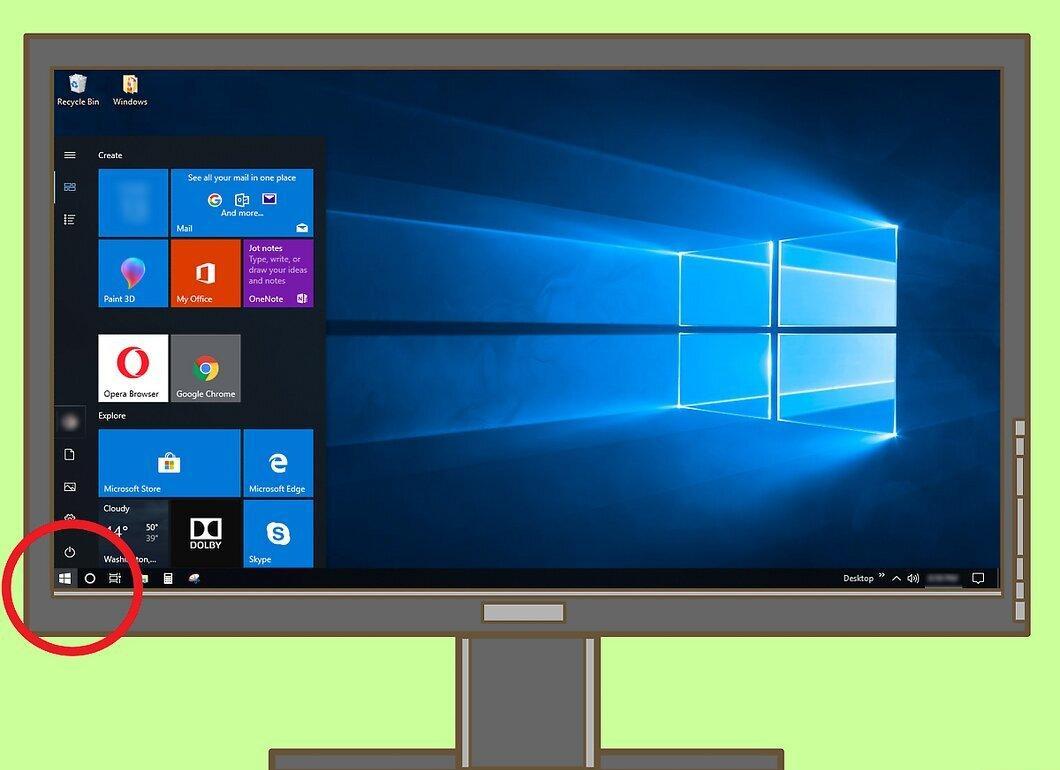
Open the menu by clicking the Windows logo.
Step 3. Search for Control Panel.
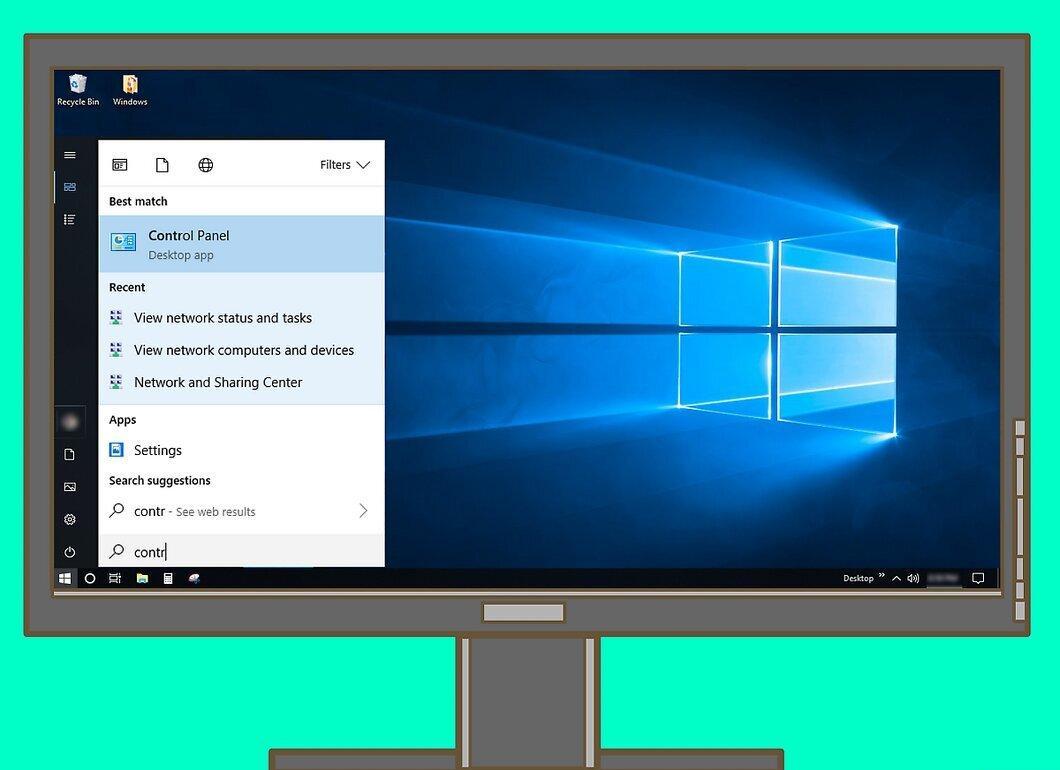
Type "Control Panel" into the search bar.
Step 4. Open Control Panel.
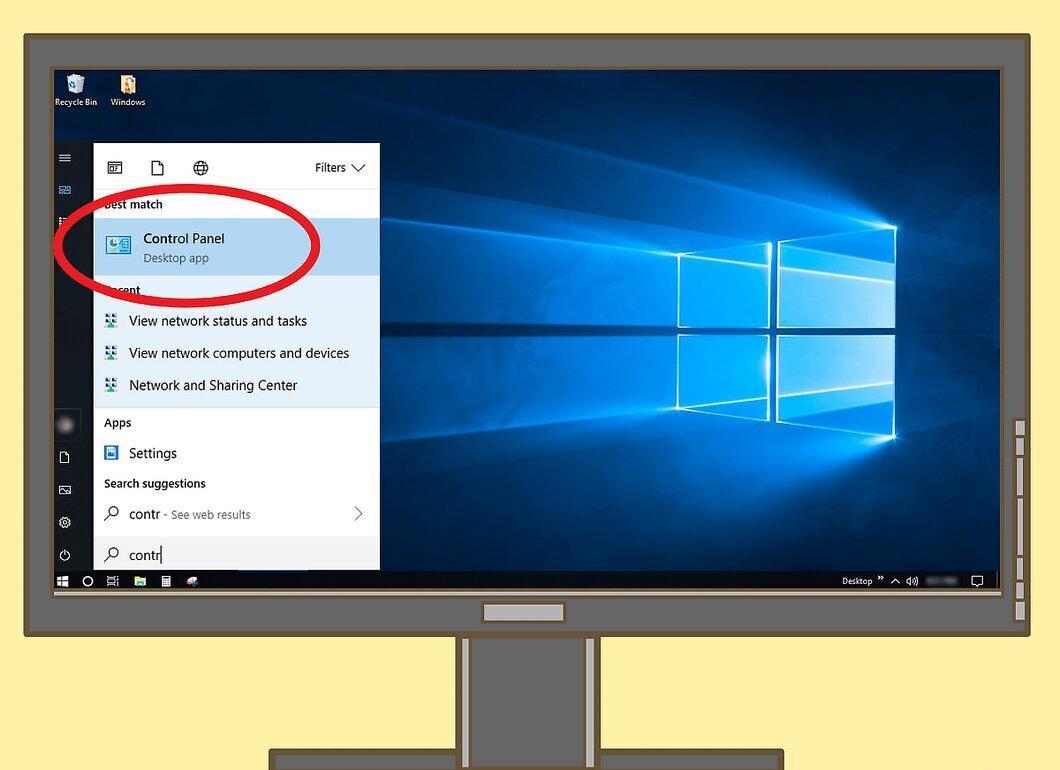
Click on "Control Panel" at the top of the menu.
Step 5. Go to the "Network and Internet" section.
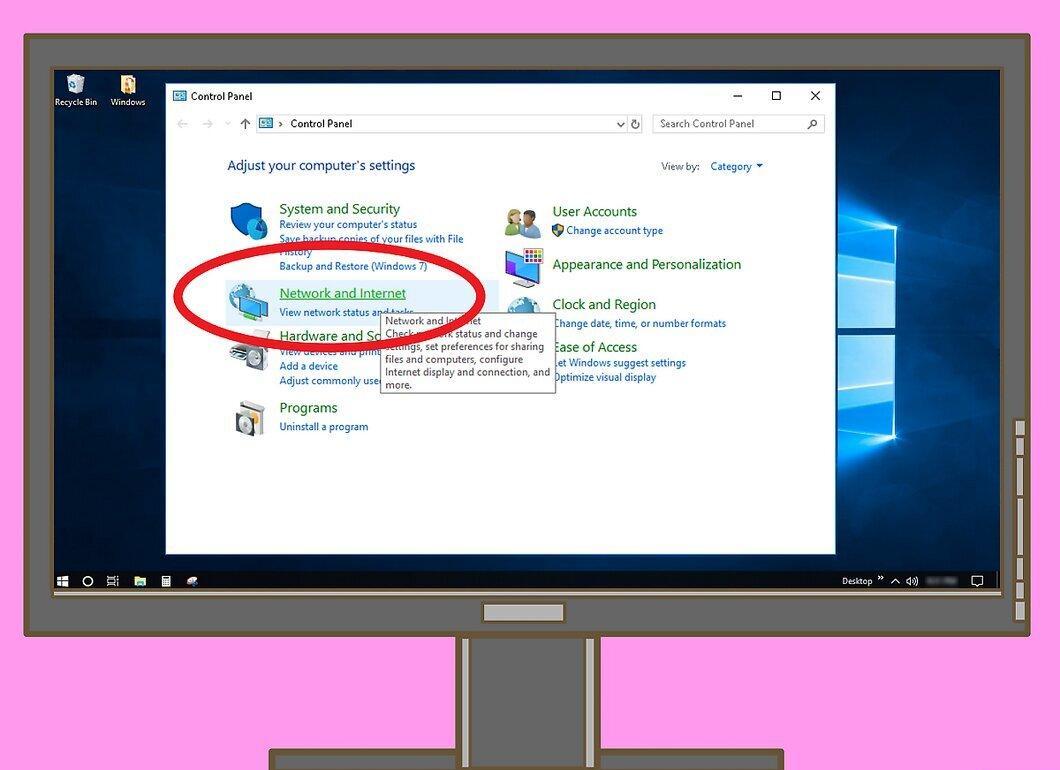
Click on "Network and Internet" in the left part of the window.
- If "Small icons" or "Large icons" is displayed, skip this step.
Step 6. Open Network and Sharing Center.
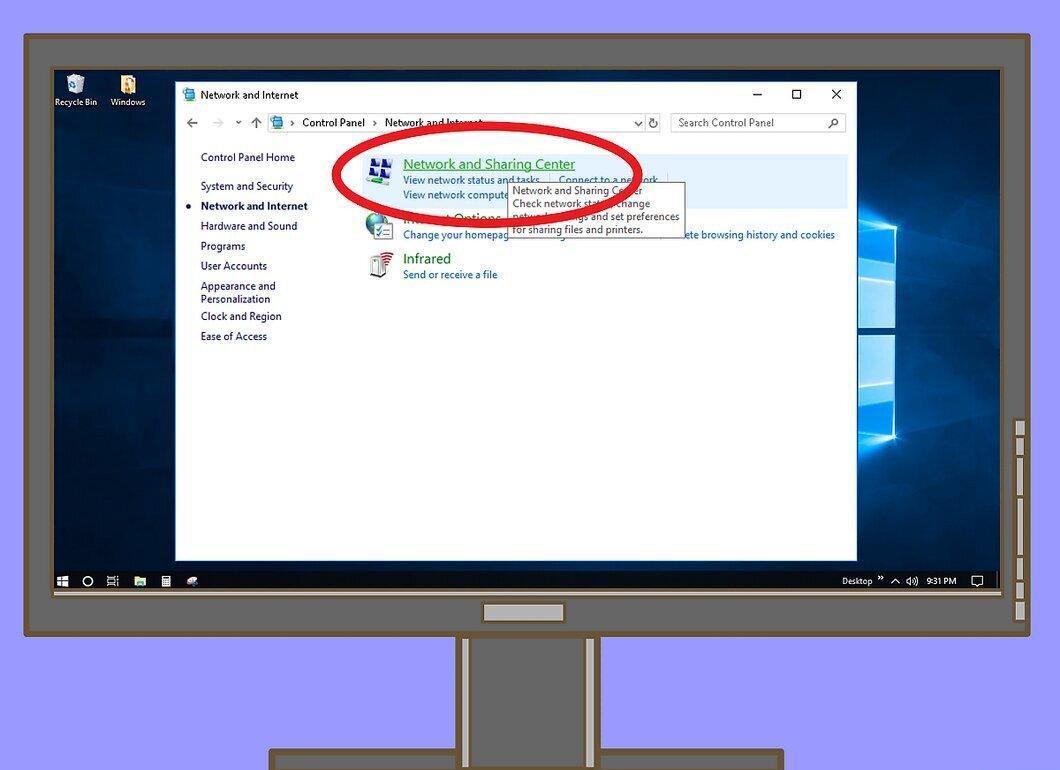
Select "Network and Sharing Center" to view all connections.
Step 7. Select "Change adapter settings".
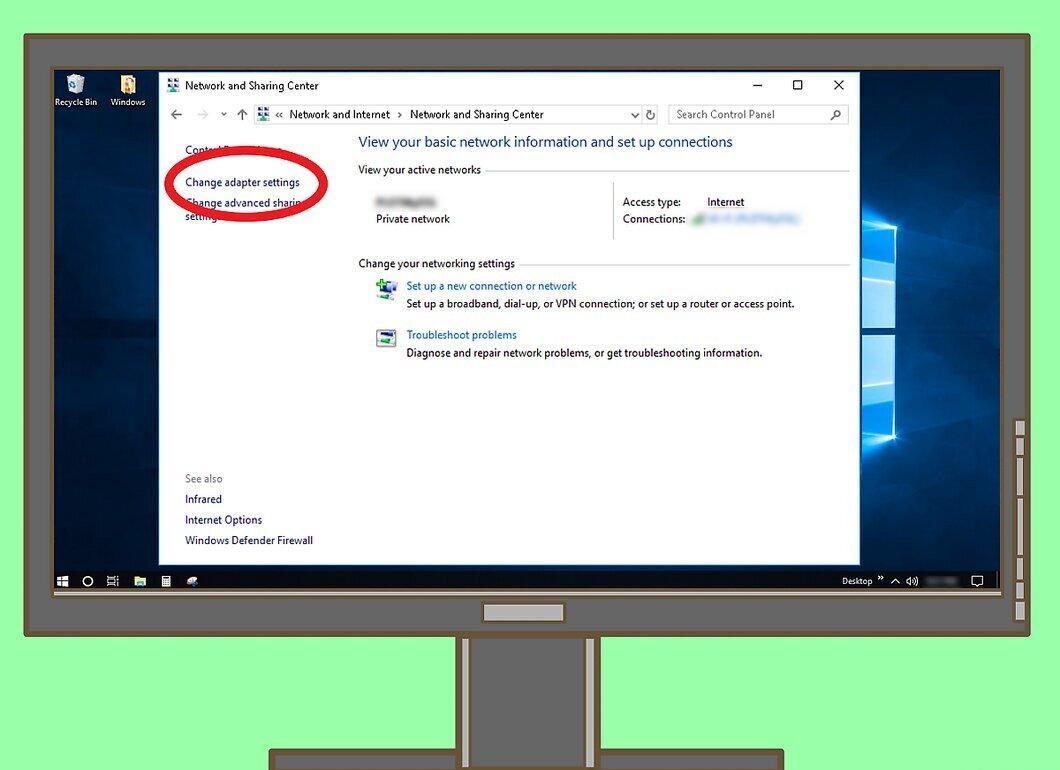
Click on the "Change adapter settings" link.
Step 8. Highlight both connections.
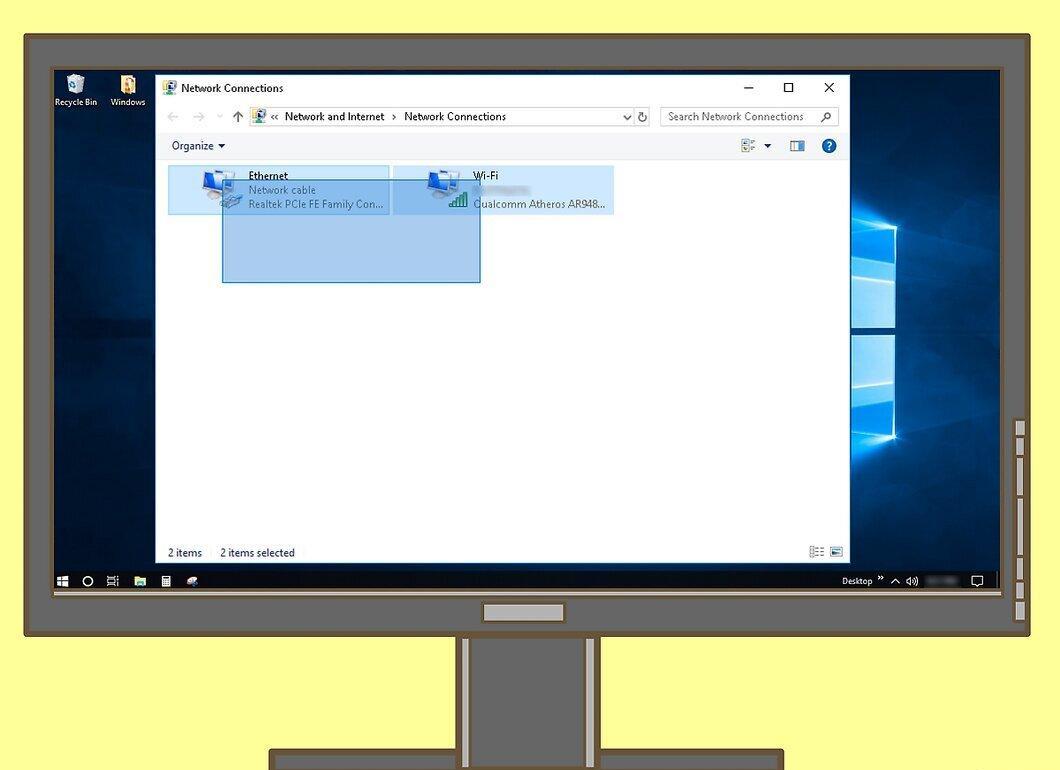
Highlight both connections by clicking on them.
- You can also use the Ctrl+A combination.
Step 9. Right-click one of the icons.
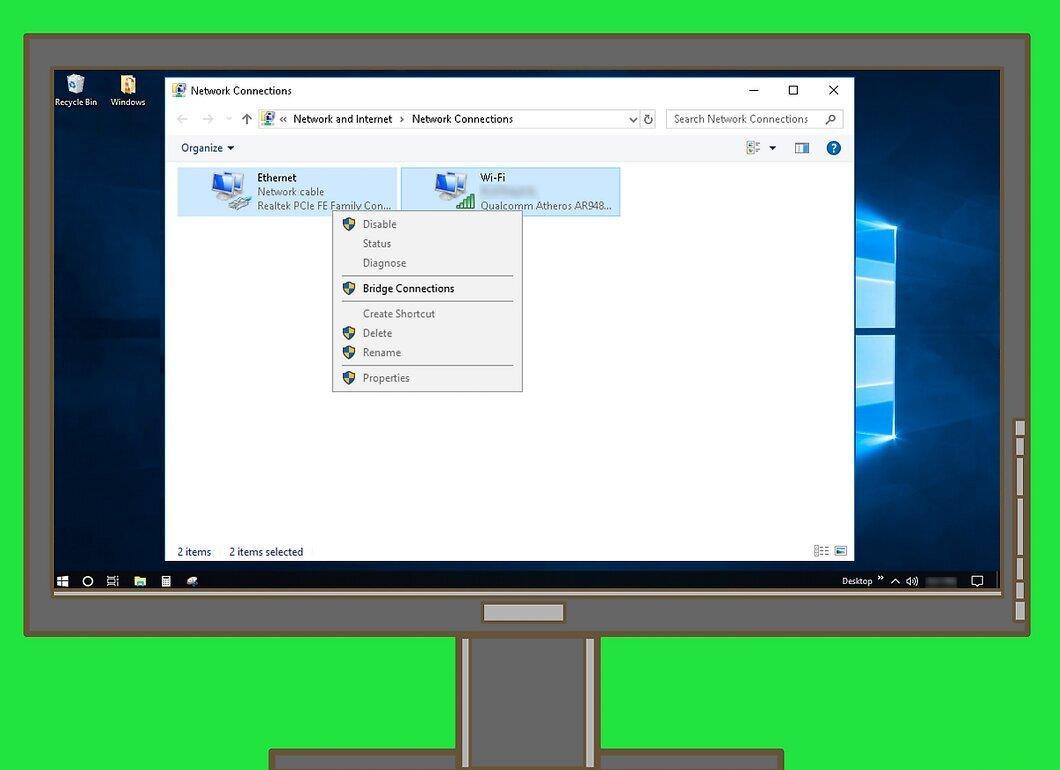
A context menu will appear.
- If you do not have a right mouse button, try clicking with two fingers on the trackpad.
Step 10. Select "Bridge Connections".
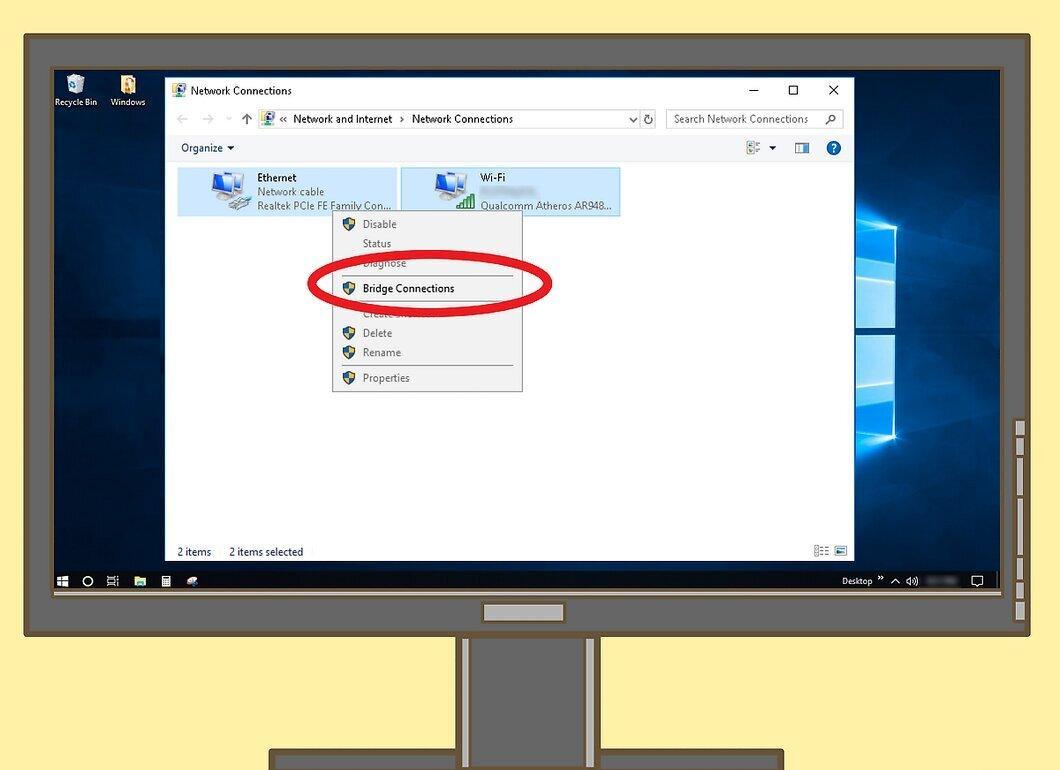
This option will allow the laptop to use the computer's internet connection.
Sharing Internet Connection (Mac OS X)
Step 1. Get a USB-C to Ethernet adapter.
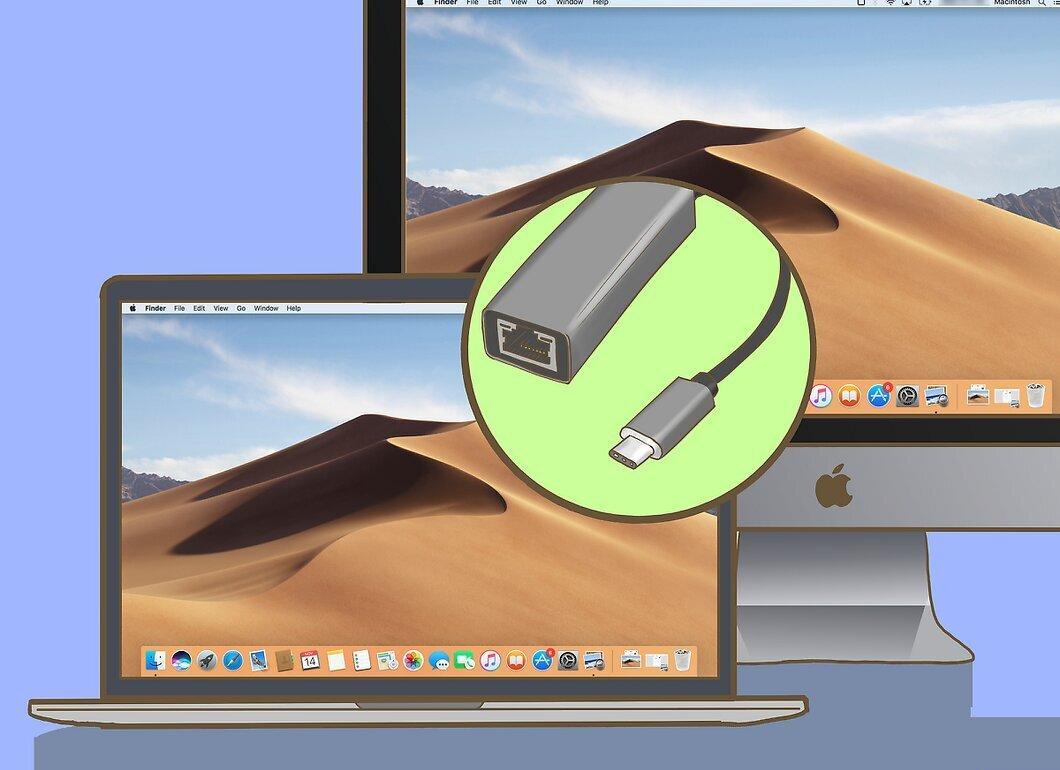
Purchase a USB-C to Ethernet adapter for your Mac, as modern Macs do not have Ethernet ports.
- A second adapter will be required for connecting to the Mac laptop.
Step 2. Connect the computers with an Ethernet cable.
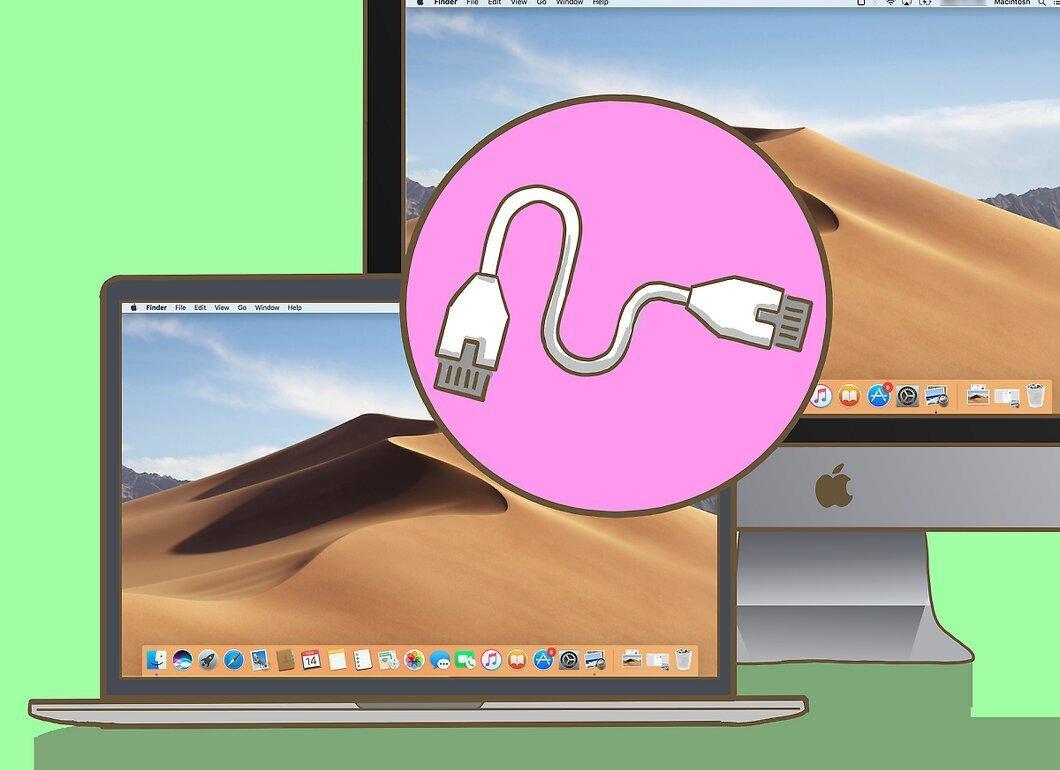
Connect the USB-C to Ethernet adapters and then connect the computers using an Ethernet cable.
Step 3. Open the Apple menu.
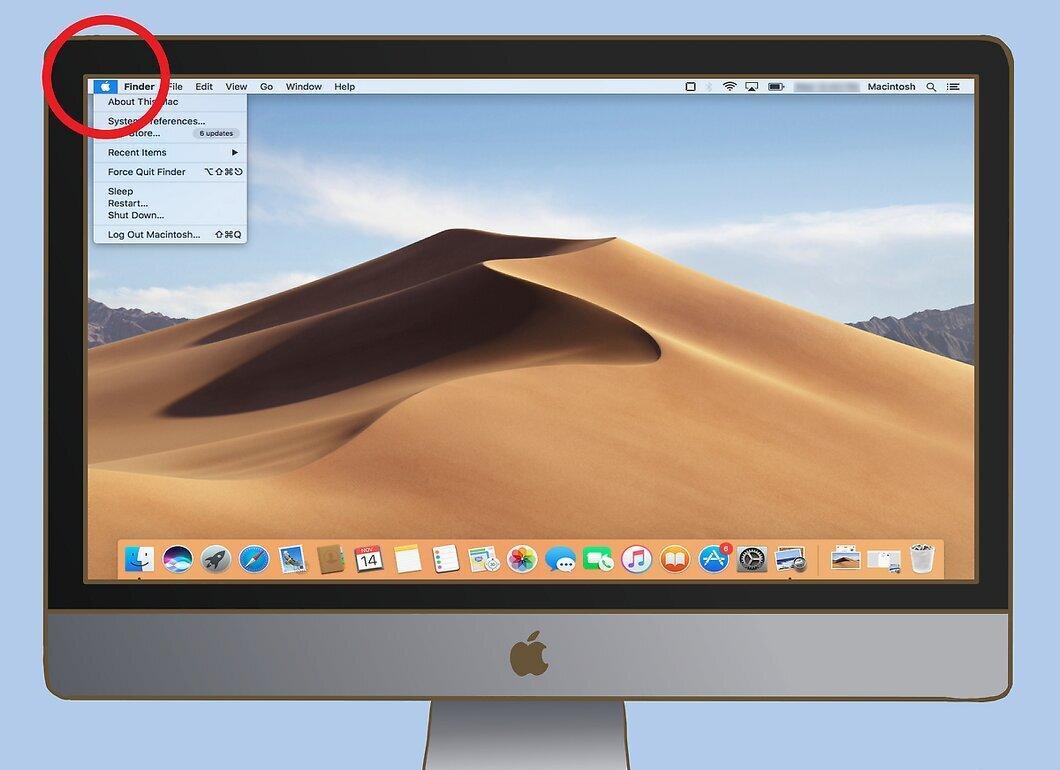
Click on the Apple logo in the upper left corner of the screen.
Step 4. Go to System Preferences.
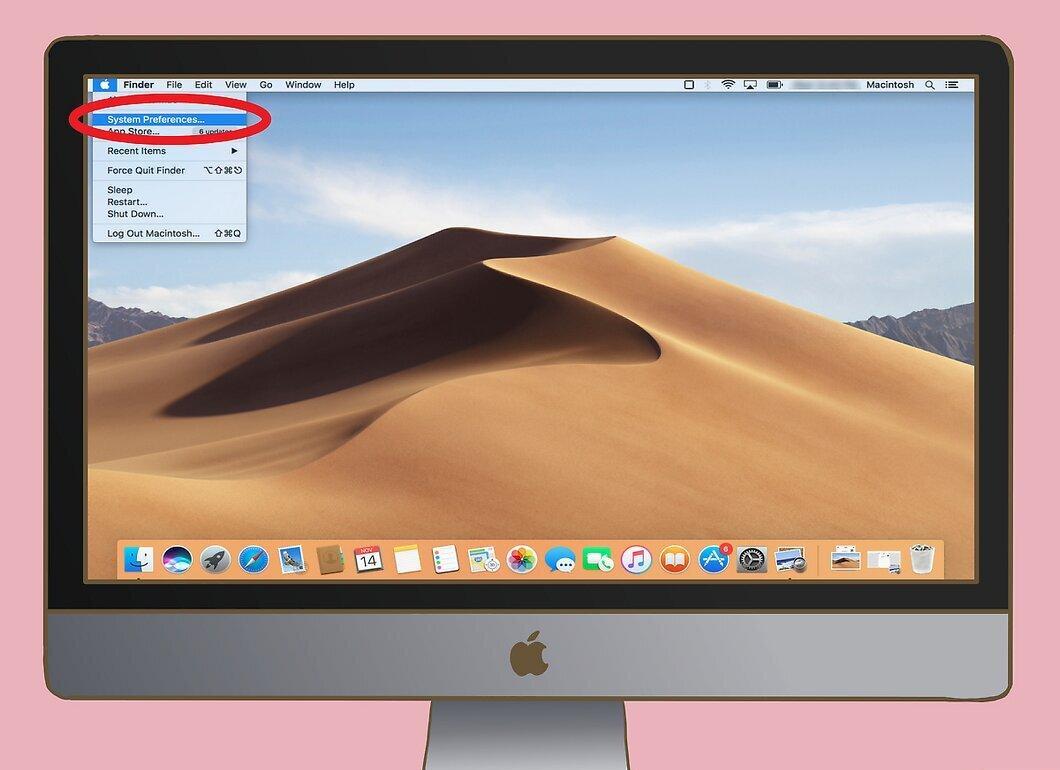
Click on "System Preferences" in the dropdown menu.
Step 5. Select "Sharing".
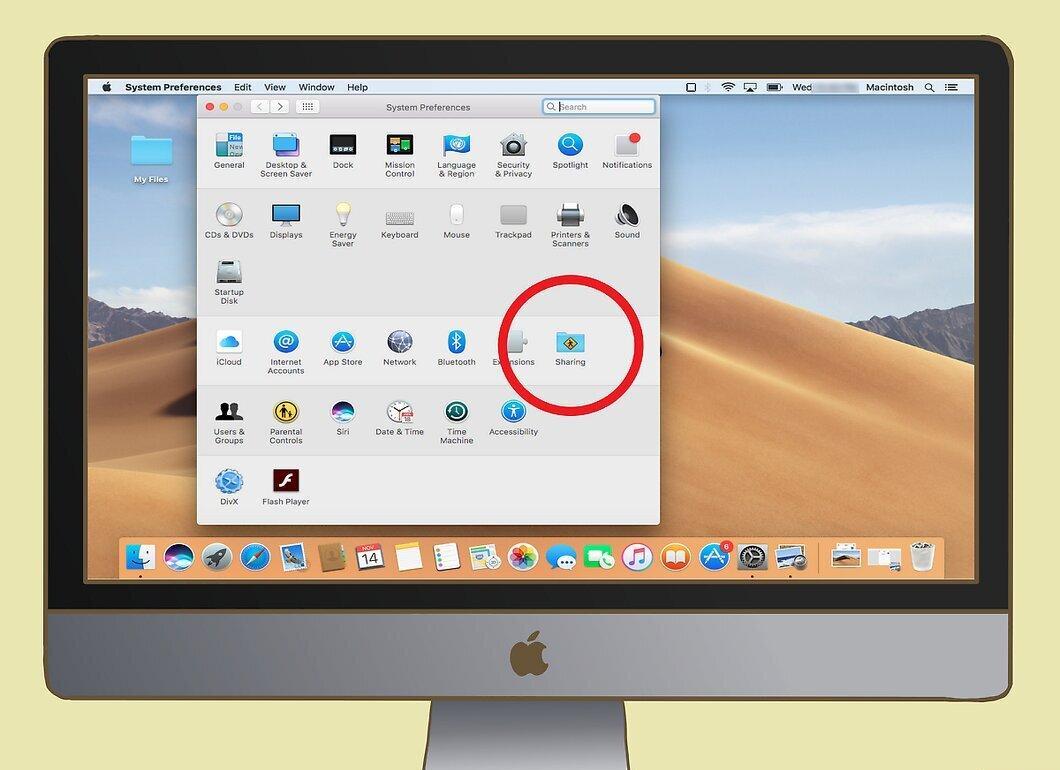
Click on "Sharing" in the settings window.
Step 6. Check the "Internet Sharing" box.
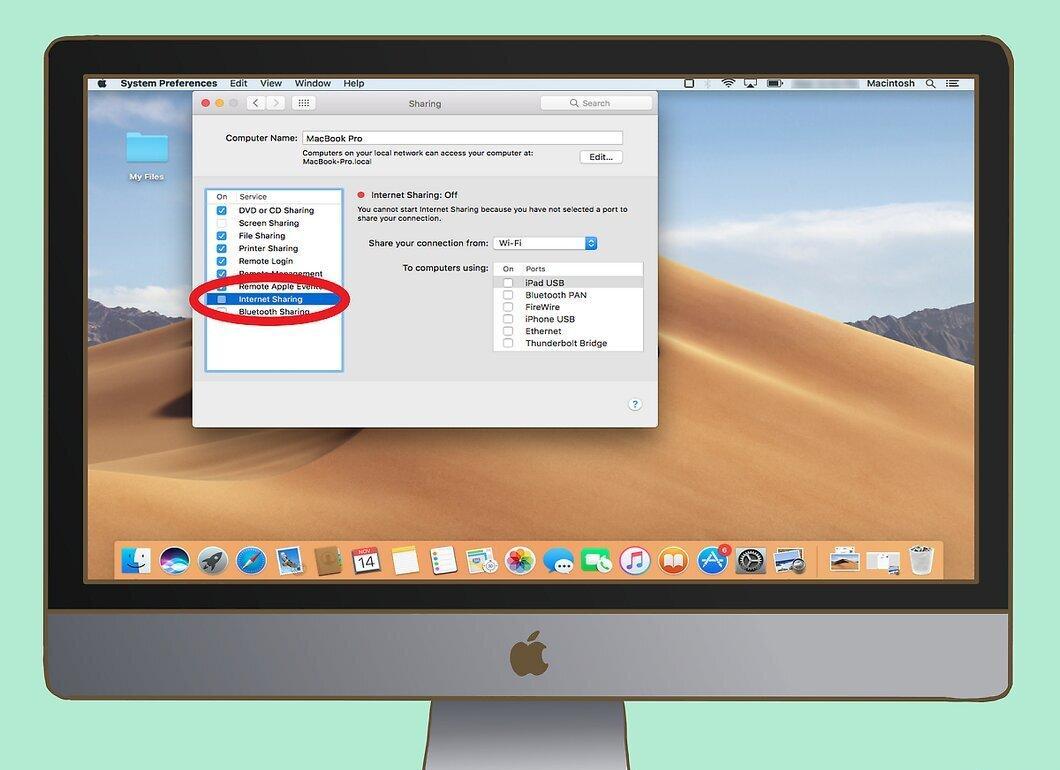
Make sure the "Internet Sharing" option is activated.
Step 7. Configure the shared connection.
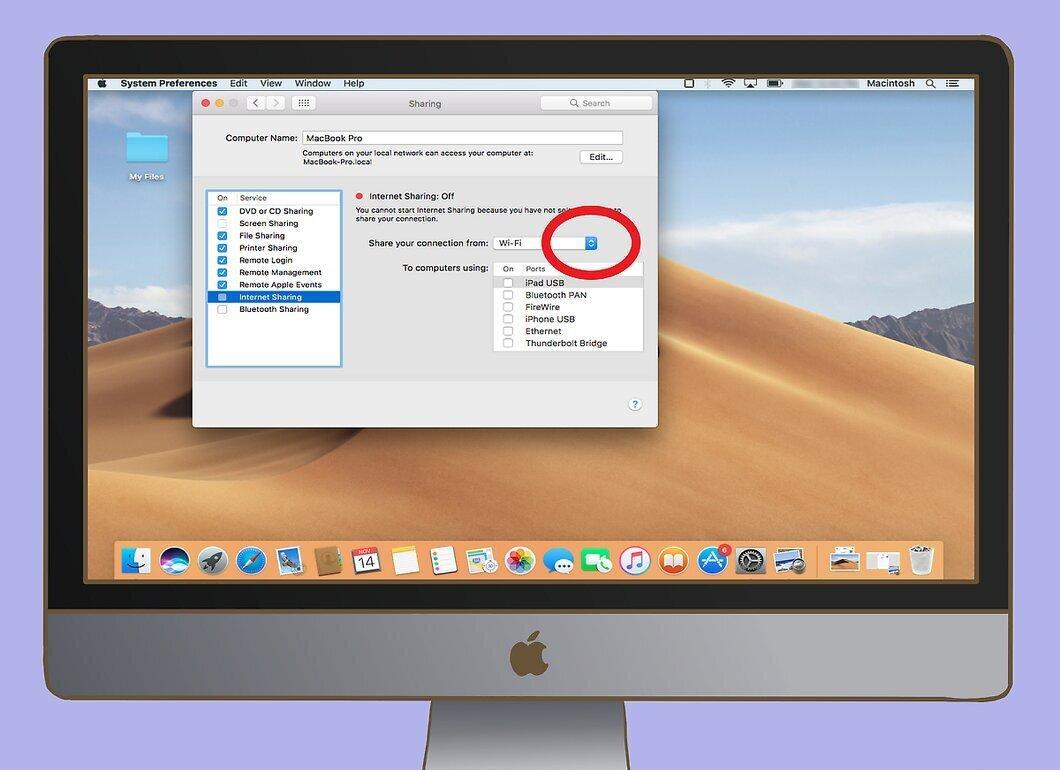
Open the dropdown menu and select how to connect to the internet.
Step 8. Select Wi-Fi.
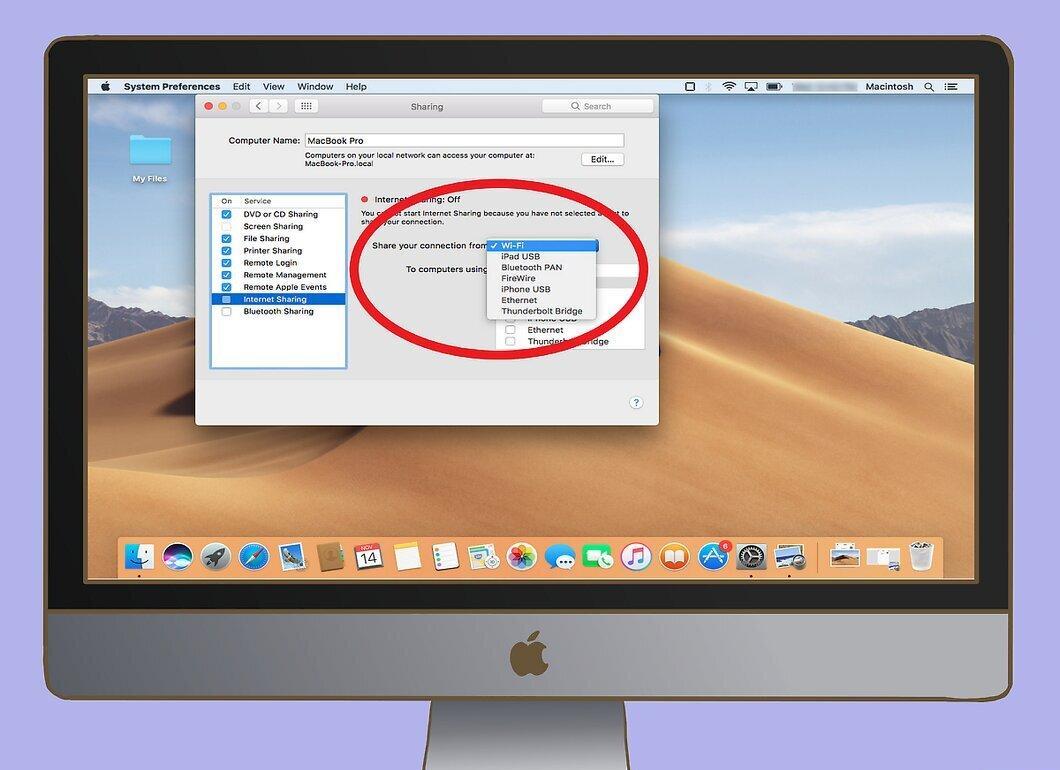
Specify Wi-Fi as the source of the internet connection for your computer.
Step 9. Check the box for "Ethernet".
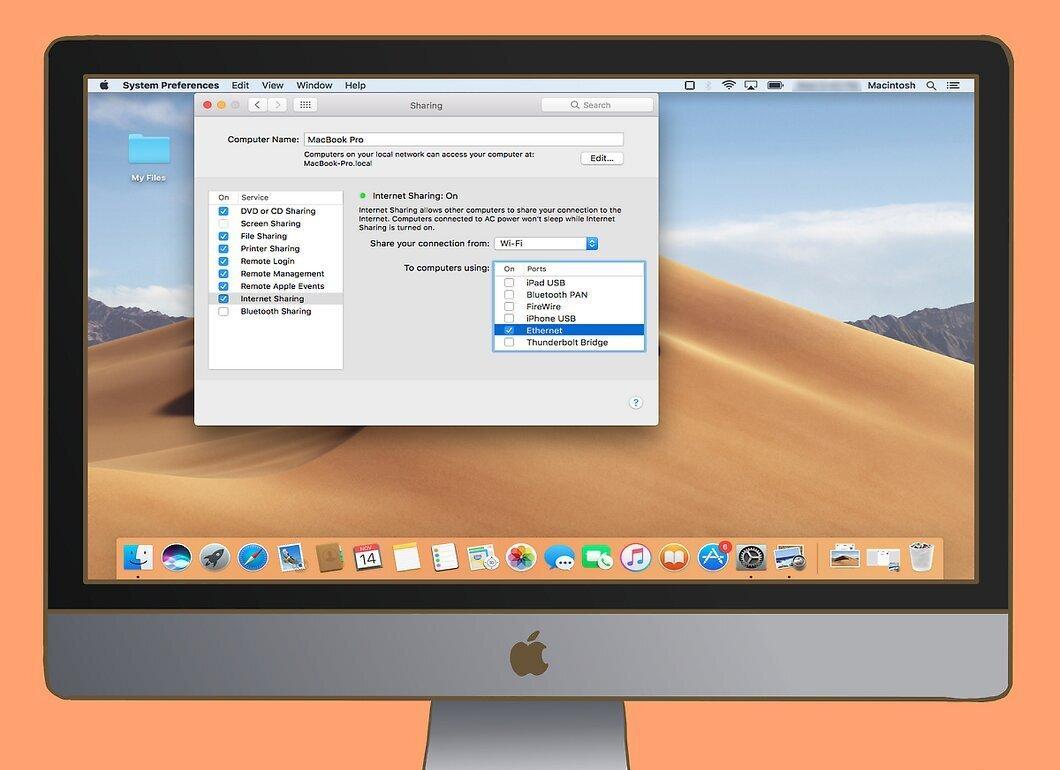
Activate Ethernet as the method of connection for other devices so they can use the internet through your computer.


